Bodice Front Style 25
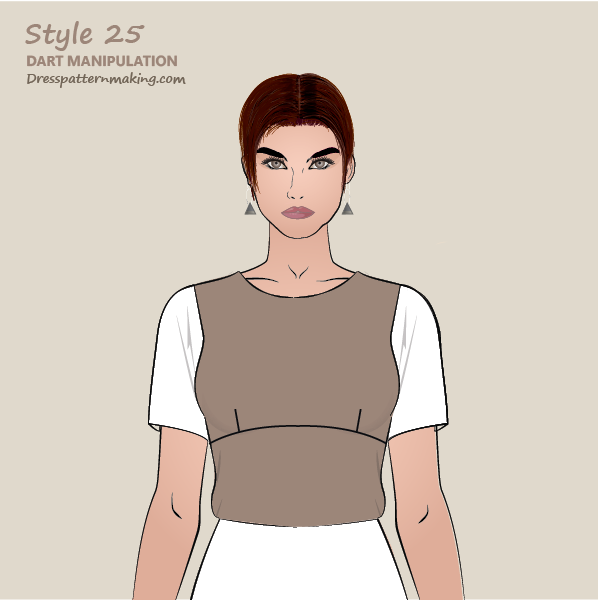
The bodice of this garment has an Empire Line. There is a style-line that runs under the bust, creating two pattern pieces. The lower section is the midriff. Complete step-by-step details for creating the Empire Line Style through to the Bodice Back can be found in the Elements menu under Empire Styleline. The basic information is shown here in the context of dart manipulation. The dart work required in this style is:
- increasing the dart value in the top pattern piece, as the return of the fabric to the under-bust requires more dart intake at that level
- removal of the darts in the midriff section; the darts are incorporated into the pattern piece
Note that we will be drawing the Empire Line onto the block itself (i.e. not tracing the block, then marking the Empire Line), for three reasons:
- You do not want to have to redo this work each time you make a garment with an Empire Line, you can copy the information from the block straight to the pattern.
- If you do all the work on the pattern pieces, it will require more cutting up and sticking together of the pattern pieces.
- Tracing paper is more difficult/fiddly.
Example: Outcome
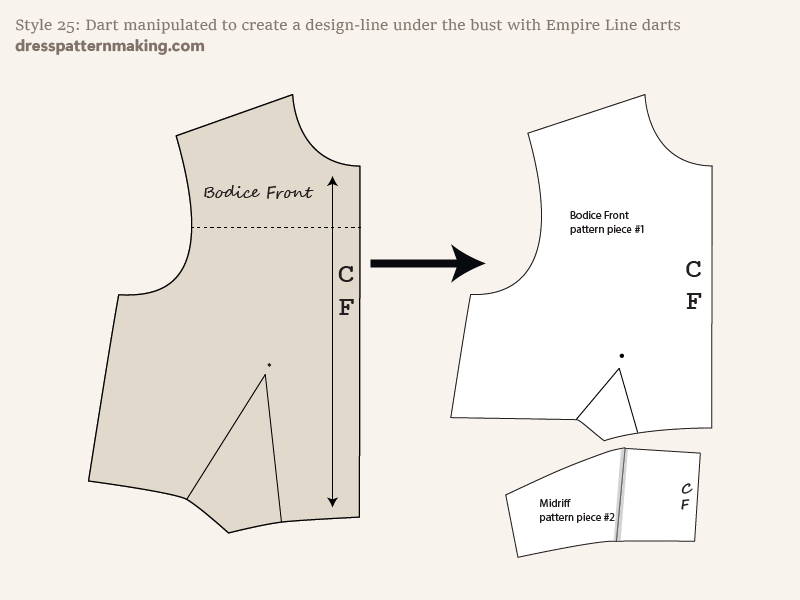
Figure B shows the block being used on the left (1-Dart Block), and the pattern that will be created (Style 25) on the right.
The focus of these instructions is covering the theory and practice of manipulating darts and the exercise finishes after the dart manipulation has been done. For production ready patterns you would need to take further steps to add seam allowance, pattern labels, pattern piece numbers, the grainline, etc.
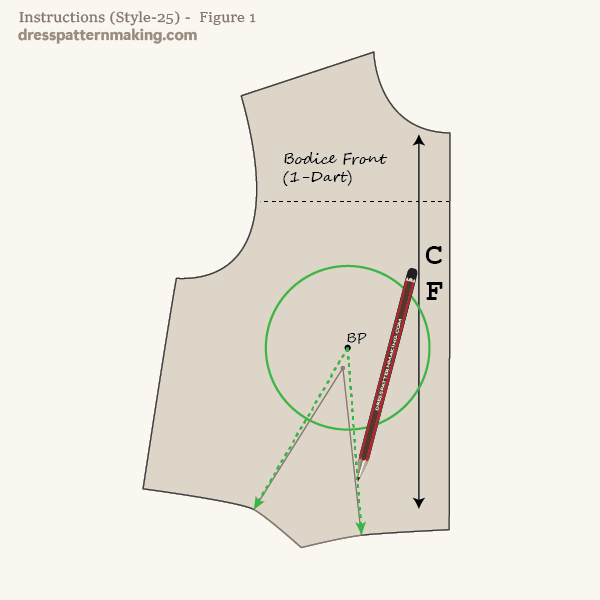
Instructions (Style-25) - Figure 1
In these images I have used color for emphasis only. Use a hard pencil (4H-6H) when hand drafting patterns.
To mark the Empire Line on the block:
- Draw the dart legs from the Bust Point (rather than the Dart Point) if it's not already marked on your block.
- Draw a circle, using your Bust Mound measurement as the radius, with the Bust Point as the center of the circle. (You will need a compass).
Note from the next image I will not be showing the dart that ends at the Dart Point; the dart shown in all further images is the one to the Bust Point.
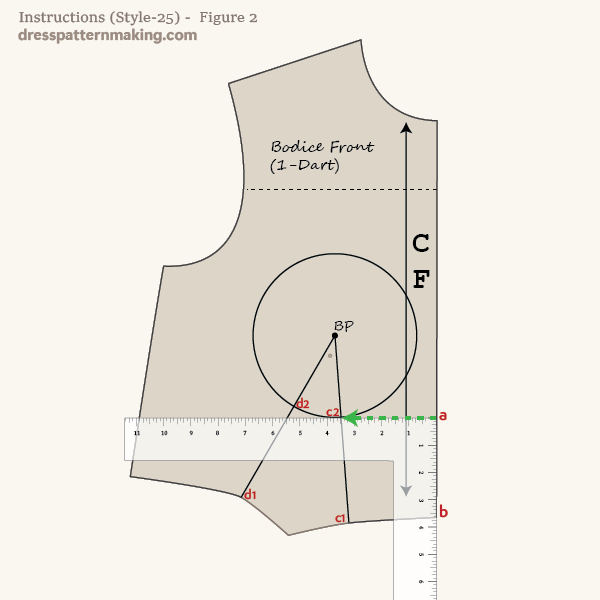
Instructions (Style-25) - Figure 2
- Draw a line at right angles to the CF to touch dart leg C where it meets the bust radius circle - marked c2 in the image. Where this line touches the CF is marked A.
- Measure from A down to the waistline, marked B.
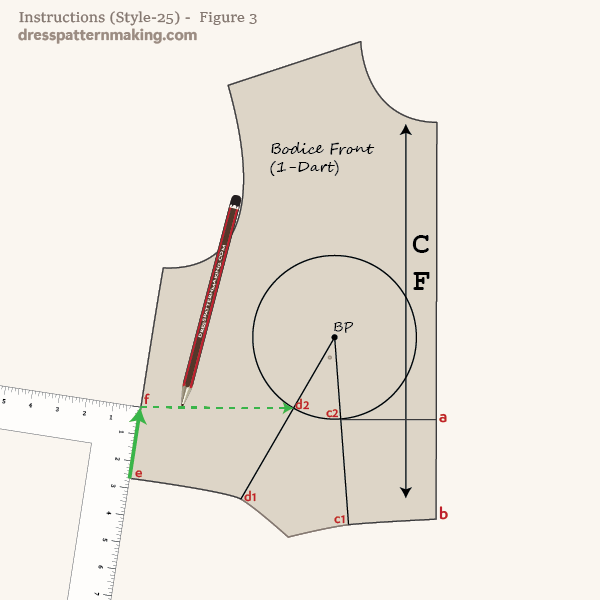
Instructions (Style-25) - Figure 3
- Calculate: A~B measurement taken in the previous step, minus 0.75-inch, Total = x.
- Using the measurement x, measure up from the side seam point E up to F.
- Draw a line from F to meet the dart line D. (Note that C2 to C should equal D2 to D).
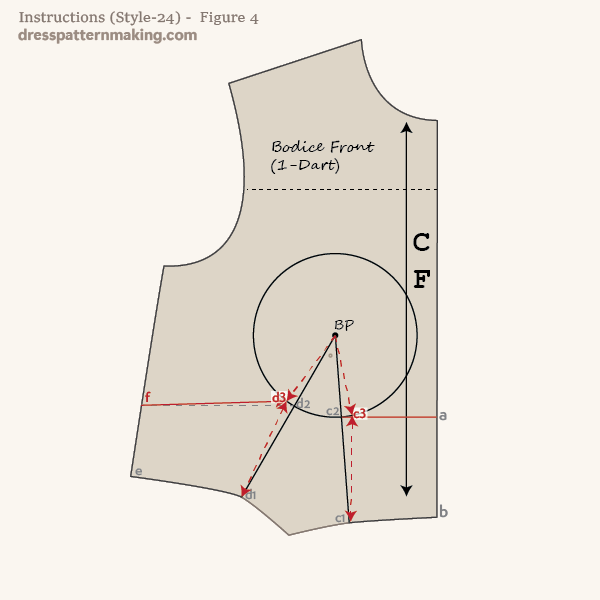
Instructions (Style-25) - Figure 4
Now the dart will, in most cases, need to be increased at the under-bust level for shaping. This requires measuring yourself at the under-bust level, determining the difference between the block and your measurement (taking into account ease), to come up with the amount that the dart will need to increase. This also encompasses the Bodice Back - some of the dart value will be taken out of the dart in the Bodice Back. As mentioned before, this is covered elsewhere in detail.
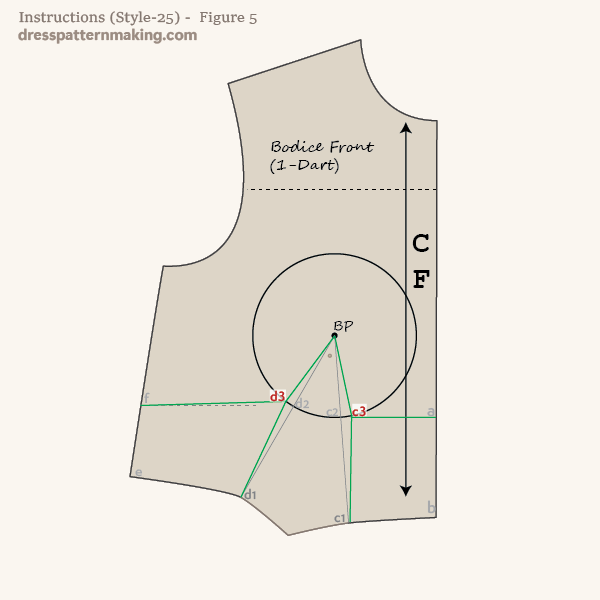
- Increase the dart value at the Empire Line level by half the value of the dart increase to either side of C2 & D2; the new dart width is now marked by C3 & D3.
- Draw dart legs from D3 to D1 and from C3 to D1.
- Redraw the empire line from F to D3.
If this seems confusing, look at Figure 5 at what the final lines should look like.
Instructions (Style-25) - Figure 5
Now the lines are very angular, but the curving of these lines can be done after the block is traced and you are making the pattern.
Instructions (Style-25) - Figure 6
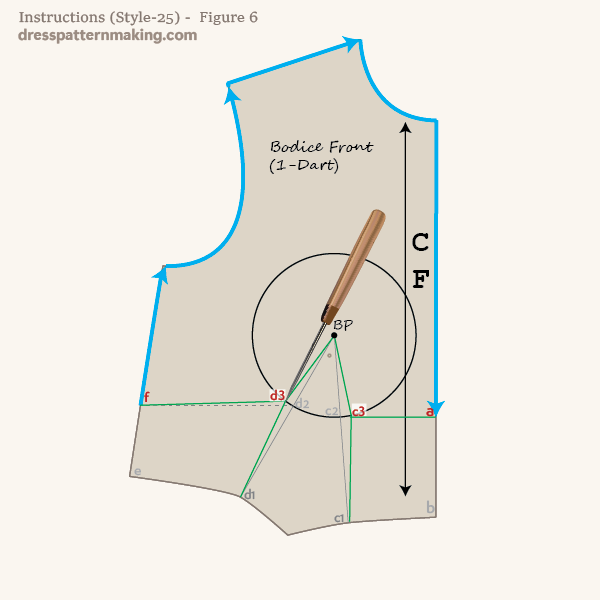
Now it's time to trace the block and create the two pattern pieces: the Bodice panel and the midriff. We will start with the Bodice pattern piece. Put your block on top of your paper.
- Trace the block from point F to point A.
- Mark the Bust Point with your pencil.
- Using an awl, piece the block through to the paper at points D3 and C3.
- Lift up your block (see Figure 7).
Instructions (Style-25) - Figure 7
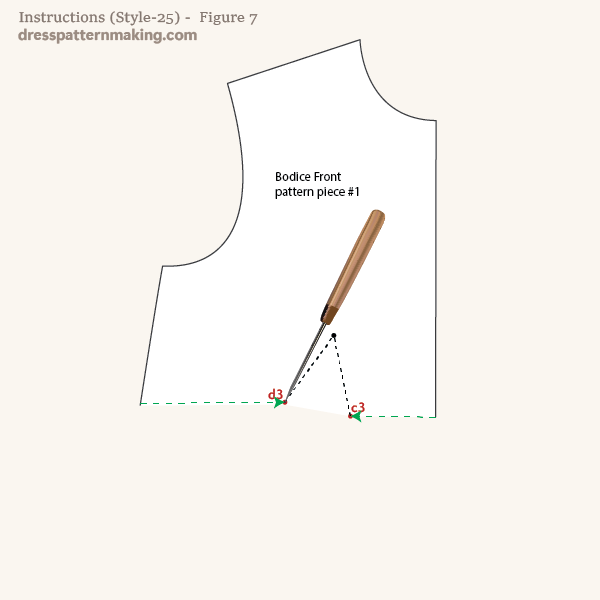
This is what you should have when you lift up the block: there should be pinpricks at D2 and C3 (shown by red dots in the image).
- Draw lines from the Bust Point to D3 and C3.
Instructions (Style-25) - Figure 8
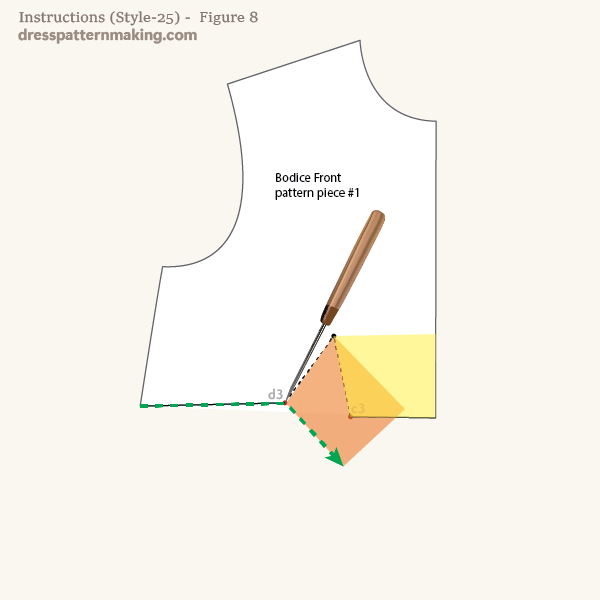
This image is just to show you what the under-bust line would look like if we left it as is; to show you the need for the steps taken in Figure 8. (Refer to Curving the Waist for more examples; although this isn't the waist, the same principle applies).
- The yellow shape is the traced shape
- The orange shape is the yellow pivoted on the Bust Point
- The resultant green dashed line shows how angular this line is.
To create a more reasonable curve, see Figure 9.
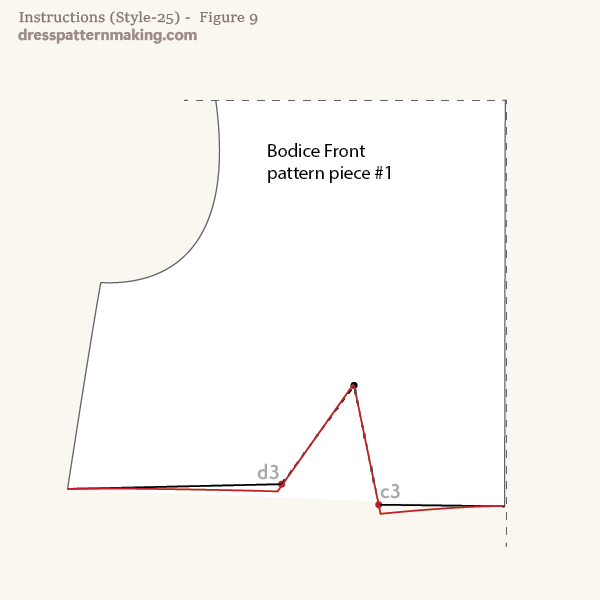
Instructions (Style-25) - Figure 9
- Extend both dart legs 1/4-inch.
- draw curved lines to the CF and to the side seam from these new dart leg points.
If you are unsure about how to finish off the dart, see the pages on Finishing off Darts,which gives a few step-by-step examples.
This pattern piece is finished, and we will continue with the midriff from Figure 10.
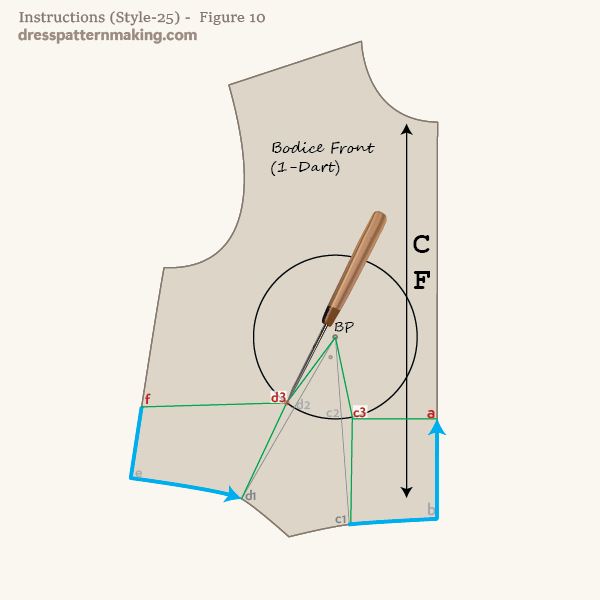
Instructions (Style-25) - Figure 10
- Trace around the block from F to D1, and from C1 to A.
- With an awl, piece the points D3 and C3 so they are marked on the paper beneath.
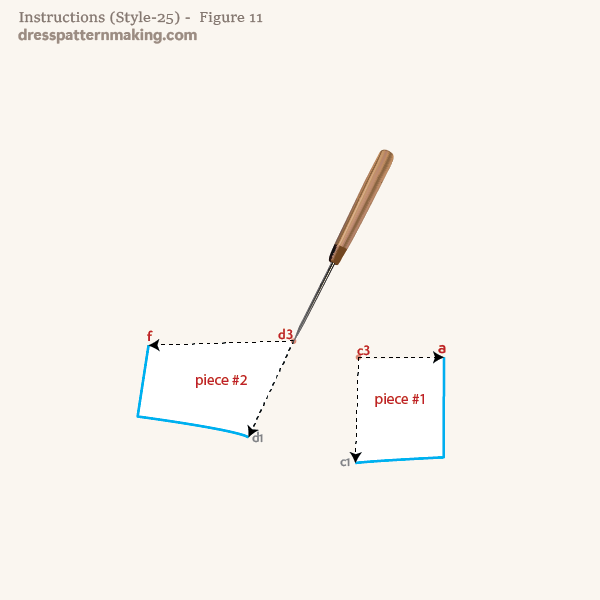
Instructions (Style-25) - Figure 11
- Draw lines from the awl marking at D3 to F and to D1.
- Draw lines from the walk making at C3 to A and C1.
There will be stuck together soon to become one piece, but to help with the instructions they are temporarily marked piece #1 and piece #2.
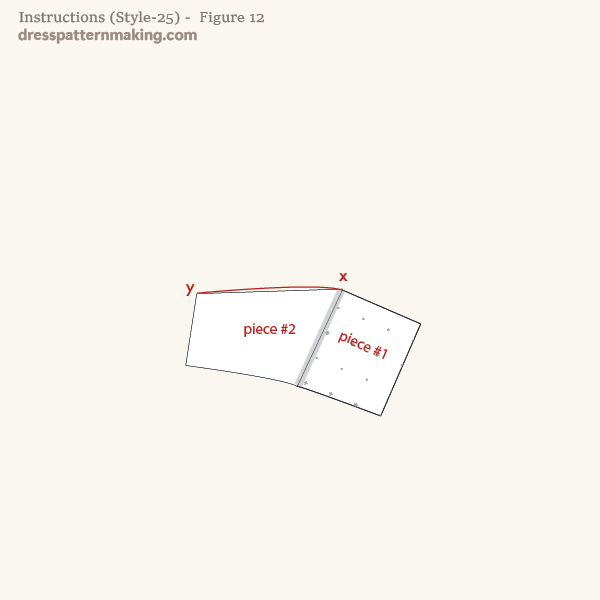
Instructions (Style-25) - Figure 12
- Cut out piece #1 (but NOT piece #2)
- Move piece #1, align it with piece #2 and stick them together with sticky tape.
- Draw a curve from X to Y.
- The pattern piece can be cut out.
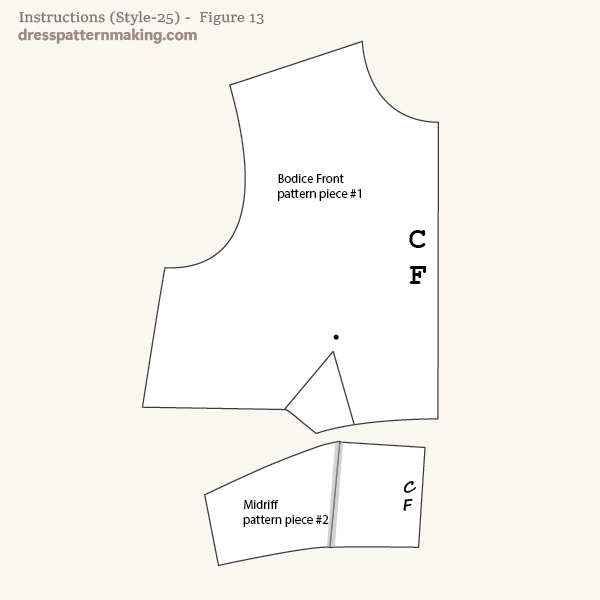
Instructions (Style-25) - Figure 13
- You will need to add the grainline and other details (not shown here).
- You will also need to walk the top seam that adjoins the Bodice pattern piece to ensure the lengths are the same.
