Empire Line
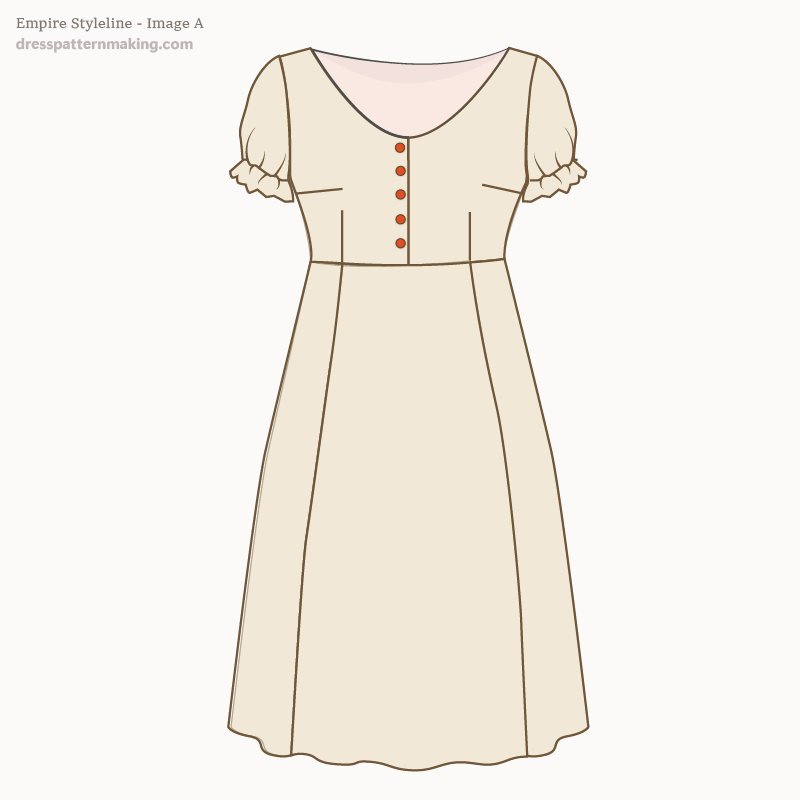
The Empire Line is a bodice styleline that crosses under the bust, with the skirt falling from that styleline. This is in contrast the the more standard style of dress where natural waist is the dividing line between the bodice and the skirt, and the skirt falls from the natural waist. The Empire Line started in France during the French Revolution and was inspired by the fashions of ancient Greece & Rome.
One would therefore think (in my opinion at least) that the "Classic Empire" would be this Empire Line.
However, when I studied patternmaking, the textbook I used said that the 'Classic Empire' had a styleline under the bust which separated the bodice into 2 piece. The bottom portion of the bodice has the darts removed and becomes a fitting midriff section. This would mean that a skirt attached to this 'Classic Empire' style would fall from the natural waist. This Empire Line style that divides the bodice into 2 sections to create a very fitting section from the underbust to the waist is very different to the original 18th Century style which resulted in a large amount of ease in the waist.
Regardless of which of these styles should be termed 'Classic', in this section I will cover drafting the second 'Classic' style, the one with a midriff section.
These instructions given are limited to the style-line: by this I mean I do not give the instructions for elements such as facing, adding seam allowance, marking the placement of the zip, etc.
Block Used
I will be using the Bodice Blocks for these instructions - Bodice Block Front & Bodice Block Back..
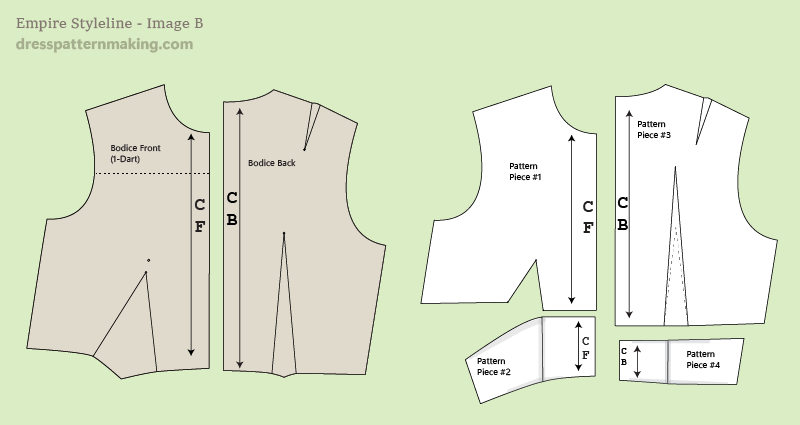
Outcome
The image below shows the block being used (Bodice Block Front & Back) on the left, and on the right are the final pattern pieces.
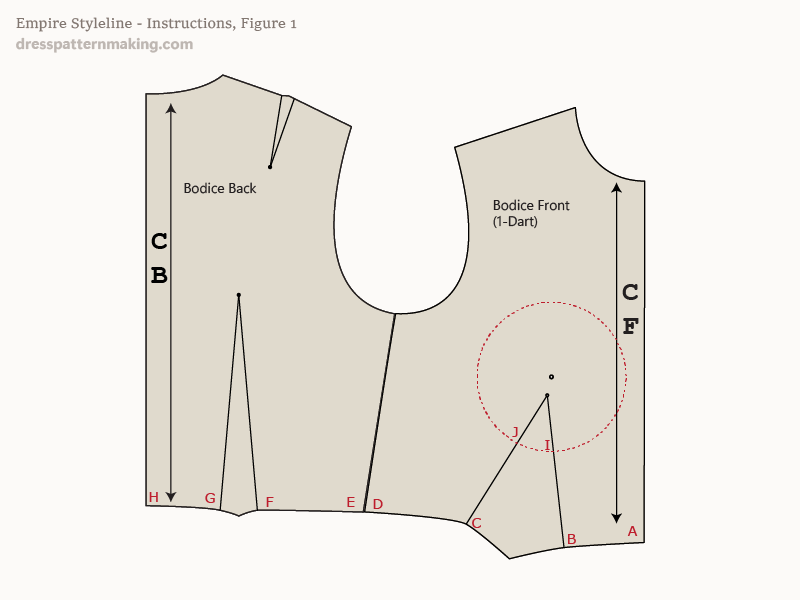
Instructions (Empire Line)- Figure 1
Firstly we will make Empire Line markings on the block. When we have finished putting all the markings on the block we will trace to create the four pattern pieces (two front, two back).
- Draw the bust mound circle on your Bodice Front with a compass, with the Bust Point as the center. Use your personal measurements.
- Align the Front and Back Blocks at the side seam.
- Mark the points A to J as shown"
- A = CF waist
- B = dart leg on Bodice Front
- C = dart leg on Bodice Front
- D = waist side seam on Bodice Front
- E = waist side seam on Bodice Back
- F = dart leg on Bodice Back
- G = dart leg on Bodice Back
- H = CB waist
- I = point where dart leg B crosses the dart mound circle*
- J = point where dart leg C crosses the dart mound circle*
- B to I should equal C to J.
Instructions (Empire Line) - Figure 2
- Draw a line from the CF (point K), at right angles to the CF line, to touch point I.
- Measure from A to K: write down the value = X.

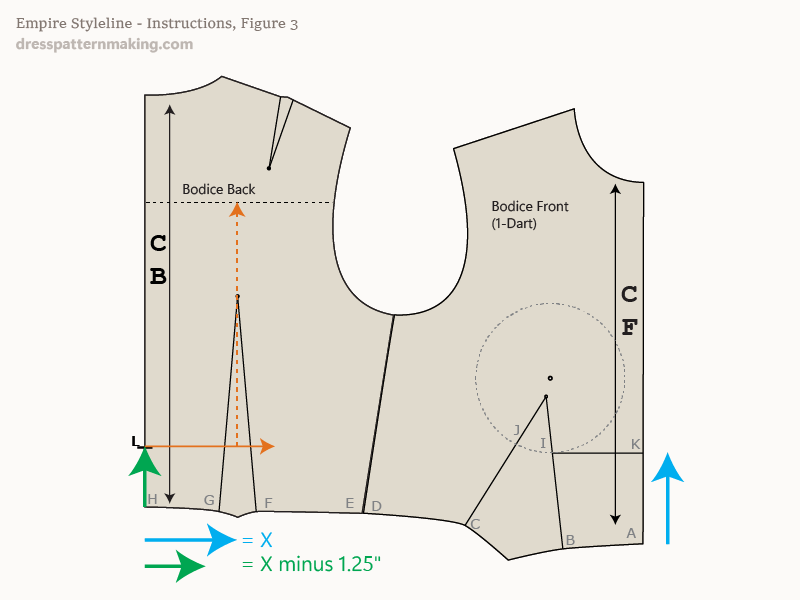
Instructions (Empire Line) - Figure 3
- Measure up from the back waist point H using the sum of the equation (X), where X is: (A to K) minus 1.25-inches. Label the point L.
- Draw a line from L at right angles to the CB line, draw the line some distance past the second dart leg. (The solid orange line in the image).
- Draw a line up and down from the dart point - up to the Across Back line and down to the line L. ***
*** Very important note: Raising the back dart point to the across back will make the design very fitting. Scroll down to Figure 7 see how you lose some width in the bust line by doing this. You can choose to leave the dart point where it is if you prefer a more relaxed fit.
In this example: X = 3.63 inches. Therefore X = 3.69 -1.25 = 2.44-inches).
Instructions (Empire Line) - Figure 4: Standard Dart Adjustment
Now we want to increase the width of both the front and back darts; this is because the Empire Line is fitting under the bust. In this image I am using the standard increase amount of 0.5-inches to the back dart (the width increases a total of 0.5-inch, which is 0.25 inch at each side of the dart on the line L), and .75-inch increase to the front dart, which is 0.38-inch on each side of the dart on the bust mound circle. See the image for how the darts are redrawn. Although I am using some standard amounts, you should use your personalized measurement. See Image 6 for instructions. After doing the calculations outlined in Image 5, you should draw the new darts as in this image, then proceed to the instructions in Image 6.

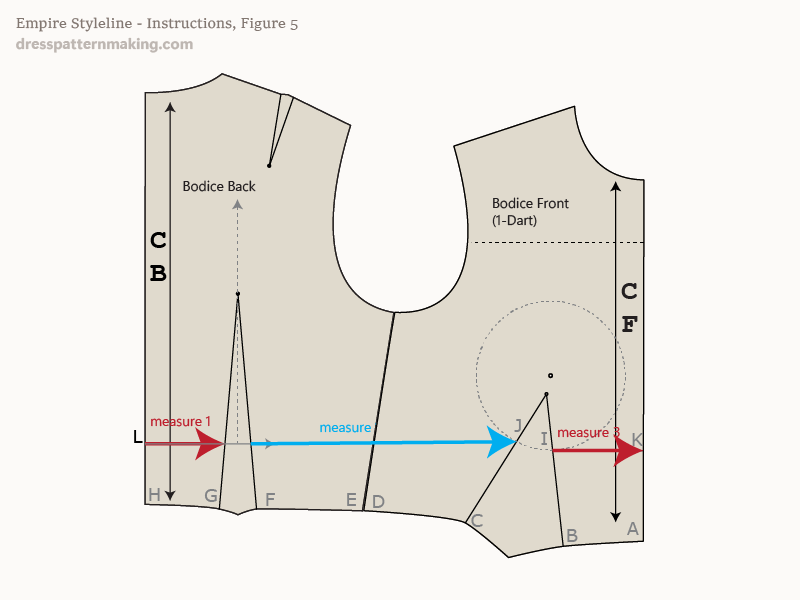
Instructions (Empire Line) - Figure 5: Personalized Dart Adjustment
- Measure (#1) from L to the first dart leg. Measurement = P
- Measure (#2) from the second dart leg (on the L-line) to point J. Measurement = Q
- Measure (#3) from point I to K. Measurement = R
- Add together: P + Q + R = S. Multiply S x 2, since we have measured the half-blocks.
- Now measure your under-bust circumference, letting the back drop down a little, it doesn't need to be really tight. This measurement = T.
- Take your Personal Body Under-bust measurement T, add 2 inches ease, then divide by 2. This total = U.
- Calculate: U minus S. The final value = V, and is the amount that needs to be added to the two darts. Use 2/5 of the measurement to add to the back dart, and 3/5 add to the front dart.
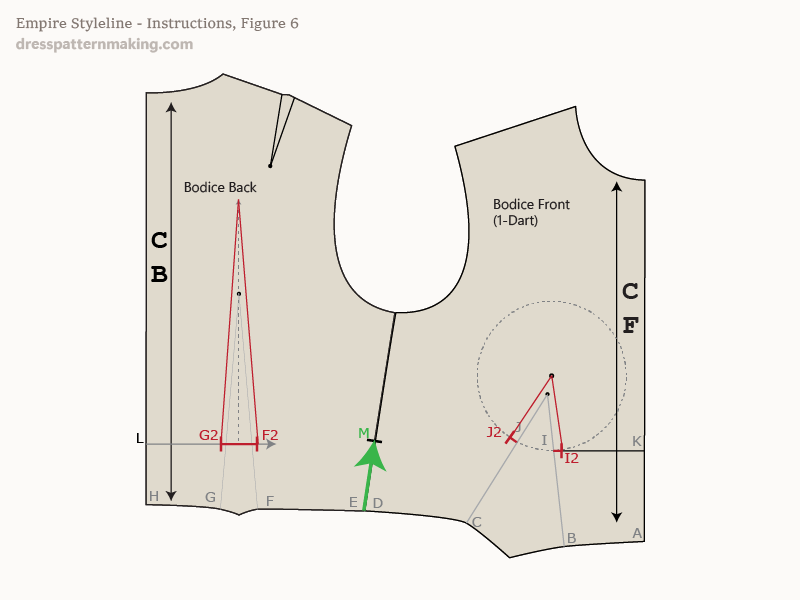
Instructions (Empire Line) - Figure 6
You should now have your darts widened to your personalized measurements; as per the red lines in the image below.
- Measure up from E/D for the value of: (A to K) minus 0.75-inch. Mark point M.
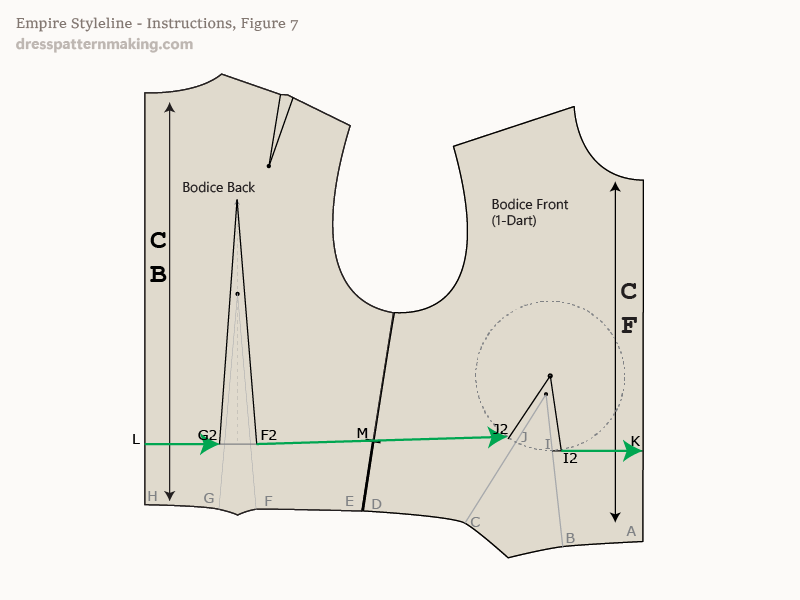
Instructions (Empire Line) - Figure 7
In this image and the next, we're going to finish off the Empire Line Markings. It is best to do this in a colored marker so they are obvious.
- Draw a line from L to G2.
- Draw a line from F2 to J2, through M in the side seam.
- Draw a line from I2 to K.
....continued in the next image...
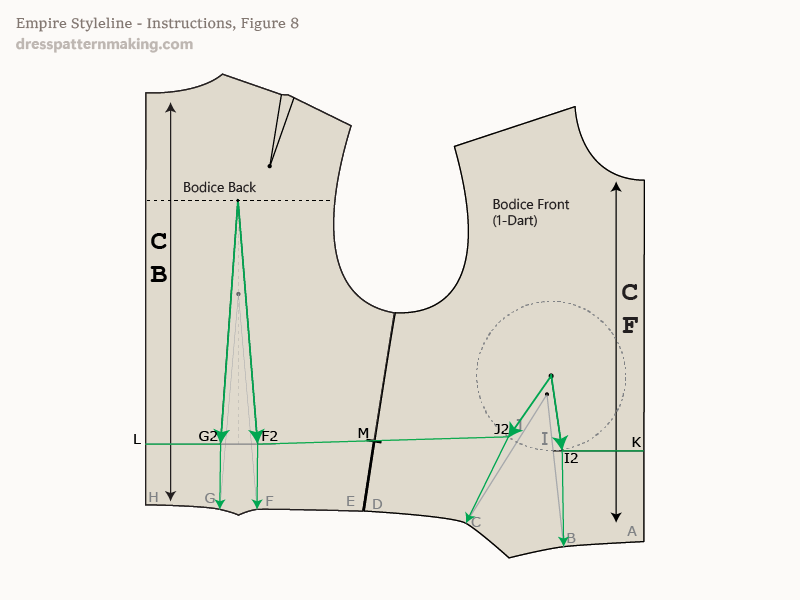
Instructions (Empire Line) - Figure 8
- Draw lines from the new back dart point (on the across back line), down to G2 and F2.
- Draw lines from G2 to G, and from F2 to F.
- Draw lines from the Bust Point on the Bodice Front to J2 and I2. (Note that a dart point should be created and the dart legs drawn; I won't go through that here).
- Draw lines from J2 to C and from I2 to B.
The Blocks are now ready to use to trace out and create the four pattern pieces for the Empire Line pattern.
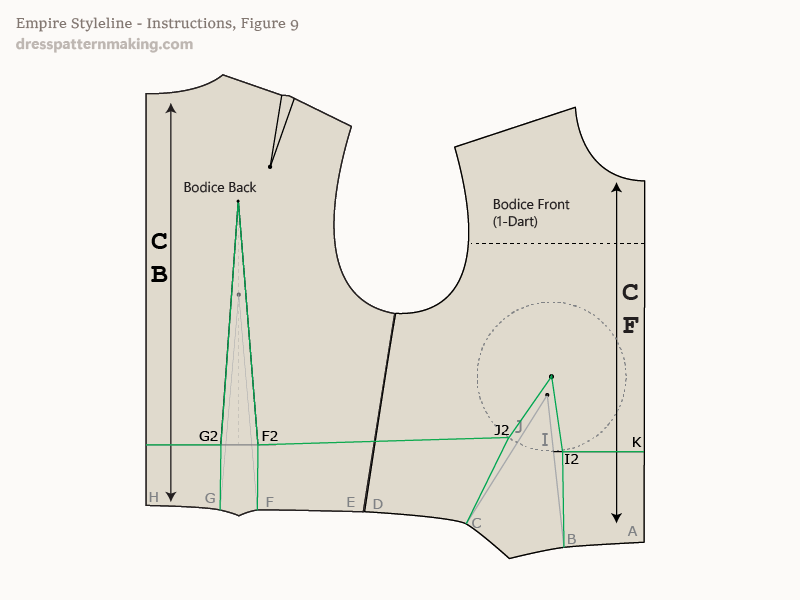
Instructions (Empire Line) - Figure 9
Now we will take the Bodice Front and create the two pattern pieces: the Bodice and the ????.
- Trace around the block from point M on the side seam to point K on the CF. Mark the Bust point and dart width points.
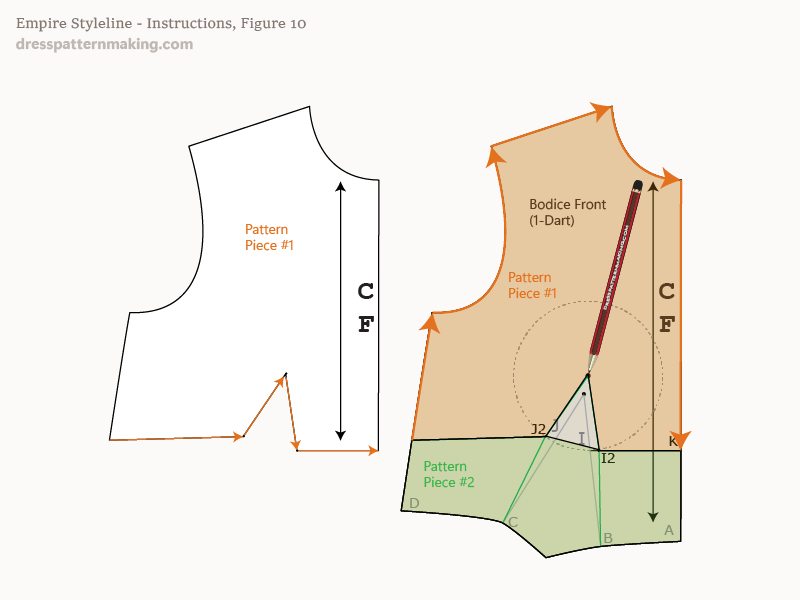
Instructions (Empire Line) - Figure 10
- Trace the first pattern piece - shown in the image in orange, remembering to mark the Bust Point and two dart width points.
- Move your block and finish the pattern piece.
- You would need to add seam allowance (not shown in image).
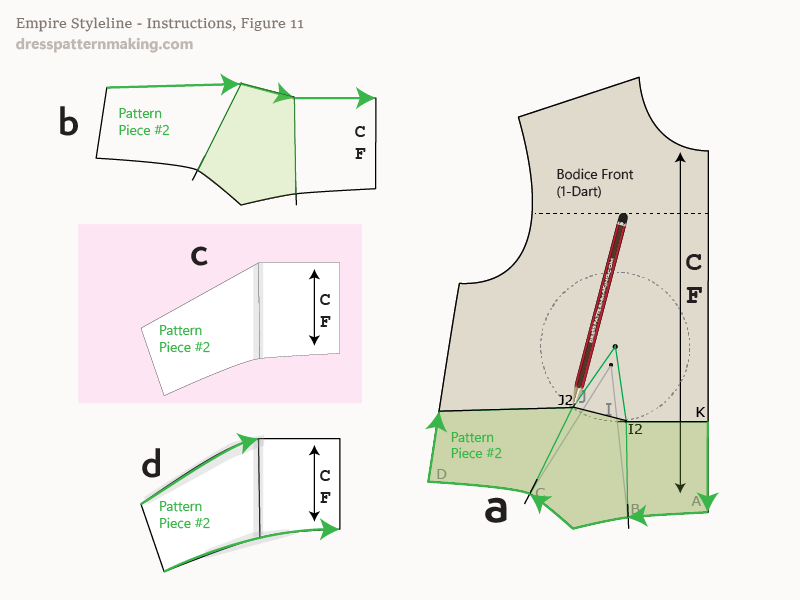
Instructions (Empire Line) - Figure 11
- Put your Front block on the paper and trace the second pattern piece - the midriff section. Pattern piece #2 is shown on the block shaded in green. When tracing, remembering to mark the two dart width points at the top and bottom (J2 & I2 and C and B).
- Move your block and draw the internal lines of the pattern piece (B). Cut the resultant piece out of the paper, then cut out the dart value portion (shaded in green).
- Stick the two pieces together (C).
- You need to stick the resultant midriff pattern piece back onto paper and blend a smooth curve for the top and bottom of the piece.
- You would need to add seam allowance (not shown here).
Instructions (Empire Line) - Figure 12
- Follow the same steps for the Bodice Back as for the Bodice Front to create pattern pieces #3 and #4.

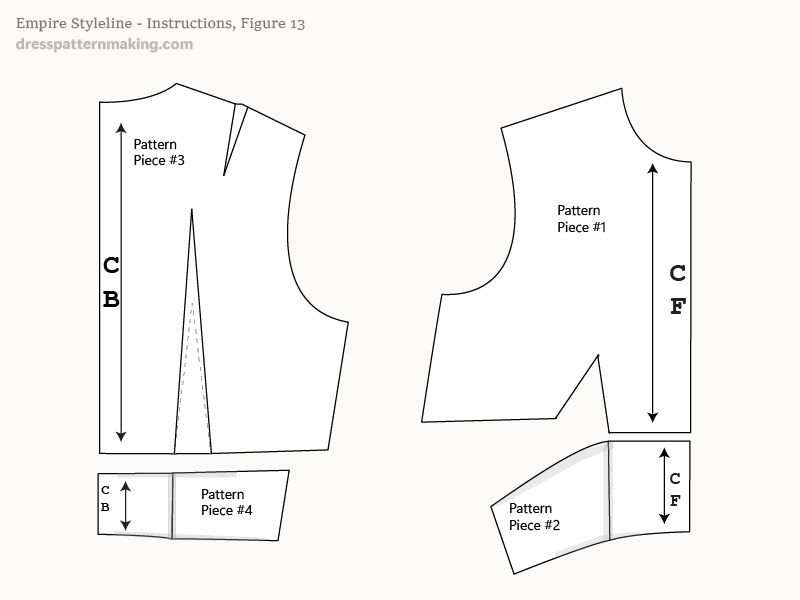
Instructions (Empire Line) - Figure 13
Here are the four pattern pieces, without seam allowance or cutting instructions, etc.