Sleeveless & Cutaway Armholes
The standard Bodice Block is a close-fitting block, but if you use it to create a garment that is sleeveless you will not have the minimum ease at the armhole area, and if you use it to create a garment with cutaway armholes, you will have a lot of gaping in the armhole. Of course you may choose to have extra ease in the armhole area, but that is design ease, and a different issue. You first need to know how to create close-fitting garments with minimum ease and no gaping before introducing extra ease (and you generally do not want gaping). Therefore, when making garments that are sleeveless or with cutaway armholes using the basic Bodice Block, adjustments need to be made to remove the additional ease or gaping. In order to make those adjustments you need (a) an understanding of manipulating darts, and (b) contouring marks on your block that allow you to make the necessary changes as you draft the pattern. The Contouring pages under the Principles Menu cover this issue in detail, with an explanation of why this occurs and how to make the necessary adjustments when making your pattern to avoid that gaping. There are seven pages in the Contouring menu, which follow on from each other and should be read in the order they appear in the menu. If you have both a low neckline and sleeveless/cutaway arm design, you need to make adjustments for both.
Summary
When creating garments that are sleeveless or have cutaway armholes, you need to use a block that has contour markings, and you need to know how to use that information. You also need an understanding of manipulating darts.
Example (Sleeveless & Cutaway Arms) - Figure 1
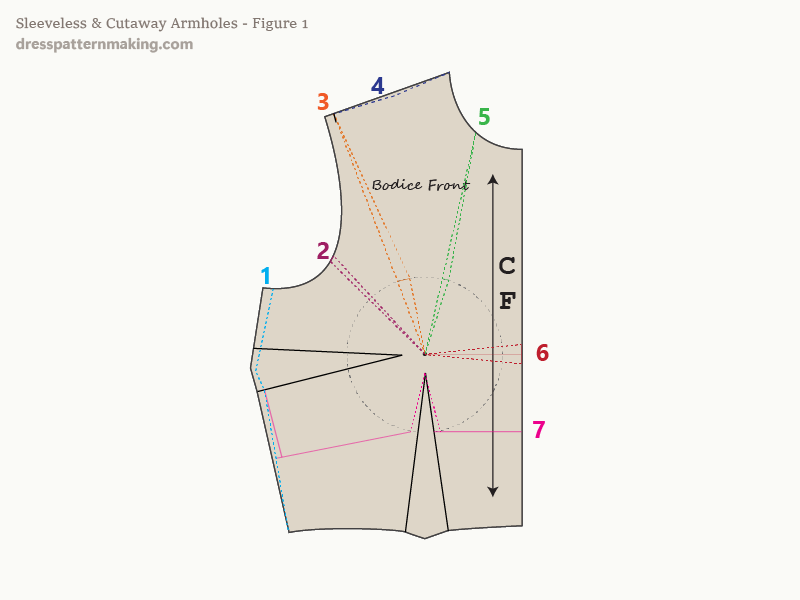
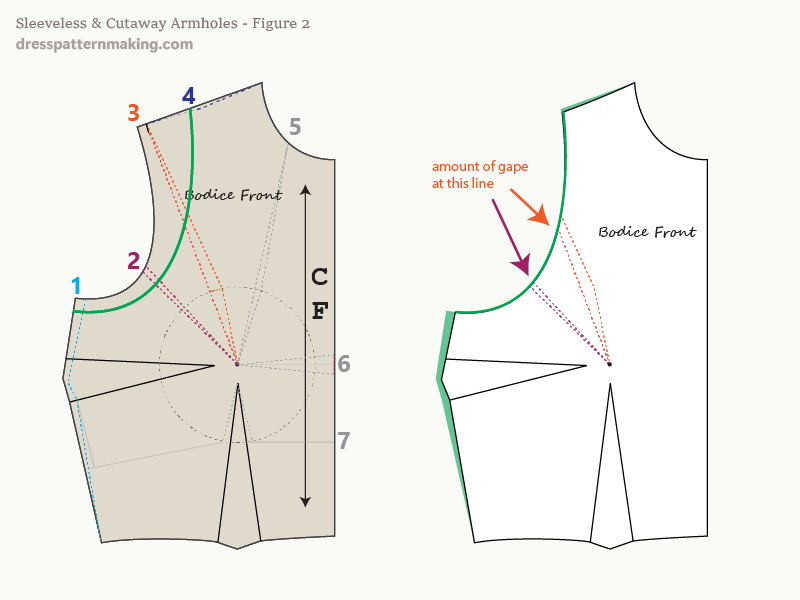
This is a Bodice Block (Front) that has contour markings. These lines show where adjustments need to be made when making sleeveless garments, garments with cutaway armholes, and garments with low necklines. In the example below, we will be looking in particular at the contouring information marked 1, 2, 3 & 4 , as they are the ones that relate to sleeveless and cutaway armholes.
Example (Sleeveless & Cutaway Arms) - Figure 2
In this image the armhole line has been drawn in green on the block (left). Wherever the green line (the new armhole of the garment) crosses the contouring marks (the dashed colored lines) indicates that some kind of contouring needs to be done. To the right is the traced block, ready to make the pattern. In the tracing step contouring No.1. (reduction in block width) and No.4 (shoulder line alteration) have already been done. What we still need to do is contouring No. 2 & No.3. What this is telling you is how much gaping will occur with this cutaway arm. Remember this is the half-block and the gaping will be on both sides. These two gape darts need to be moved into one of the existing dart (i.e. darts that are actually part of the design of the garment).
Example (Sleeveless & Cutaway Arms) - Figure 3
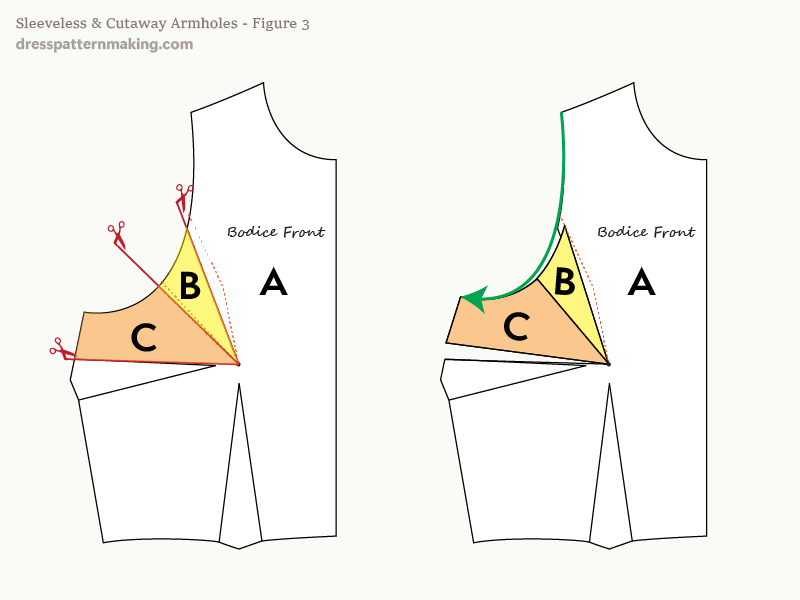
The two gape darts from Image 2 can be moved into either the side seam dart, or the waist dart, or distributed in any manner between the two of them. In this case I am going to move them both into the side seam dart.
- The pattern is cut along the gape dart lines to the Bust Point, and from the Bust Point along the upper side seam dart leg. The pattern piece is now in three pieces - in the image the pieces are shown in different colors for emphasis, and marked A, B & C.
- Piece B is pivoted anti-clockwise on the Bust Point until the gape dart is closed. Then piece C is pivoted until the second gape dart is closed. Note that the side seam dart is increased each time.
- The side seam dart has opened up (i.e. increased in size) as the two gape darts have been incorporated into it.
- The armhole line needs to be redrawn.
- The side seam dart needs to be redrawn.
In this case there were two gape darts that needed to be incorporated into the side seam dart. If this also had a low neckline, that would be a further dart that would need moving.
Example (Sleeveless & Cutaway Arms) - Figure 4
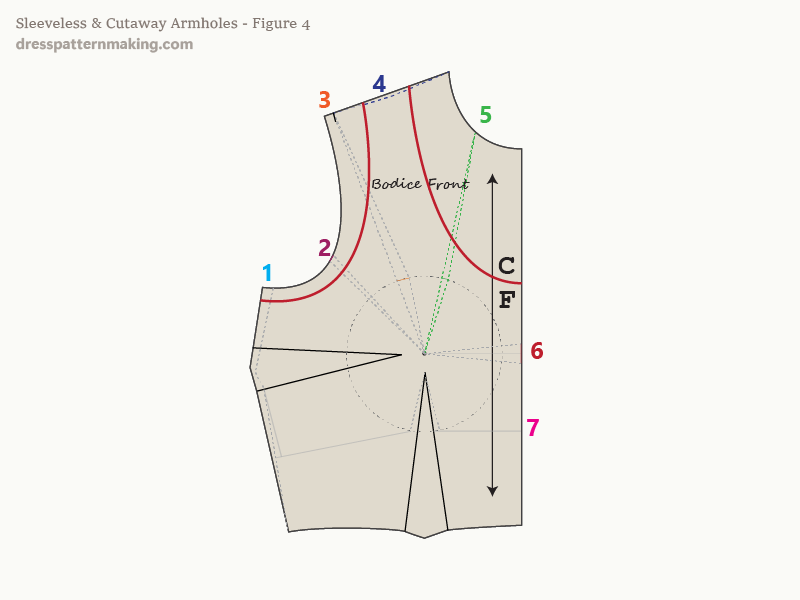
The example above had cutaway sleeves but a high neckline. If it had a low neckline, further contouring would be needed. This block in Figure 4 has design lines drawn in red. Those design lines show that the garment will have cutaway arms AND a low neckline. The design lines cross 5 different contour markings, and adjustments would need to be made for all of these. In our example above, gape darts 2 and 3 were moved into the side seam dart. In this case, with a low neckline, a further gape dart (gape dart 5) would also need to be moved.
