Puff Sleeves
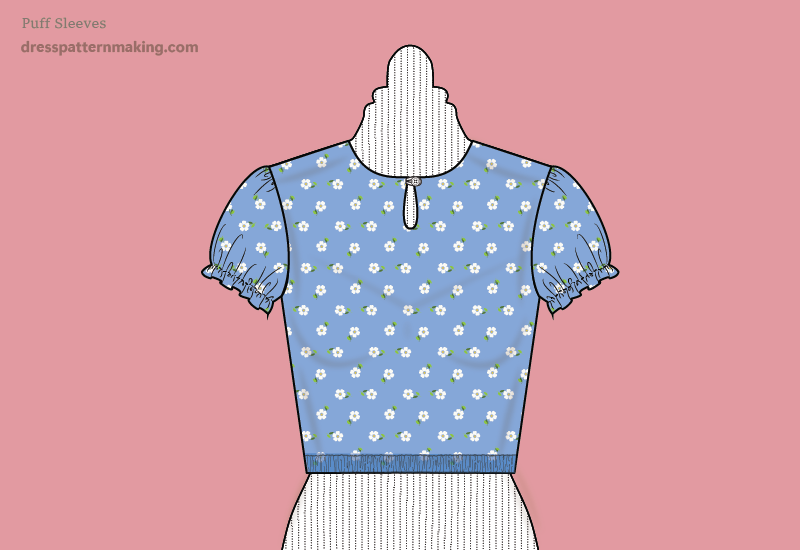
Puff sleeves are short sleeves that have added fullness in the sleeve cap and/or the bicep. The bicep is either elasticized or has a cuff. Varying amounts of fullness can be added for more or less 'puff'. These sleeves are created with the derivative sleeve block - the Dartless Sleeve Block. (You could use the standard Sleeve Block; using the Dartless Block just saves a couple of steps. The Dartless Block does not taper and does not have an elbow dart. It also can have the cutting lines marked to save time measuring each time you add fullness.) Figures A & B relates to all styles. Figures 1 - 3 shows how to draft a Puff Sleeve with fullness in just the sleeve cap. Figure 4 - 6 shows how to create a Puff Sleeve with fullness in the bicep. Figure 7 - 9 shows how to create a Puff Sleeve with fullness in the sleeve cap and bicep. Creating the cuff is shown on the Sleeves Cuff page - see the menu on this page.
Important! Seam allowance has NOT been added in these examples.
Figure A - Drafting a Puff Sleeve
You could use the Standard Sleeve Block instead of the Dartless Sleeve Block; but creating and using the Dartless block saves having to do the same few steps every time you create sleeves with added fullness such as Puff Sleeves, Bishop Sleeves, Bell Sleeves, etc.
- Trace the Sleeve Block, in this case the sleeve length is 2-inches*.
- Transfer notch markings to the pattern.
Your design may, of course, have a different length. If a cuff is part of the design you are creating, the width of the cuff would add to the final length of the sleeve. If you are using the Standard Sleeve Block, the underarm line will tape; make sure you change this so the underarm seam-line is at right angles to the bicep line - as shown by the green arrow.
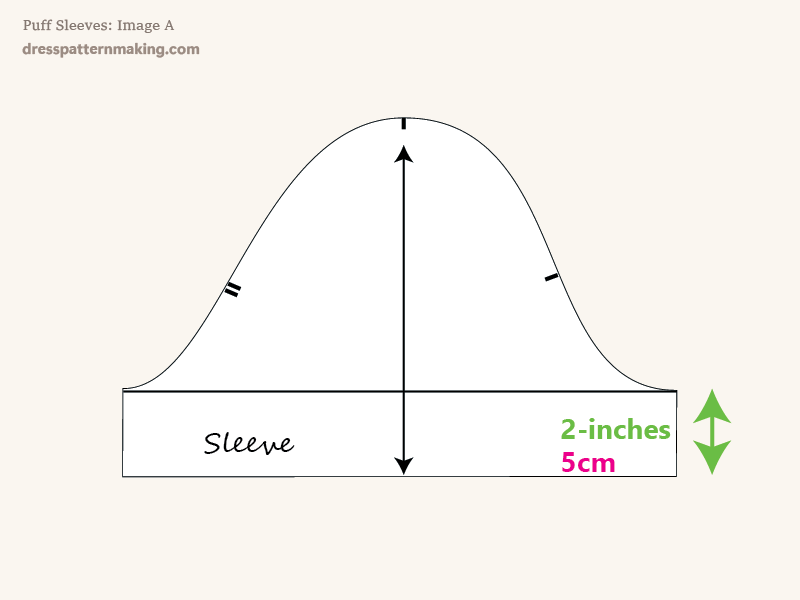
Figure B - Drafting a Puff Sleeve
- Divide the bicep line into six equal sections (shown in blue in the image) and draw five vertical lines (shown in red).
- For the sleeve with fullness added at the bicep, cut along all of these vertical lines
- For the sleeve with fullness added at the sleeve cap, cut along all of these vertical lines
- For the sleeve with fullness added at both the bicep and the sleeve cap, cut only along the three middle lines
You will need sticky tape to tape these pieces to create the pattern piece.
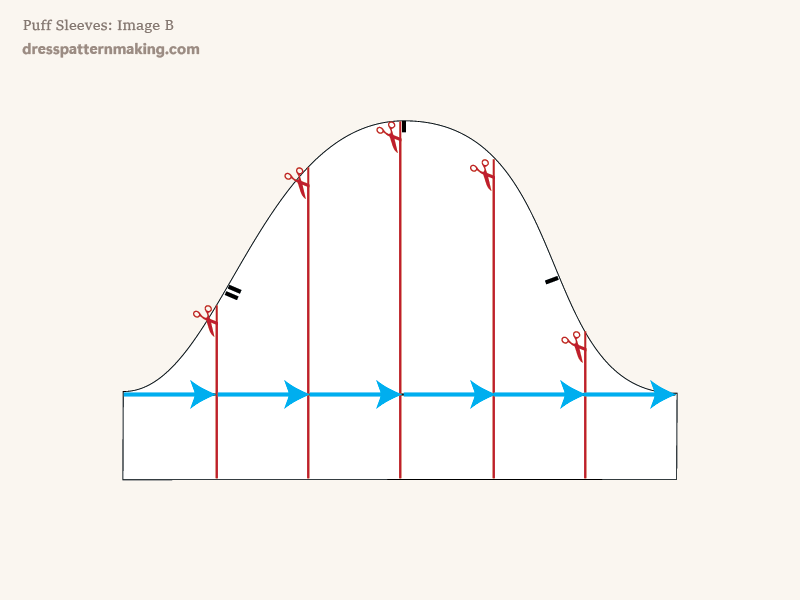
Figure 1 - Drafting a Puff Sleeve with fullness in the Sleeve Cap
- Spread the pieces so there is an equal amount of space between them; 1.75 inches is used here.
We will have to redraw the sleeve head and the curve of the sleeve edge - see Figure 2.
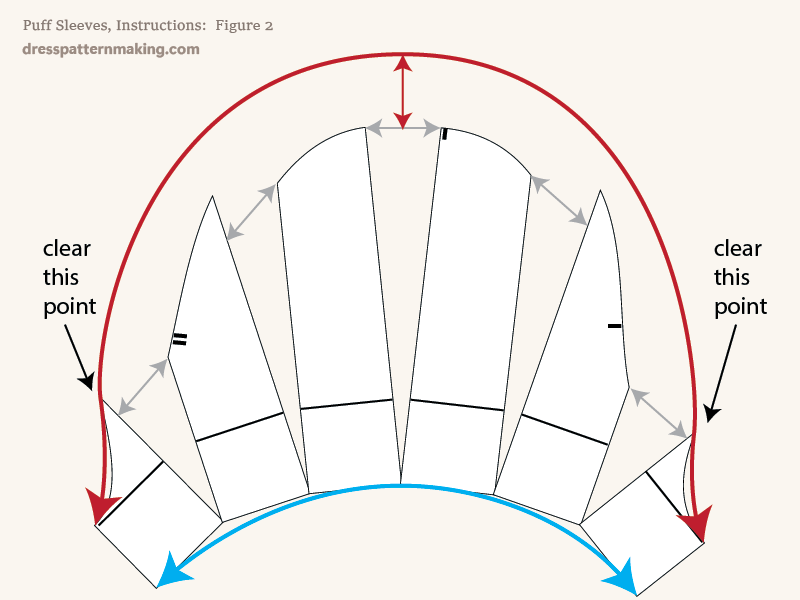
Figure 2 - Drafting a Puff Sleeve with fullness in the Sleeve Cap
- Redraw the sleeve cap as shown in the image, raising the height of the sleeve head the same amount as the spread (in this case 1.75-inches).
- Redraw the sleeve edge curve.
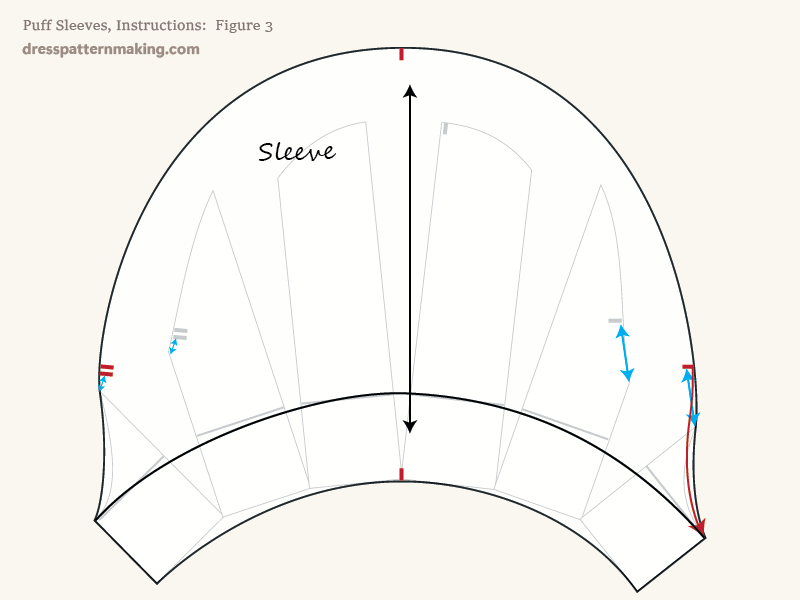
Figure 3 - Drafting a Puff Sleeve with fullness in the Sleeve Cap
- Mark notches as shown (so the length from the bodice/armhole point to the notch is the same distance as it was in the original sleeve; the added fullness is above the notch).
- Mark grainline.
- Redraw the front sleeve curve from the notch to the bodice/armhole point.
- Label your pattern piece.
- Add seam allowance and cutting instructions have not been added in this example, you will need to add those for a production ready pattern.

Figure 4 - Drafting a Puff Sleeve with fullness in the Bicep
For this puffed sleeve, the fullness is gathered in some way around the arm; with a cuff or with elastic, etc. Note that if you use this sleeve without being gathered at the arm, it is a Flared Sleeve. So this Puffed Sleeve and the basic Flared Sleeve is drafted the same way. If you spread it enough, it becomes a Butterfly Sleeve.
- Spread the six pieces evenly so there is 1.75 inches between each piece.
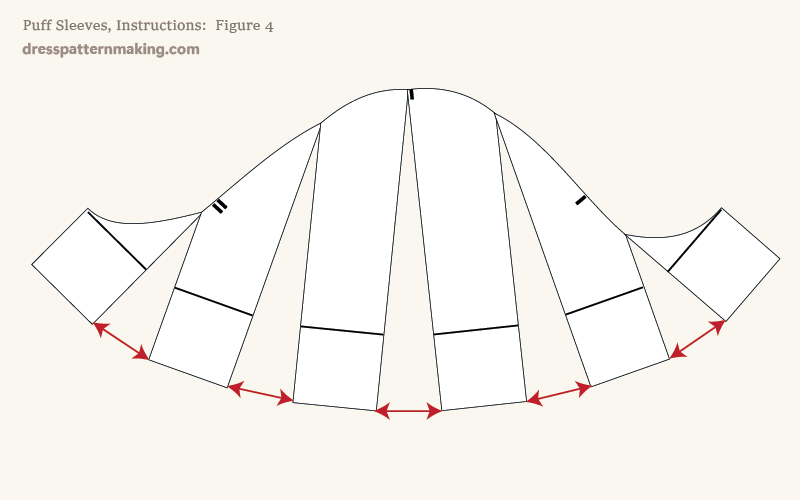
Figure 5 - Drafting a Puff Sleeve with fullness in the Bicep
- Lower the sleeve edge by the same amount of the spread; in this case 1.75-inches.
- Redraw the sleeve edge according to this depth to smooth of the curve - note the smoothed curve at the front armhole.
- Redraw the sleeve cap.
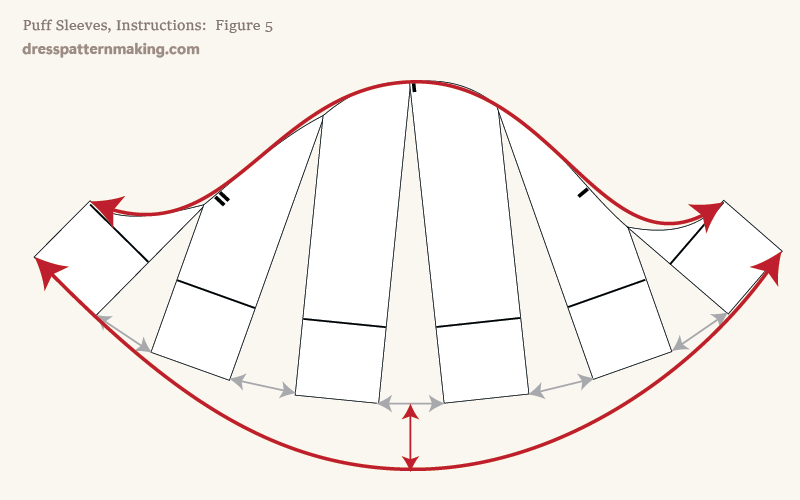
Figure 6 - Drafting a Puff Sleeve with fullness in the Bicep
- Mark the notches.
- Mark the grainline.
- Label your pattern piece.
- Add seam allowance and cutting instructions (not shown here).
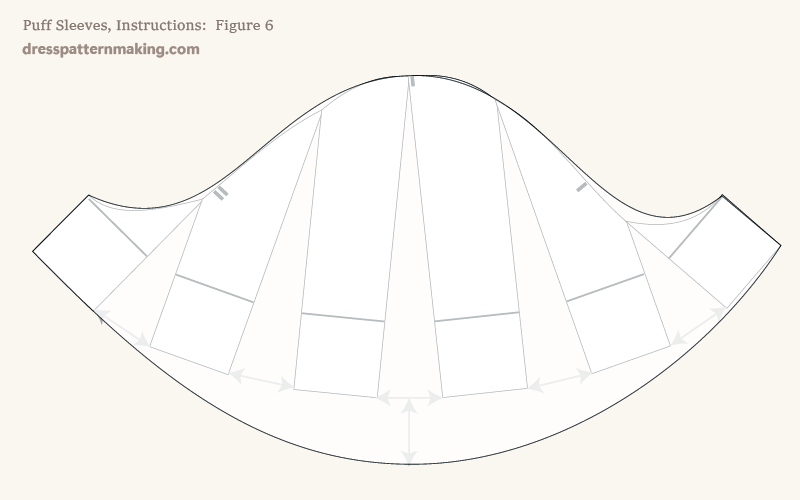
Figure 7 - Drafting a Puff Sleeve with fullness in both the Sleeve Cap & the Bicep
- Draw another line parallel to the bicep, about half-way between the top of the sleeve cap and the back/front notches.
- Cut along that line. You will now have eight pieces.
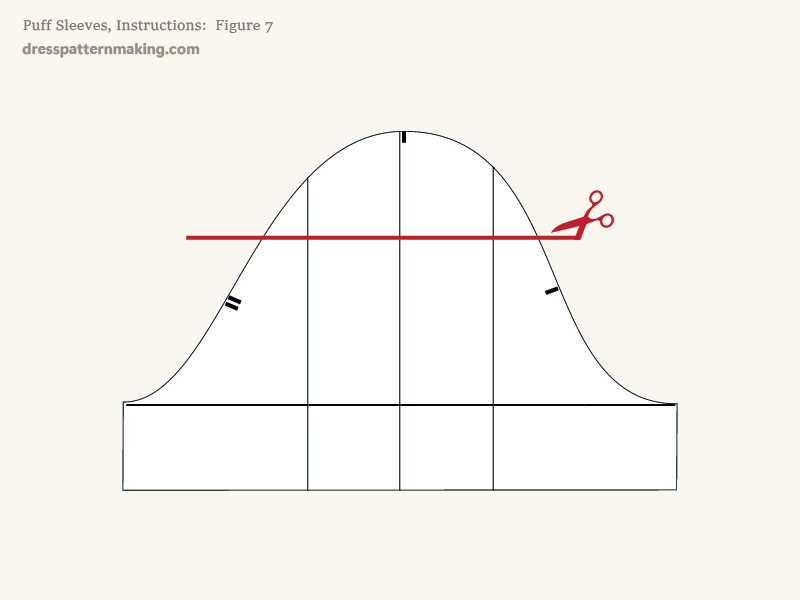
Figure 8 - Drafting a Puff Sleeve with fullness in both the Sleeve Cap & the Bicep
- Cut and spread the pieces horizontally and diagonally* so there are equal spaces between them, except for the top edge pieces (shown in color for emphasis). Place them so that they assist in redrawing the curve.
- Redraw the curve.
- Draw a center line for making top notch.
*I have cut and spread 1.5-inches, but this is up to you - how much added fullness you want for your design.
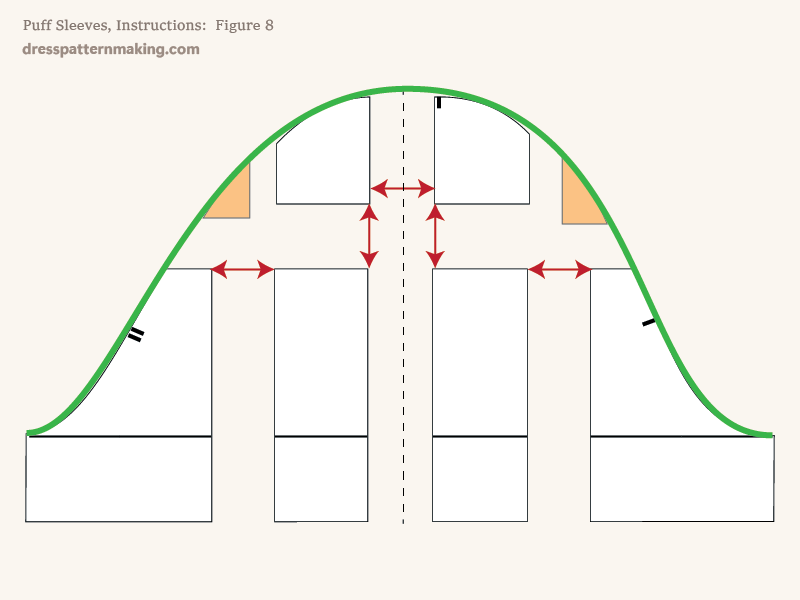
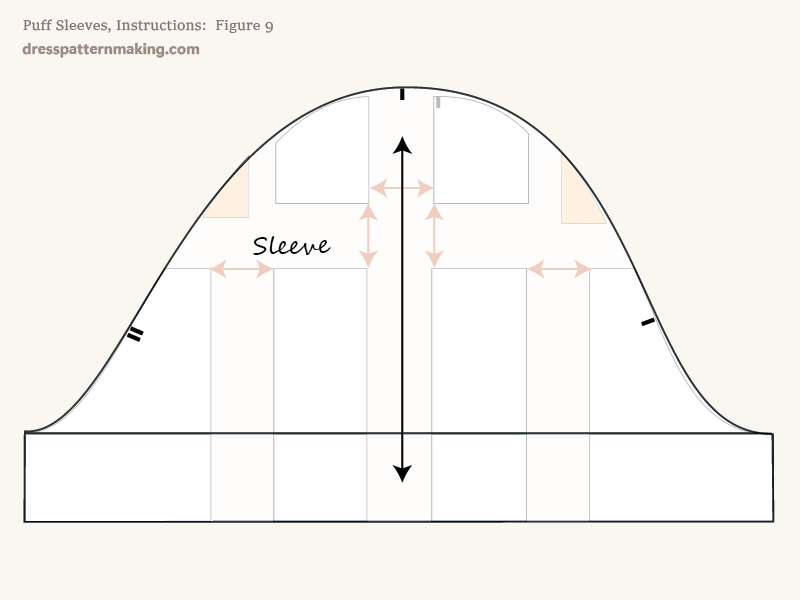
Figure 9 - Drafting a Puff Sleeve with fullness in both the Sleeve Cap & the Bicep
- Mark the notches.
- Mark the grainline.
- Label your pattern piece.
- Add seam allowance and cutting instructions (not shown here).
