Manipulating Darts
Darts can be repositioned to adjust shaping without affecting the garment’s overall fit. The extent of movement depends on the block—bodice blocks allow for more manipulation than skirts or sleeves. Dart movement is achieved by closing a dart in one location and opening the same value elsewhere, pivoting around a central point.
Darts can be moved using two methods:
Pivoting is preferred when possible, it is less time consuming as it avoids cutting and rejoining the pattern. However, if pivoting isn’t feasible, the cut-and-spread method is necessary. Some designs may require a combination of both methods, or multiple cut-and-spread adjustments in a single pattern.
To practice dart manipulation, explore the step-by-step examples in related sections, such as the Bodice Front or Back. If you want a deeper understanding of why pivoting is more versatile in the Bodice Front, the rest of this article will explain.
Darts on the Bodice Front
The darts in the Bodice Front can be relocated to any position along its edge.
Example: Moving a Dart in the Bodice Block
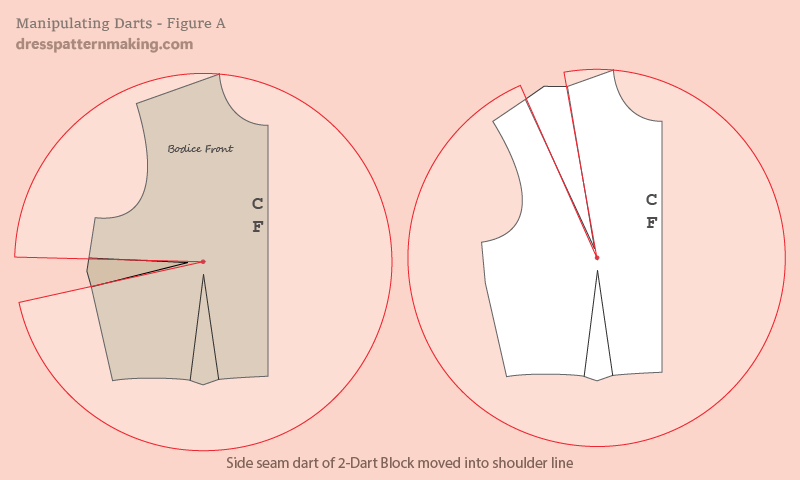
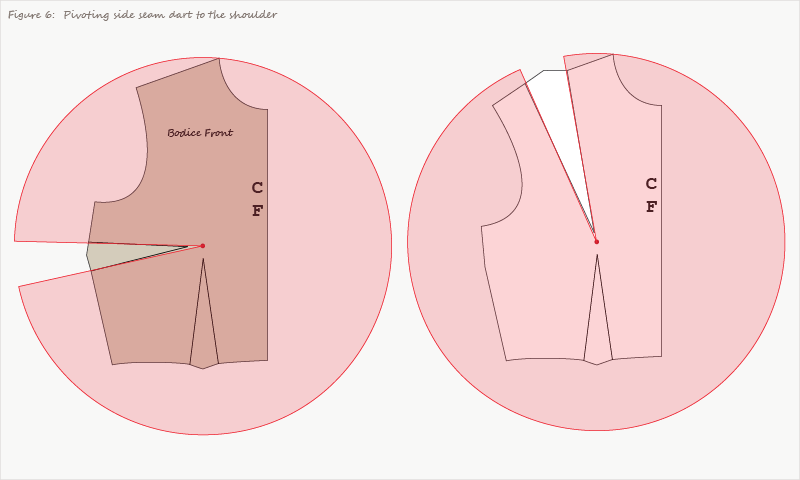
Figure 1 shows a bodice block on the left and a modified pattern on the right, where the side seam dart has been moved to the shoulder.

In this example, only the side seam dart was moved, while the waist dart remained unchanged. However, both darts could be relocated if the design required it—for example, shifting the waist dart to the center front while moving the side seam dart to the shoulder. The Bodice Front offers significant flexibility, allowing one or both darts to be moved anywhere along its perimeter.
Moving Darts in the Bodice: Many Options
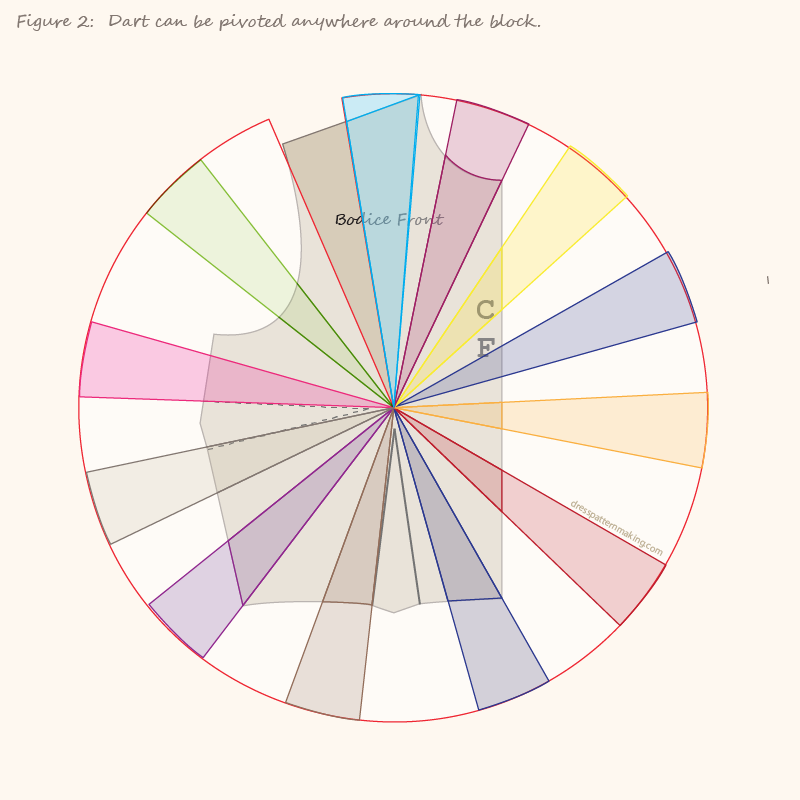
Figure 2 illustrates the possible placements for the side seam dart around the edges of the bodice block. In each case, only the side seam dart is repositioned, while the waist dart remains unchanged. The diagram does not show the actual pivoting process but instead highlights potential dart placements and their values at different points along the block's perimeter.
Dart Values
Before exploring dart movement in skirts, it’s important to understand how dart values change when repositioned. This is especially relevant for bodice blocks, where dart movement is more flexible compared to skirts.
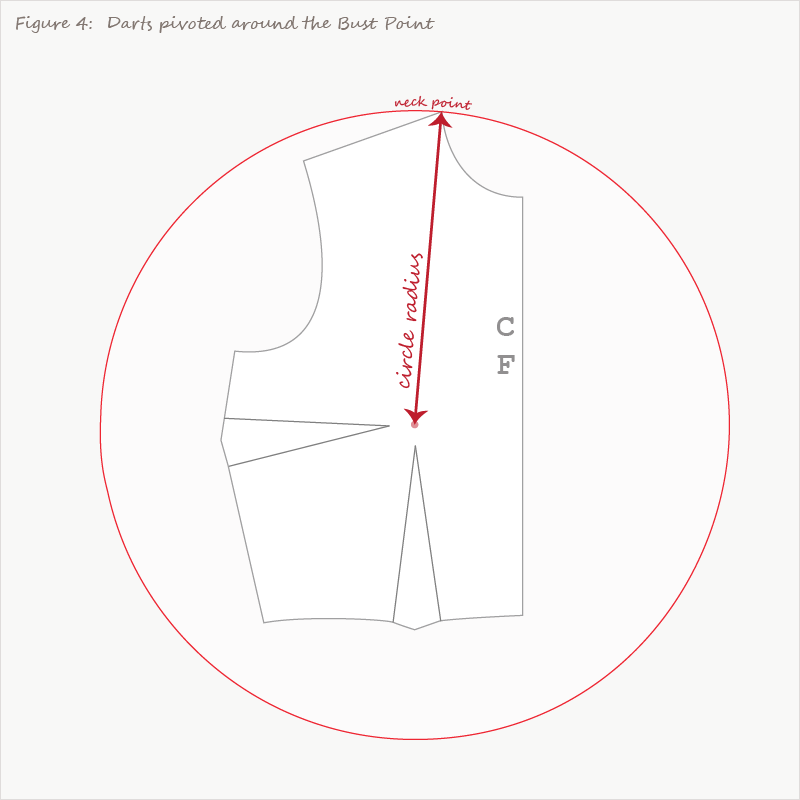
Figure 3 revisits the bodice block from earlier, showing a version with a waist and side seam dart, and another where the side seam dart has been moved to the shoulder. The diagram highlights the dart values—the width of each dart—and demonstrates that the shoulder dart is wider than the original side seam dart.
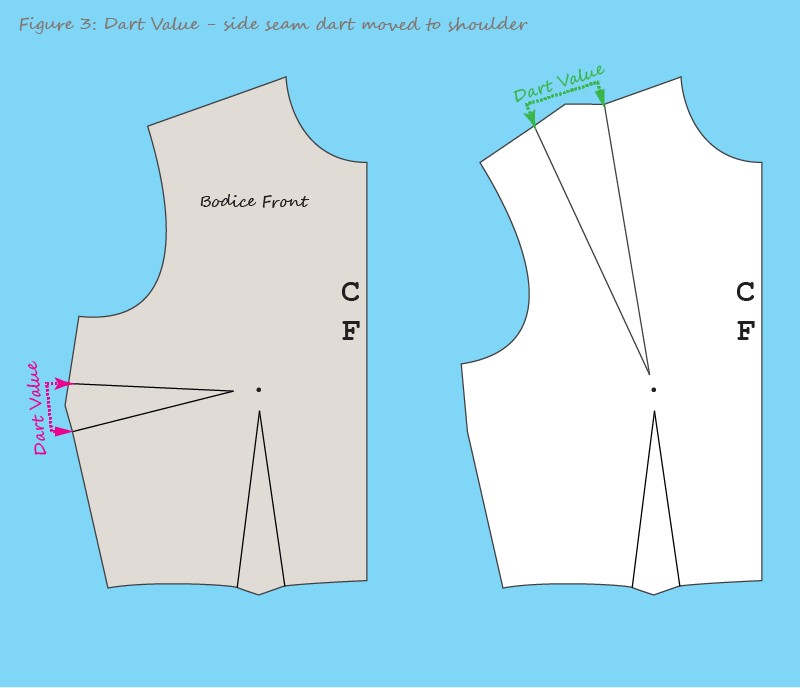
This difference occurs because the dart rotates around a central pivot point, the Bust Point, which serves as the center of a circular movement. The radius of this circle extends from the Bust Point to the furthest edge of the block, in this case, the Shoulder Tip. See Figure 4 below:
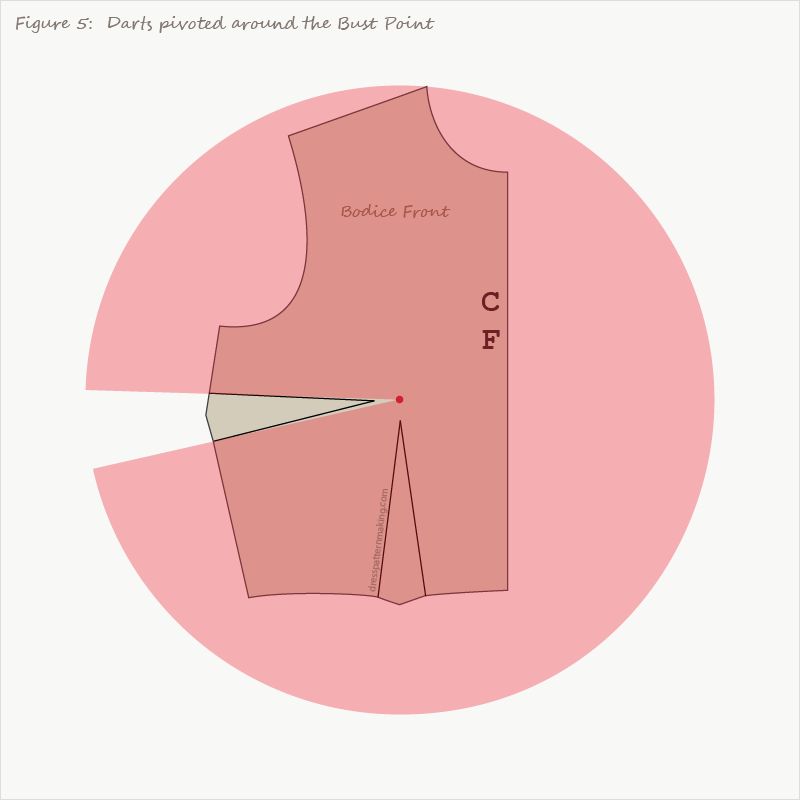
To better visualize dart movement, imagine cutting out a wedge from this circular area at the side seam dart. See Figure 5:
In Figure 6, the cut-out wedge has been rotated to the shoulder. The wedge itself remains the same size, but the shoulder dart is larger because the shoulder line is positioned farther from the pivot point.
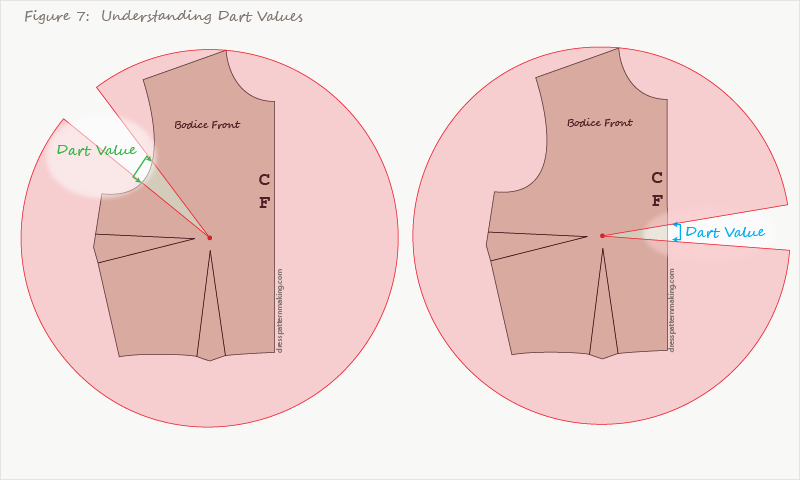
In Figure 7, the same wedge has been pivoted to the armhole and center front, aligning with the dart point. The closer the wedge is to the center of the circle, the smaller the resulting dart value.
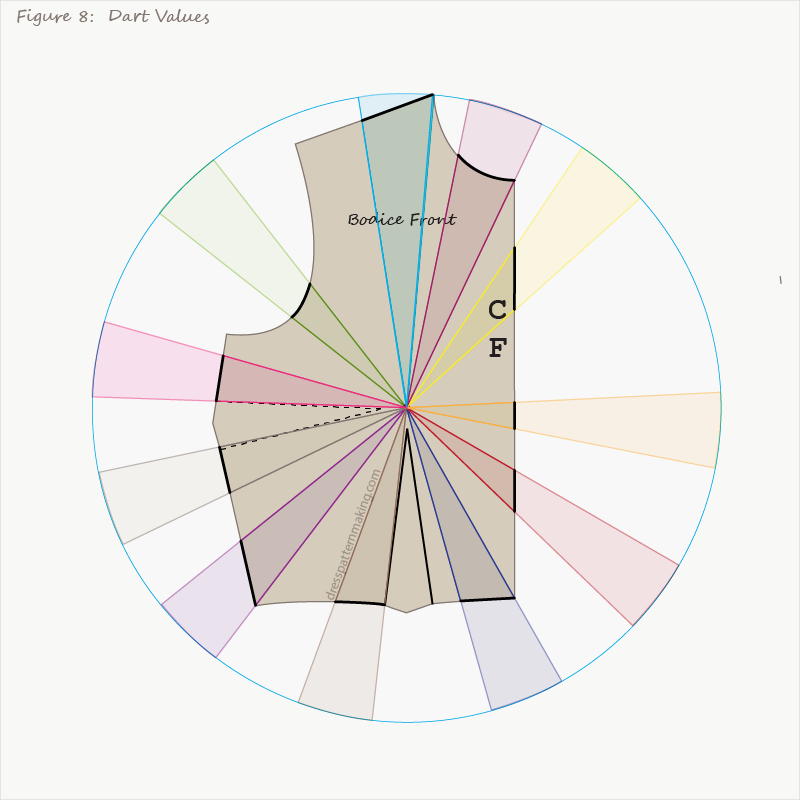
In Figure 8, the circle has been rotated to different positions around the bodice block. The colored arrows indicate the dart value at each placement.
Darts in the Skirt
In the Bodice Front, closing one dart opens another elsewhere, allowing for stylistic choices such as shifting the dart for design lines (e.g., Armhole or Shoulder Princess seams) or converting darts into gathers, pleats, or tucks.
This flexibility does not apply in the same way to skirts. In Figure 9, the same circular pivot concept is applied to the skirt block. Here, the dart’s pivot point remains at the Dart Point, and closing a waist dart significantly impacts the skirt hem.
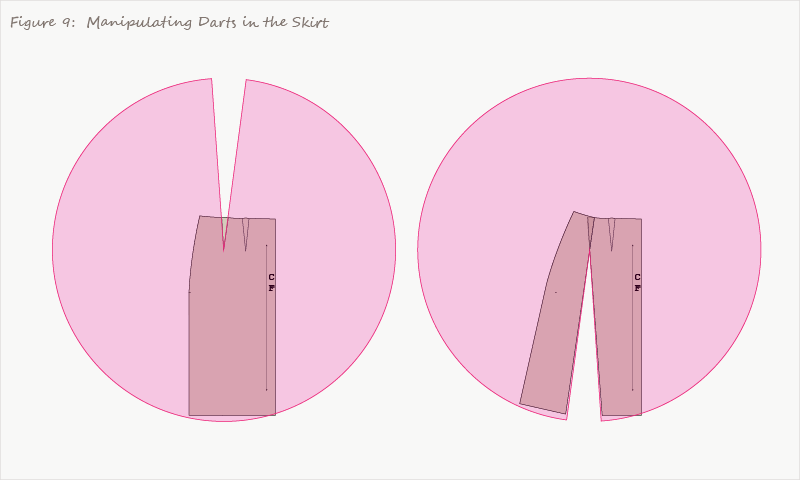
In this case, shifting the waist dart to the hem solely for dart shaping wouldn’t be practical, as it would waste fabric. Instead, this method is used to create an A-line skirt. If both darts are closed at the waist, the skirt maintains a contoured waist while gaining additional flare at the hem.
To compare approaches, Figure 10 will illustrate the difference between removing a dart by incorporating it into a seam versus using dart manipulation to shift its value into the hem.

Moving the Dart Elsewhere in the Skirt
So far, we’ve seen how a dart can be moved from the waist to the skirt hem. Unlike the Bodice Front, where darts can be repositioned freely around the block, does the same flexibility apply to the skirt? Figure 11 explores some possibilities. While it's theoretically possible, the resulting design lines aren't commonly used, but feel free to use those design lines yourself if you wish to.
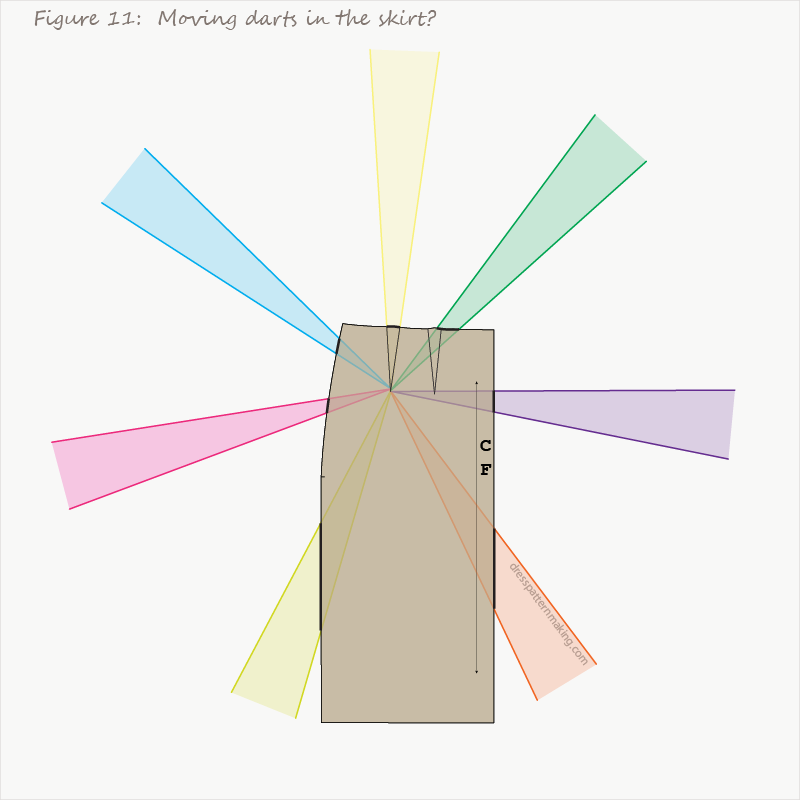
When considering dart placement, ask yourself: Does the new position make sense? How will it affect the garment’s appearance? Will it look unusual or impractical? In some cases, a design line might be a better alternative than simply moving a dart. While you technically can reposition a dart anywhere, that doesn’t always mean you should. Thoughtful placement is key to achieving a balanced design.
Darts in Other Blocks: Bodice Back and Sleeve
The same dart manipulation principles apply to other blocks, such as the Bodice Back, Sleeve, and Pants, but with limitations. In these cases, dart movement is less common than in the Bodice Front. Instead, shaping is often incorporated into garment features like yokes, which can provide a smoother design solution.
More Complex Dart Manipulation
The dart manipulation examples on this page focus on moving a dart from one edge of the block to another. Using this method, you can follow step-by-step instructions to create Styles 1–27:
More advanced dart manipulation techniques, such as Parallel Darts and Asymmetric Darts, require additional theory. These are covered in the Complex Dart Manipulation section.
Once you understand these concepts, you can follow along to create the remaining Styles 28–45 listed in the View Other Styles section.