Large-Bust Adjustment
In my block making instructions, you can create larger bust-cup sizes within the block-making process. This is in comparison to most block making instructions, where you create a block with a B-bust-cup, then (when finished), you make a Large Bust Adjustment and create a new block. This article is to show (or prove, if you like) that my instructions for drafting larger bust cups is actually the same thing as doing a Large Bust Adjustment. I then go on to also show that the drafting of the large bust cups needs to be based on the Upper Bust rather than the Bust measurement or it will not fit.
Please remember that when I talk about cup sizes, I am not talking about bra cup sizes. My bra cup size is F as there is 6 inches difference between my Under-Bust and Bust. My cup size for patternmaking purposes is D as there is 4 inches difference between my Upper Bust and Bust. See the article Bust Cup Sizes.
The Standard Way
The example block in these images is a Standard Size 12, with a Bust measurement of 44 inches. I am using Helen Joseph-Armstrong's instructions for creating the block, then doing the Large Bust Adjustment, as per her instructions, with this block. In this first image, the block that is created is a standard B-cup. The B-bust-cup is achieved by drawing a line (blue dashed line) to the left of the block-width line (red dashed line), and extending the bottom of the block out to that width (blue arrow). This produces a dart allowance that fits a B-bust-cup.
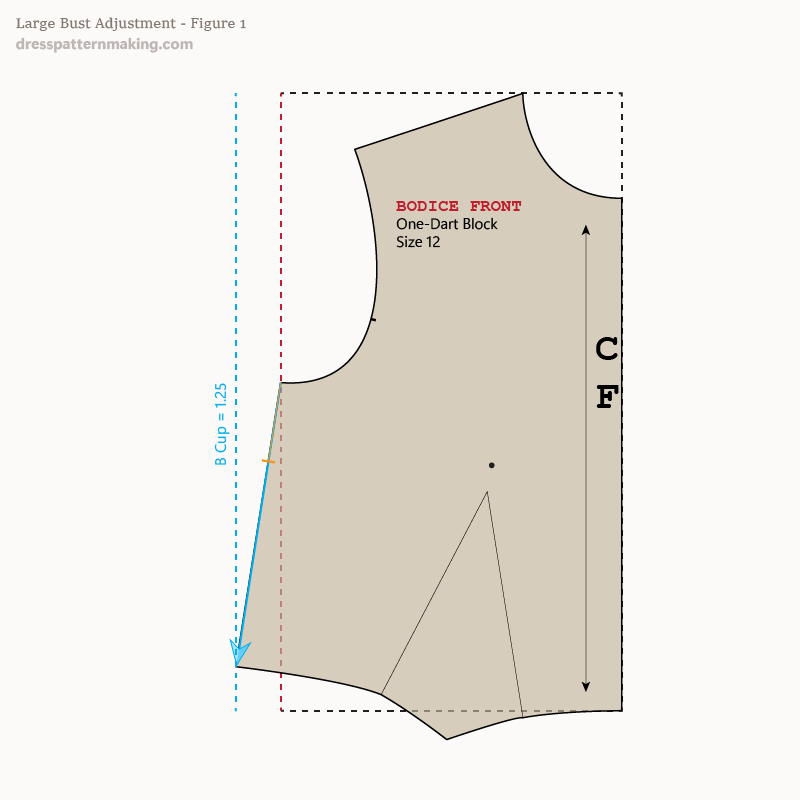
If it is unclear, have a look at the image below, where this dart allowance is not included.
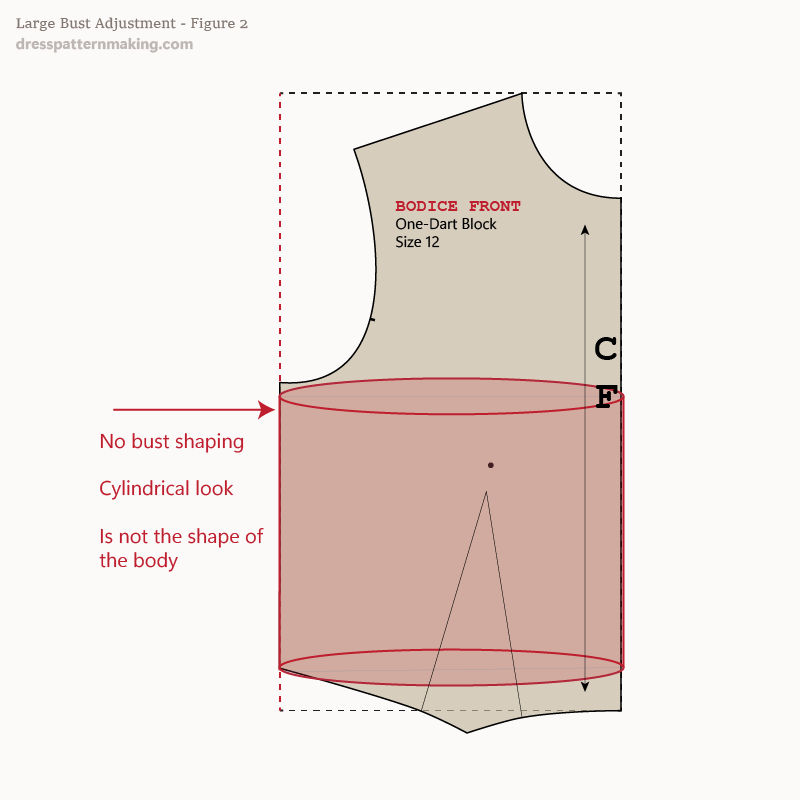
You should be able to see that this is not the shape of the female body. The bust requires a flare of fabric to accommodate its fullness, and then it is taken back in at the waist. In the image above it looks like the bodice is a cylinder, which is obviously is not.
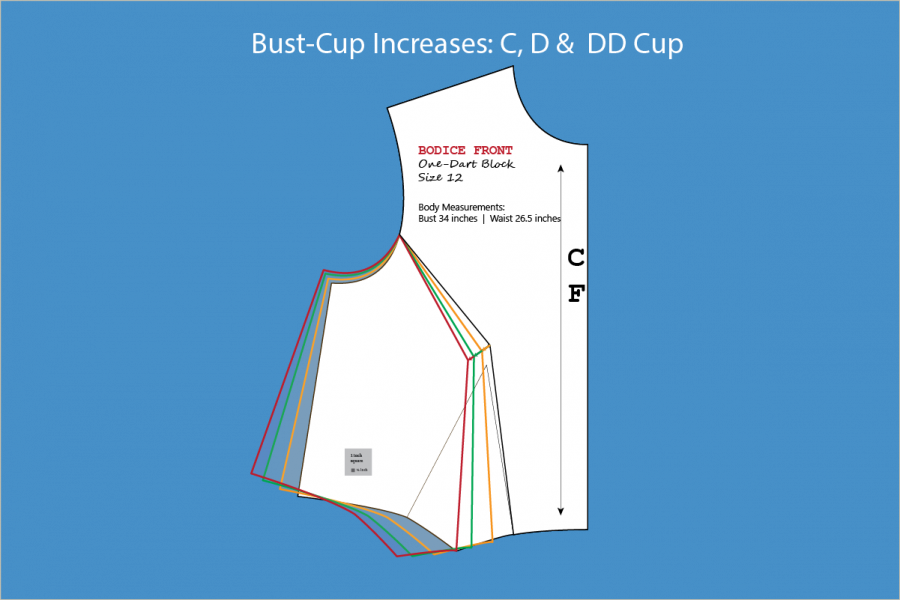
So let's get back to that block created with a B-Bust-Cup, we're going to cut & spread it to increase the darts to C-cup, D-cup and DD-cup. First I'll draw the line we'll spread it at, according to the directions in Joseph-Armstrong's book Patternmaking for Fashion Design, Fourth Edition. The dashed orange line is the line for cutting & spreading.
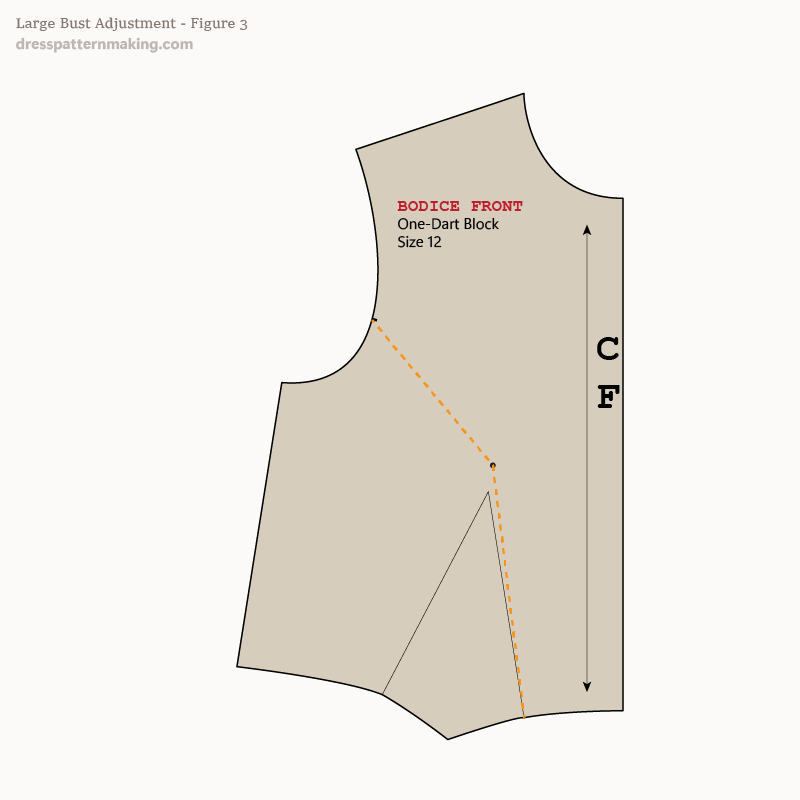
Now I will do the cut and spread separately for each of the Bust Cups, and then show them all on one image. The amount that this needs to be spread at the bust point is as follows for each Bust-Cup size:
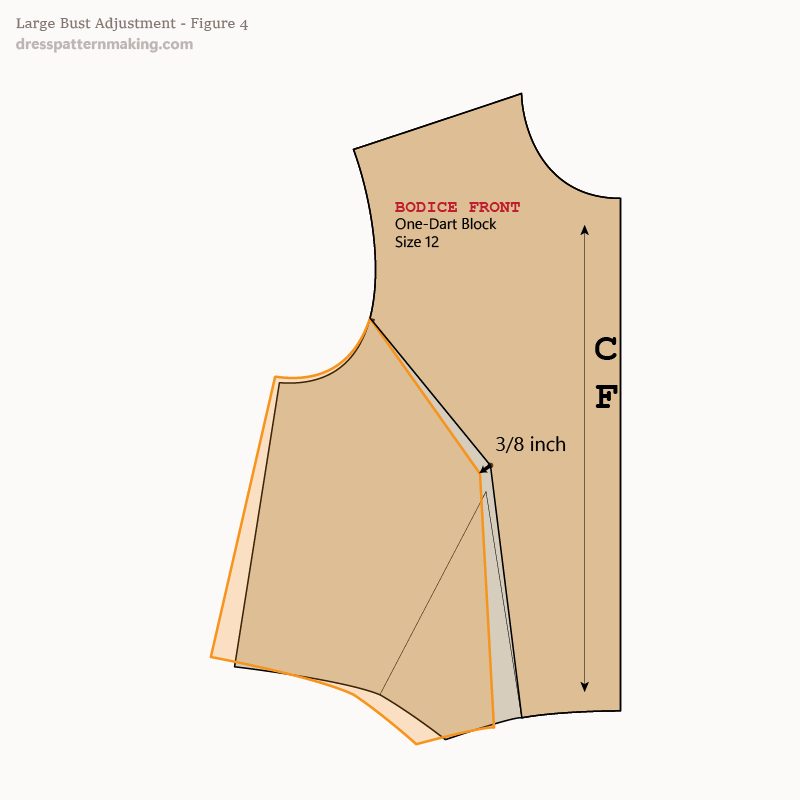
- C-Cup = 3/8 inch
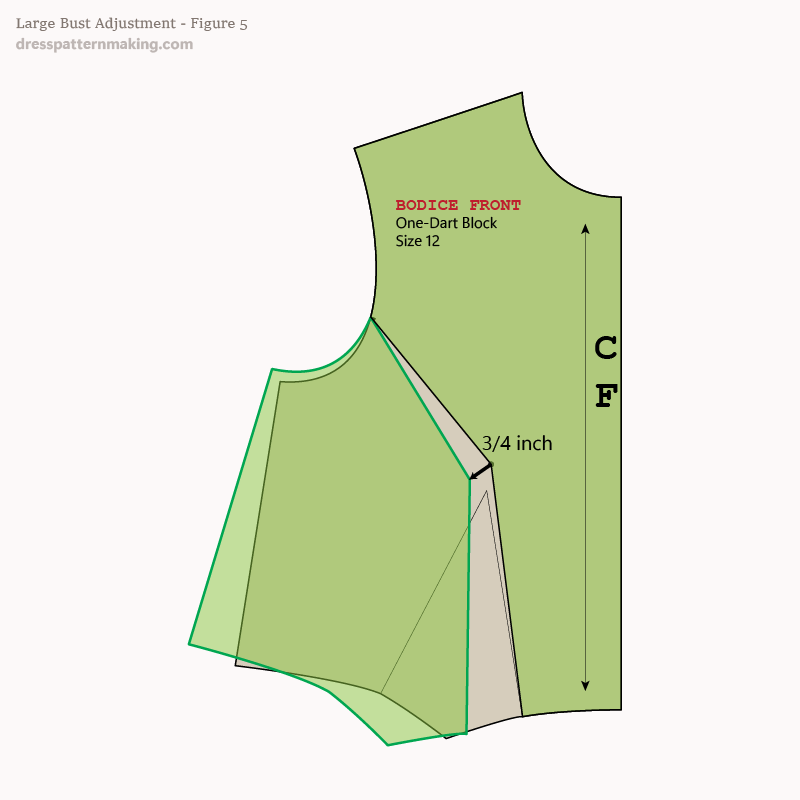
- D-Cup = 3/4 inch
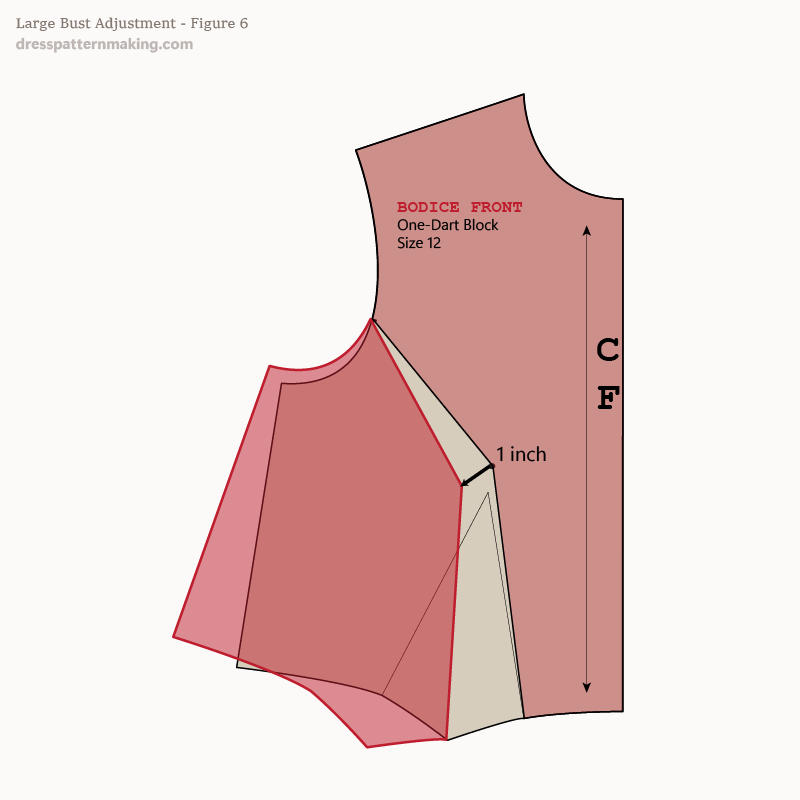
- DD-Cup = 1 inch
Large Bust-Adjustment C-Cup: 3/8 inch
Large Bust-Adjustment D-Cup: 3/4 inch
Large Bust-Adjustment DD-Cup: 1 inch
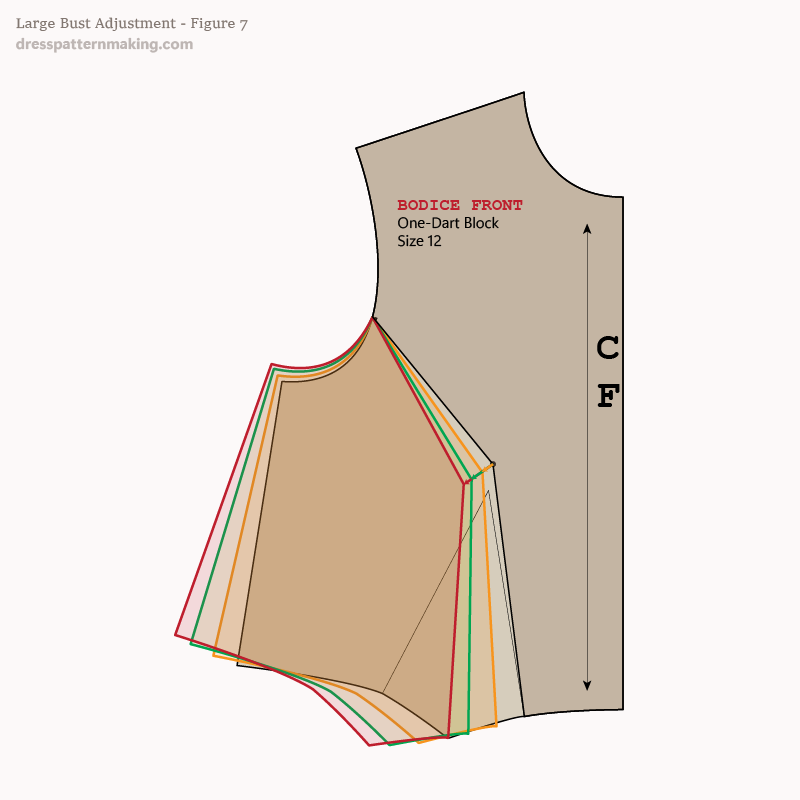
Large Bust-Adjustments: All shown together (B-cup, C-cup, D-cup & DD-cup)
Detour
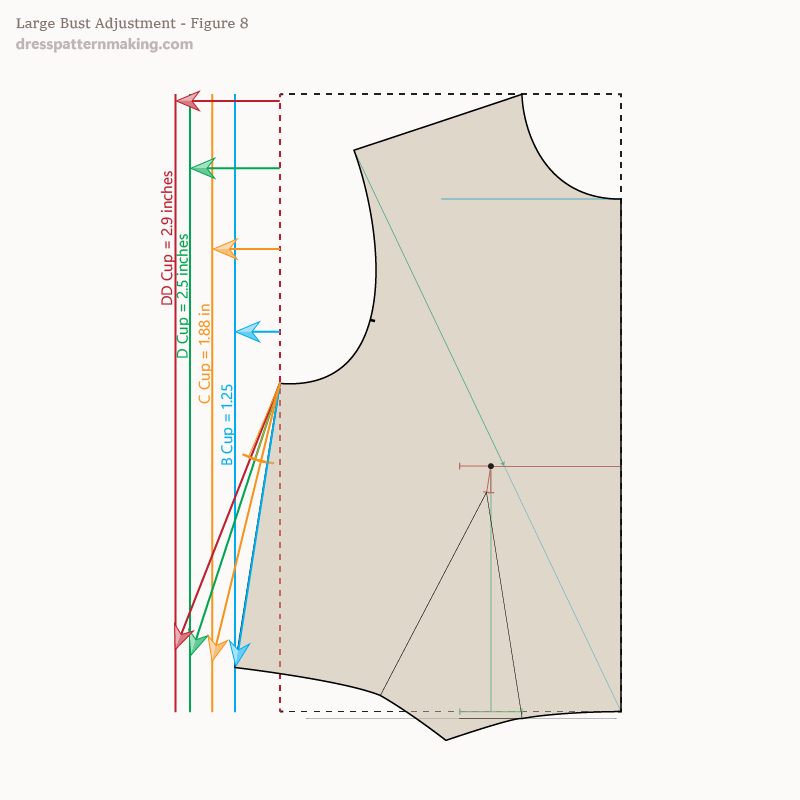
Now let's take a little detour. The following image is how, in my instructions, the bust cups are created within in the instructions (ie, you don't have to do it afterwards as in the images above). (Based on the Upper Bust of the block I used for creating the above images. I will cover that later.)
Comparison
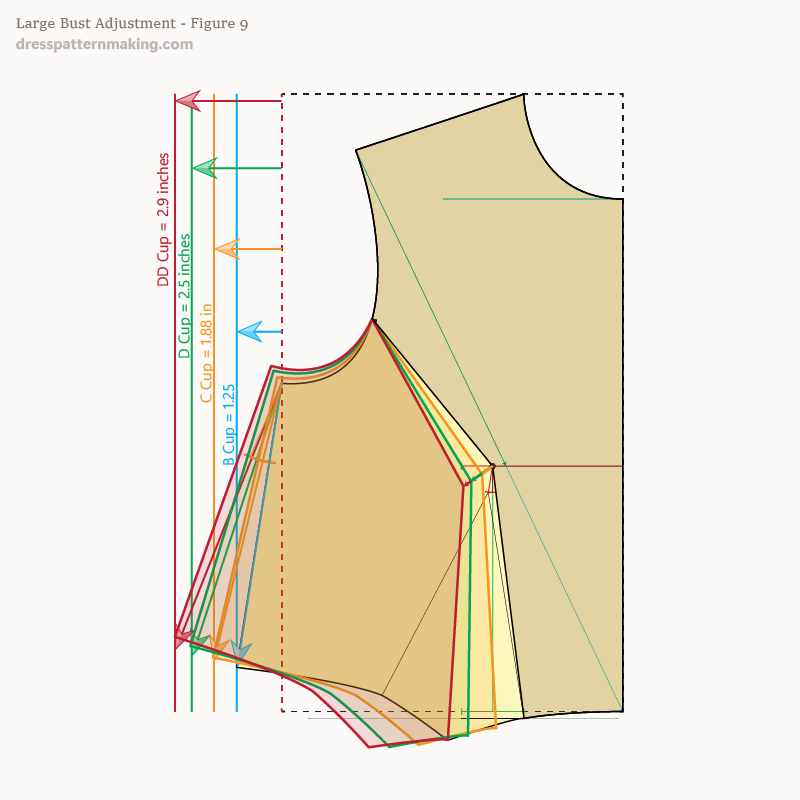
Now I have superimposed my Block with the Dart Cup lines, onto the outcome of doing the cut & spread according to the increases that Joseph-Armstrong gives. (Note that these Bust-Cup increases are similar to those in Vogue and Simplicity Patterns, and I will cover that a bit further down). Given that it is a bit busy with all the lines, I will show them separately in the following images.
Individual Comparison: C-Cup
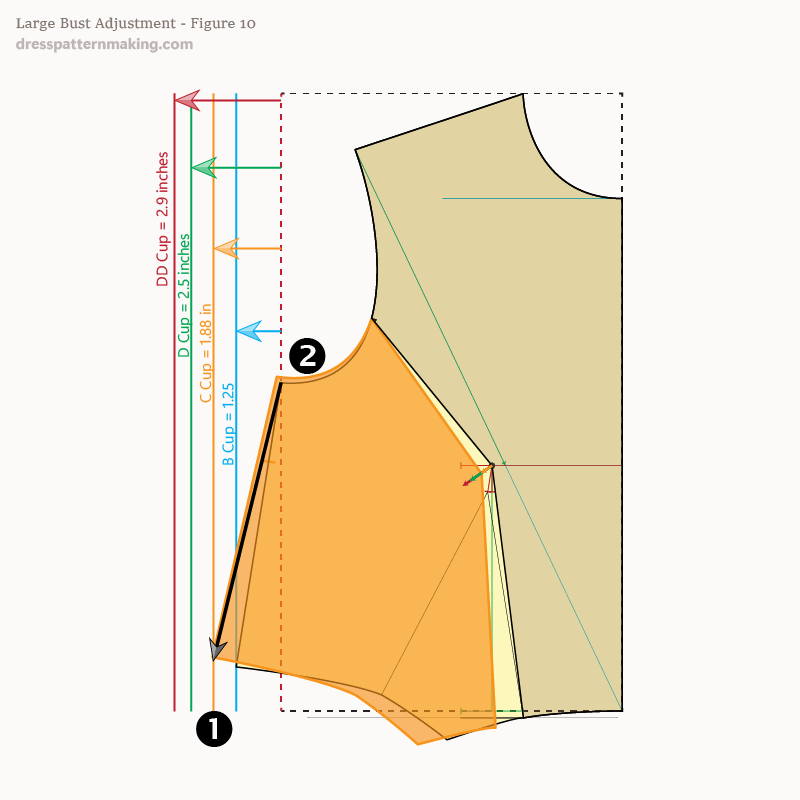
The image below shows that the C-cup adjustment ends up at the C-cup line as per my instructions (marked No.1.). There is a change in the armhole (marked by a No.2) which I'll cover after showing that all of these Bust-Cup adjustments achieve the same darts as my bust-cup lines in my instructions.
Individual Comparison: D-Cup
The image below shows that the D-cup adjustment ends up at the D-cup line as per my instructions (marked No.1.). There is a change in the armhole (marked by a No.2) which I'll cover after showing that all of these Bust-Cup adjustments achieve the same darts as my bust-cup lines in my instructions.
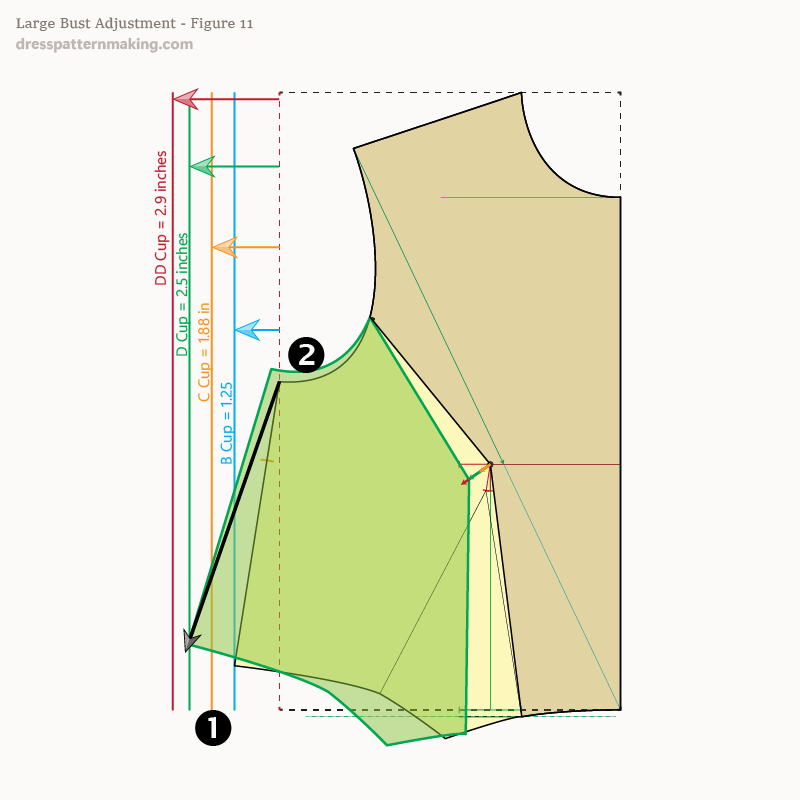
Individual Comparison: DD-Cup
The image below shows the DD-cup adjustment ends up at the DD-cup line as per my instructions (marked No.1.). There is a change in the armhole (marked by a No.2) which I'll cover after showing that all of these Bust-Cup adjustments achieve the same darts as my bust-cup lines in my instructions.
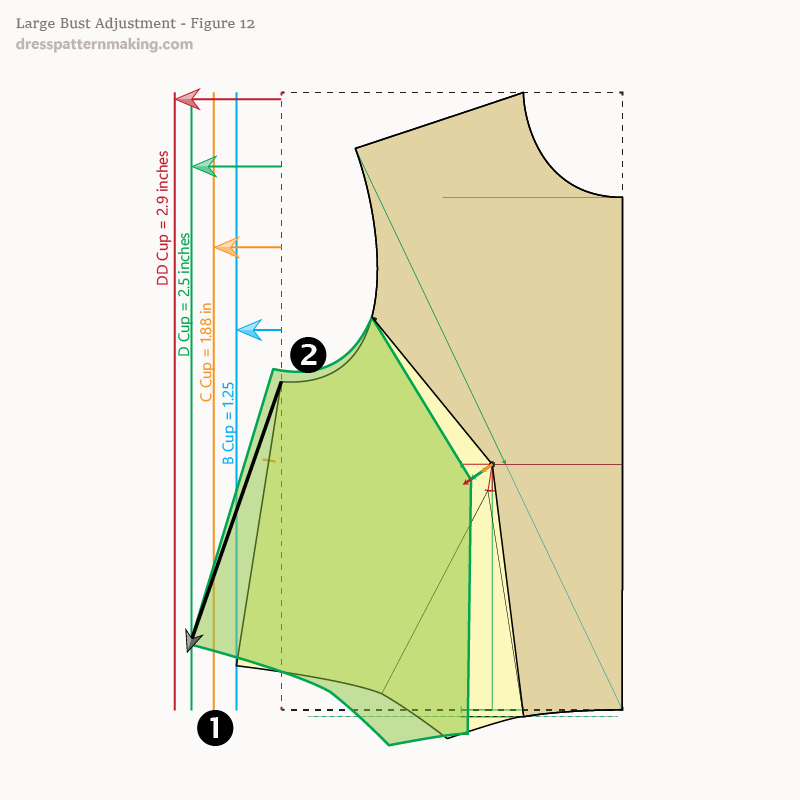
Issues
Now I've shown that the way my instructions create the bust-dart, works out the same, at least as far as the Dart Width is concerned.
BUT ... there are another two issues that need to be covered:
- Besides the bust-cup dart increase, the Large Bust Adjustment also resulted in changes in the armhole area, specifically:
- the armhole moved up, quite significantly for the larger sizes
- there was also an increase in the width of the block
- Although I didn't mention it and it isn't seen in the above images, Joseph-Armstrong says that a corresponding increase to the Center Front Length is necessary for each Bust Increase.
(A) Changes to Armhole
If we have created the block to our measurements already, the changes to the armhole are unnecessary. If you have (for example) a D-bust cup, and create a block using instructions for a B-cup, you will end up with too much ease in the Upper Bust anyway (an additional 2 inches ease). Making this armhole change, which increases the width of the block further, will be compounding the problem. If you have created the block to your measurements, you will have the correct armhole depth. Making this Large Bust Adjustment to that block will mean you will be unnecessarily raising your Front Armhole Depth.
(B) Increase Center Front Length
As per above, if you have created this block using your Center Front Length, following the Large Bust Adjustment instructions, which say you should increase the Center Front Length, means your Center Front Length will end up being too long.
Another (VERY IMPORTANT!) Thing
Must use the Upper Bust
In my instructions, I use the Upper Bust as the width of the Bodice Block, rather than the Bust Measurement. I have covered this in another article, and won't cover all that again here. I do want to mention that if you create a Large Bust Adjustment as shown in the images above, using a block you created to a B-bust-cup, and you are a D-bust-cup, that Large Bust Adjustment will not work out at all. That is because there will be too much ease in the Upper Bust for you to begin with. Doing a LBA on top of that extra ease... just won't work out. The three articles to read to understand this (especially in conjunction with this article) are:
Final Point
I mentioned Vogue & Simplicity Patterns bust-cup sizes further up in the article. I just wanted to mention that I checked the bust-cup increases given by Joseph-Armstrong (the 3/8 inch for C-Cup, 3/4 inch for D-Cup, and 1 inch for DD-cup), against the Vogue & Simplicity Fitting Shells. The measurements from Joseph-Armstrong's book and the Vogue & Simplicity Patterns are comparable. The slight difference (Vogue & Simplicity Blocks slightly less than these) can be accounted for by the fact that the Vogue & Simplicity Fitting Shells have more Upper Bust ease. If they had 12cm ease rather than 15cm ease, the bust-cup measurements would be the same.
Summary
- You can create the correct bust-cup size within the block making instructions. It is not necessary to create a B-cup dart, then do a Large Bust Adjustment afterwards.
- Creating the correct bust-cup size in my instructions have been shown above to result in the same dart size as doing it with a Large Bust Adjustment afterwards.
Not covered in this article, but is important for you to realize this by reading the three articles mentioned above:
- Creating the correct bust-cup size to create a well-fitting block, you need to start with your Upper Bust measurement, not your Bust. Otherwise, you will end up will end up with too much ease in the Upper Bust (armhole/sleeve) area.
- Creating a Large Bust Adjustment on top of a block created for a B-cup figure will result in numerous problems (too large in underarm, too long in Center Front, armhole incorrect....

