Complex Dart Manipulation

Preliminary Reading: Manipulating Darts and Manipulating Darts Bodice Front.
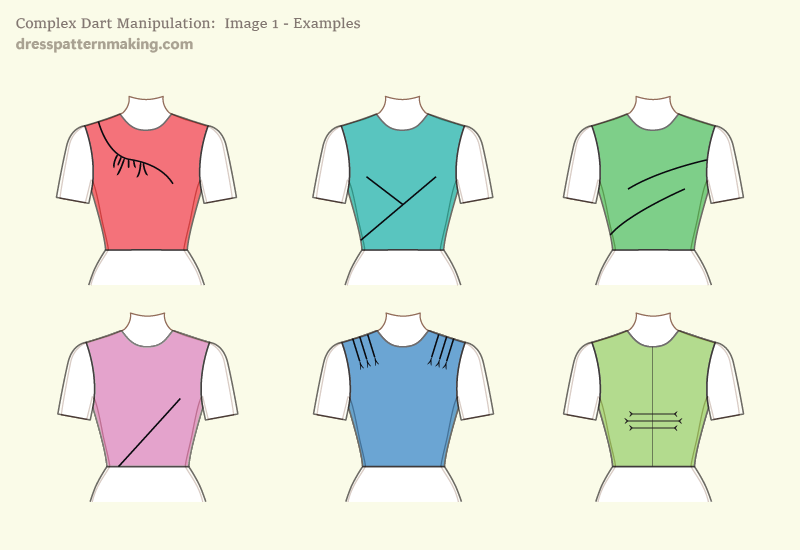
Sometimes creating a style a little harder than just moving the dart from one place to another around the block. Some styles may take some problem solving skills, some may require a two-step process (i.e. pivoting the dart into another position, then doing some cutting and spreading). The more complex dart manipulations include:
- Parallel Darts (see Style 27 and Style 28 for examples)
- Dart Clusters (see Style 33 for an example)
- Asymmetric Darts (see Style 40 for an example)
- Intersecting Darts (see Style 43 for an example
- Graduated & Radiating Darts (see Style 44 for an example)
The some additional points that will help you understand for some the dart manipulations listed above are:
Using Pivoting Method to Create Parallel Darts
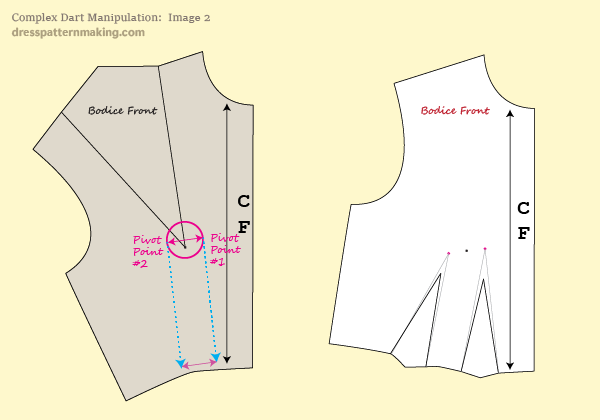
Note: The cut-and-spread method is generally easier to understand and apply, but more time consuming than pivoting. Parallel darts, by their very nature, cannot have both darts pointing towards the Bust Point. This would result in an upside-V shape ( Λ ) rather than two parallel lines. Therefore, when pivoting to create a pattern with parallel darts, you can't use the Bust Point if you want to end up with parallel lines. In the image below, parallel darts in the waist are drawn on a block that has the dart in the shoulder. You should be able to 'see' that if both of those lines ended up at the Bust Point, they would not be parallel. The pattern on the right is created by using the two pivot points to the right and to the left of the BP to create those parallel darts. It is easier to understand this in practice - follow the step-by-step instructions in Style 27 to create the parallel darts using pivot points other than the BP.

Guidelines for working with darts that do not point to the Bust Point
The dart in the bodice points towards the fullest part of the bust. When you have darts that do not point towards the bust, there are a few rules that you should follow to avoid distortion:
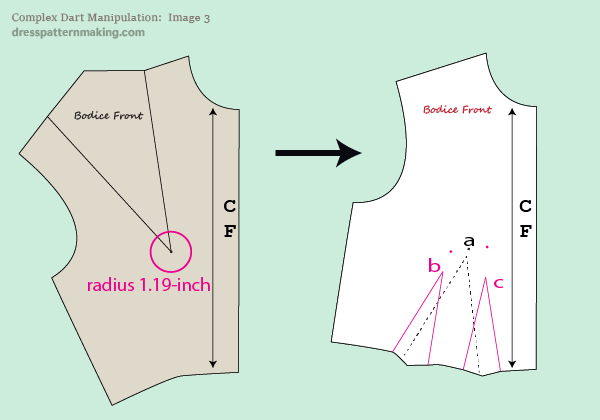
- For parallel darts, pivot points should be no further away than 1.19-inches from the Bust Point.
- The further away the dart is from the dart point (to the right or to the left) the shorter the dart should be.
- The further away the dart is from the Bust Point (to the right or to the left), the narrower the dart should be (the value of the dart needs to be smaller).
See the image below for examples of these three guides:
- Looking at the Block on the left: all pivot points should fall within the circle shown. The circle has a radius of 1.19 inches, this means any pivot point will be within 1.19 inches of the BP.
- Looking at the pattern on the right: the original dart is shown with black dashed lines. The dart points ends about .68-inch before the BP. Notice that two parallel darts (shown in pink) are quite a bit shorter than this.
- Looking at the pattern on the right: the two darts are half the width of the original dart; you could not put the full value of the waist dart into dart B or C.


