Introduction and Overview of Patternmaking
In this article, I will give a very basic overview of the process of making a pattern and the garment in the fashion industry, the workflow and process, and the knowledge that a professional patternmaker in the fashion industry would need in order to make patterns. Of course, for home sewers making their own pattern, the process would not always be the same.
So how do you even begin to make a pattern?
First, let me be clear that that (a) I have never worked in the garment industry, and (b) different garment manufacturers have different processes and may do things slightly differently. This is just a general overview of the processes and practices for those who are brand new to patternmaking. The home-sewer-patternmaker can take out what they need and leave the rest.
The Professional Patternmaker
A professional patternmaker in the fashion industry has a very particular job, which is to make patterns. They do not (usually) create the design, they do not cut the garment out, or sew it up. They receive information about a pattern and they draft the pattern following the Technical Specification sheet they are given. That techinical specification sheet will generally have a flat drawing and also further detailed information that may not be obvious from the drawing; e.g. The skirt may 'look' knee length, but the technicial specifications will probably specify an length in cm/inches.
Creating a New Garment Design
The process of the creation of a new garment design, from start to finish, is something like this (very simplified);
- The designer draws the garment design; a stylized drawing, a concept.
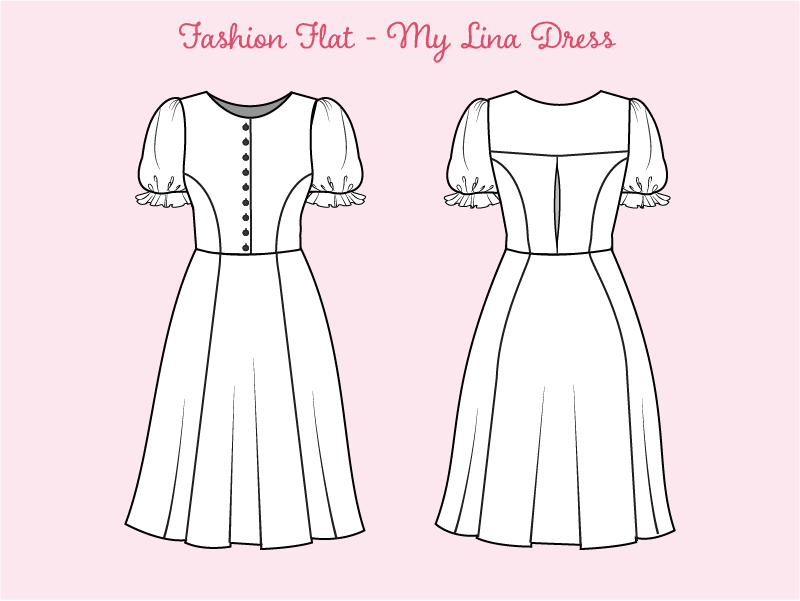
- Someone else creates a Technical Drawing, which is called a (Fashion) Flat, from the stylized drawing. This 'Flat' is a flat 3D representation of the garment, which clearly shows the design lines and details such as buttons, buttons, zips, etc. This flat drawing is accompanied by a Specification Sheet which will detail things like the type of fabric being used, the hem width, the number of buttons, the length of the zip, etc, if there is trim, lining or facing, etc.
- When patternmaker look at the Flat drawing, they can 'see' how many pattern pieces are needed to create the garment. Any information not obvious from the Flat will be found in the Specification Sheet (e.g. internal facings or finishes are not so obvious from a Flat).
- The patternmaker creates one pattern piece at a time, by
- using the appropriate block/s,
- referring to the Specification Sheet and Flat, and
- applying the Principles of Patternmaking
- All of the pattern pieces are created, notched so that the necessary information is on the pieces to join them together, and checked against each other for length and flow-through, etc. Each pattern piece is labelled and has cutting instructions noted; grainline is marked on each pattern piece. If interfacing is needed, it is noted on the pattern pieces.
- Seam allowance is added to each pattern piece, according to the guidelines of that particular company
- The patternmaker will complete a form with all the details of the pattern (maybe the same Specification Sheet, maybe another Pattern Chart) that gives all the details of the pattern; number of pattern pieces, lining, interfacing, etc.
- Someone else cuts a test garment (called a Sample)
- Someone else sews up the Sample
- The sample is put on a Fit Model to check the fit
- Changes are made to the toile if necessary
- The pattern pieces are altered if necessary
- When/if the pattern is deemed successful, the pattern pieces are graded up/down to create other sizes
Next, we will look at one aspect of what is covered above - Sketches and Flats.
Sketches & Flats
There are two types of drawings used in the fashion industry, both used for very different purposes; the Design and the Fashion Flat. As a home-sewer patternmaker, you don't need to be able to the first, but it is useful to draw what a technical illustration, even if only very roughly.
The Design: A Fashion Sketch
In the Fashion Industry, a Designer (not the patternmaker) comes up with a design. The fashion sketch is drawn on a stylized figure called a croquis; while you may be able to see the design lines on the croquis, the focus at this stage is the style and hang of the garment, the pattern on the fabric, etc. Usually these are hand-drawn graphics that are very artistic. The croquis generally look nothing like the real human figure, for example the legs may be extremely long and the waist non-existent. This design is the concept. It will be in color and include the fabric design to be used.
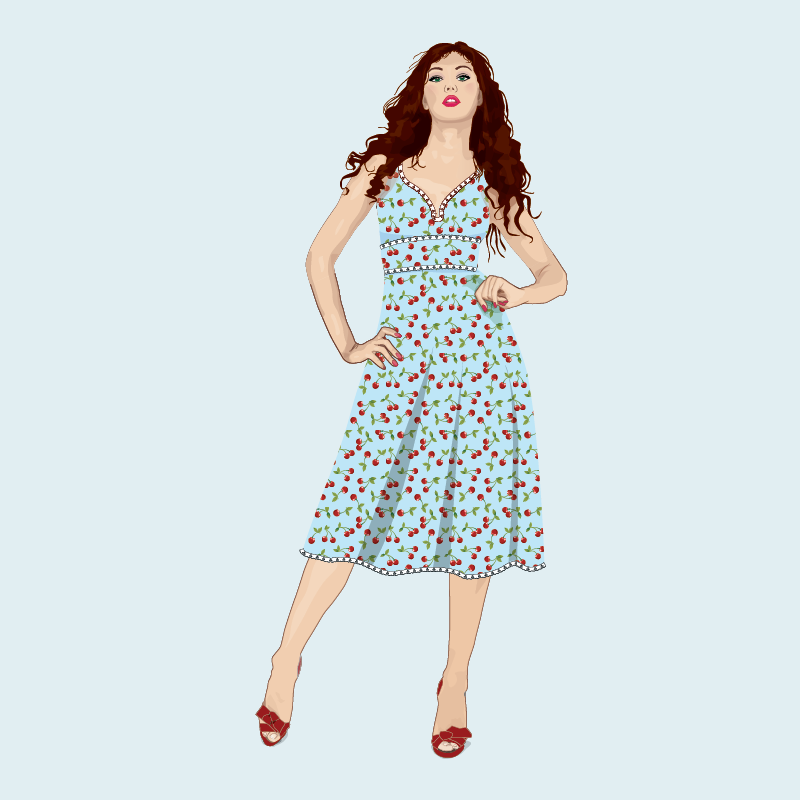
Above is an example an example of croquis that I used to use. I created my croquis from photographic images so they look human-like, so don't look like the very artistic and stylized croquis that are used in the industry. If you want to see exxamples of commerical croquis used in the fashion industry, look at the drawings on the front of commercial patterns envelopes (on the back of the pattern envelope you will find the flat), or do a Google search on Fashion Sketches.
As a home sewer making your own designs, you do not need to be able to draw fashion sketches. You do need to be able to draw an idea of what you are wanting to create, but what you do need to do is draw some kind of technical illustration, which is called a Fashion Flat, and will be covered next.
The Technical Drawing: Pattern Flats
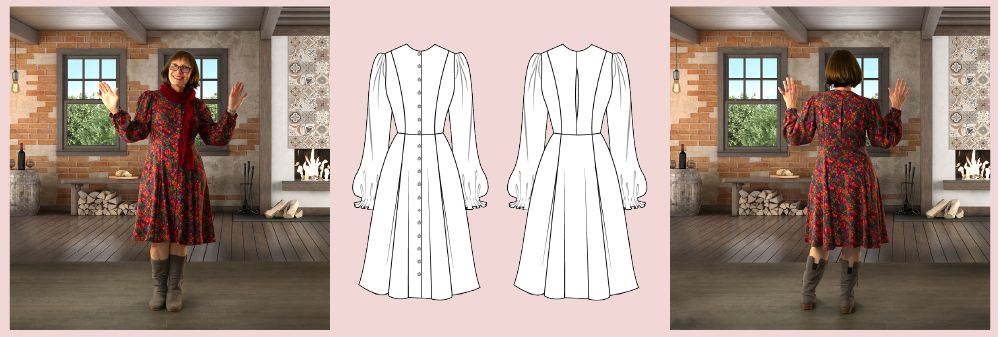
While the fashion croquis sketch is the concept for the garment design, it isn't what the patternmaker refers to when making the pattern. The patternmaker needs a technical illustration, which is called a Flat, to make a pattern. Along with the flat there would be a Specification Sheet which would give detail that may not be obvious from the Flat. The Flat will be in scale, have a front and back view of the garment, and contain details such as dart lines, dart equivalents, design lines, pockets, buttons, zips etc. for
There is enough detail in the technical flats for the patternmaker to be able to make a pattern. The specification sheet gives detail that you can't see from the drawing, for example, you cannot tell by a drawing the exact fabric, how wide the hem is, what if any, lining, facing and interfacing is required, the number of buttons, the length of the zip. etc. The patternmaking does not make these kinds of decisions, the patternmaker implements the design that is given. The patternmaker needs to be able to read the flat image, together with the specification sheet, and create a pattern from that information. The Flat is not usually colored, or have the fabric pattern included. A home sewer making their own patterns would need to determine all this information for themselves, and while it is not essential to create a Specification Sheet, you need to have a clear idea of exactly what you need for your garment.
At the minimum you should have some kind of technical drawing that shows the design lines front and back, and notes about the detail that may not be evident from the drawing. The main difference between a patternmaker in the industry just makes patterns; someone else creates the design and makes decisions about fabric and detail, someone else does the cutting, and someone else does the sewing. This means the home sewer-patternmaker has it more difficult in some ways, but easier in others. You are not relying on others, but you need to make sure you can rely on yourself. Don't assume that having an idea or a concept in your head is good enough. Don't assume you'll remember next week what you have decided to do today. Otherwise you may find yourself coming back to pattern you started making last week and can't remember exactly what you had decided to do.
Understanding or Reading a Flat
So, the very first step in creating a pattern is to have a flat which shows the design of the garment, and you need to be able to read or understand it. If you are a home sewer learning patternmaking, you will also need to draw it first. You don't need to drawing to be artistic and you don't have to be good at drawing, you just need to indicate all the stylelines that will tell you what pattern pieces you will need to create.
Reading a Flat
Pattern-makers are able to recognize the following information in Technical Flats:
- darts
- dart equivalents (gathers, pleats, tucks)
- design lines
- information about added fullness and contouring
- information about garment parts such as pockets and collars, and
- details such as stitching and notions.
However, the professional patternmaker will also be given a Specification sheet which has a lot more information on it. For example, the flat may show that a skirt has flare, but it cannot tell you exactly how many inches the hem width is. The specification sheet will give this information. Firstly we will look at how to recognize some important information in the Flat, in later pages we will look at how this information is applied to make patterns. Of course we (the home-sewer-patternmaker) will need to draw our own design, make our own specification sheet and draw our own flat, so we need to draw something that we can read. Note that Flats are usually not colored; in my examples I do use color.
Darts
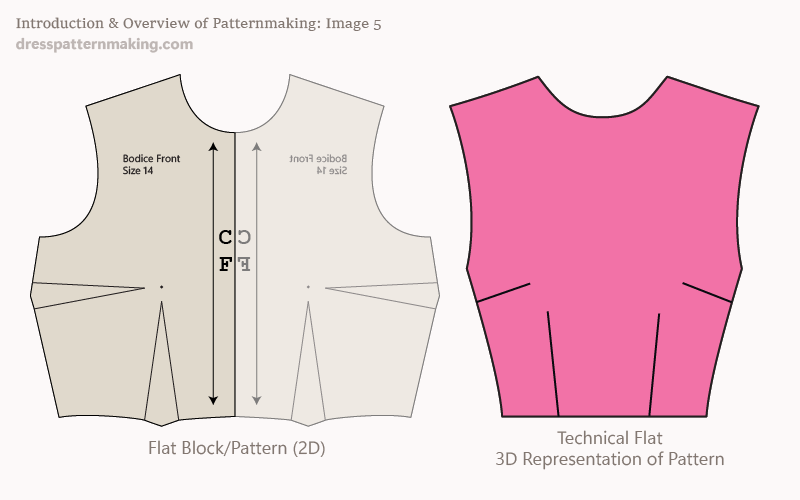
First note the difference between a dart on a flat, two-dimensional Block or Pattern, and a dart on a Technical Flat, which is a three dimensional representation of the flat block/pattern - see Image 5.
Recognizing Darts
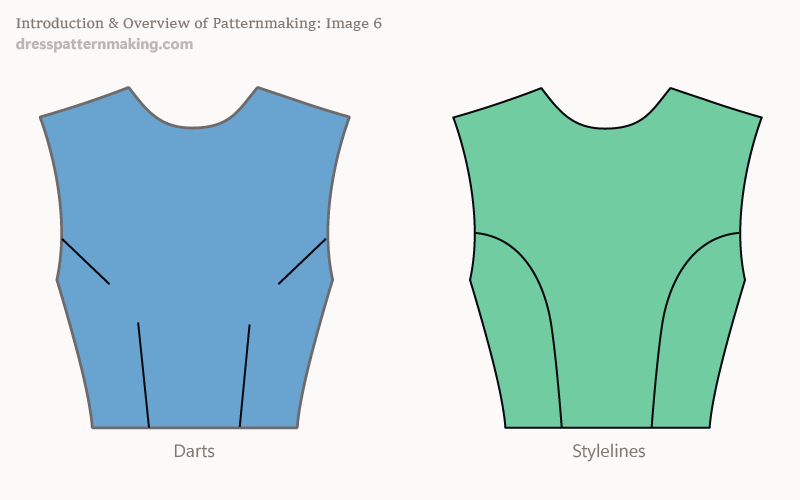
Darts are lines that end somewhere inside the flat, they do NOT cross from side to side. In Image 6, note the difference between darts (left) and a style line (right).
Darts can be curved
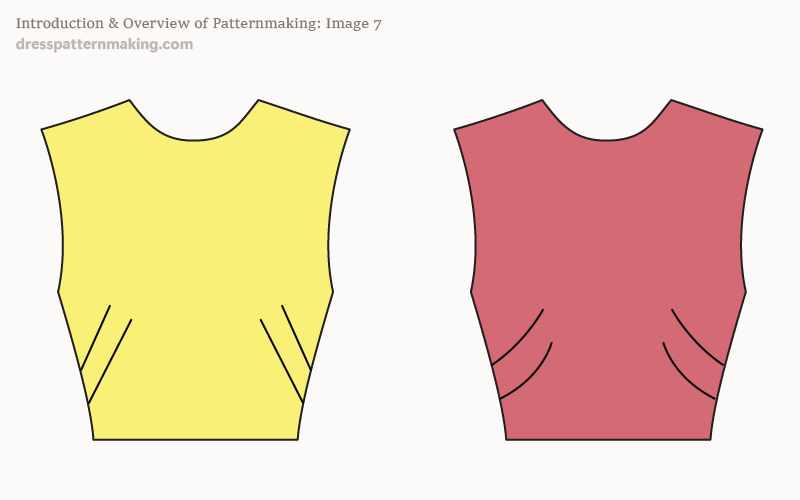
Darts do not have to be straight lines, in Image 7 below the two Flats are basically the same - they both have two darts except one has straight dart lines, the other curved.
Stylelines or Design Lines
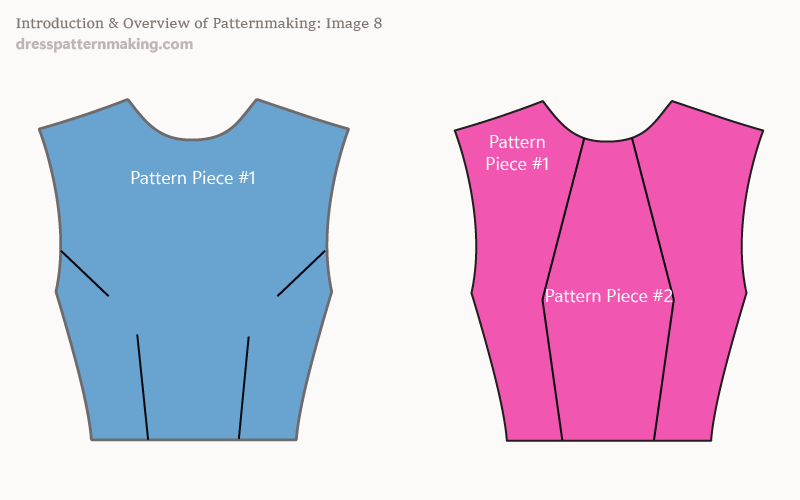
Stylelines or design-lines cross the flat from seam-line to seam-line, and the line designates separation; i.e. difference pattern pieces. In Image 8, the bodice flat on the left (blue) has only one pattern piece. The flat on the right would require two pattern pieces (the side pieces are the same pattern piece).
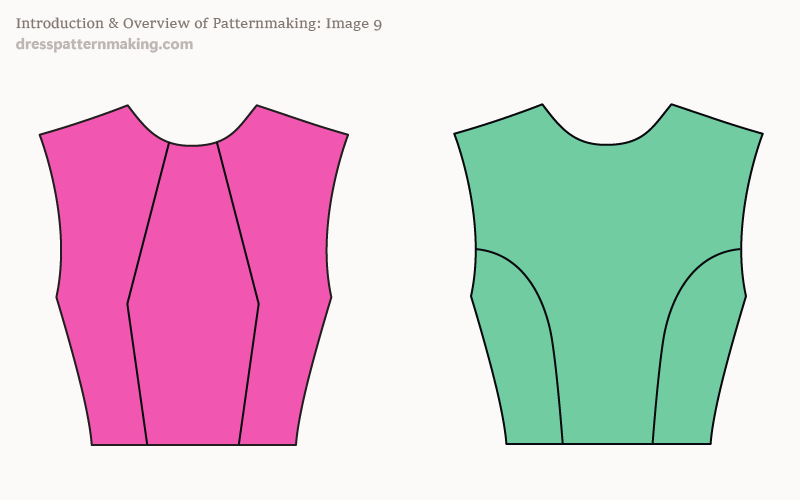
Often, but not always, darts are in incorporated into design lines. In Image 9 both of these style lines have the full value of the bodice darts incorporated into the design line.
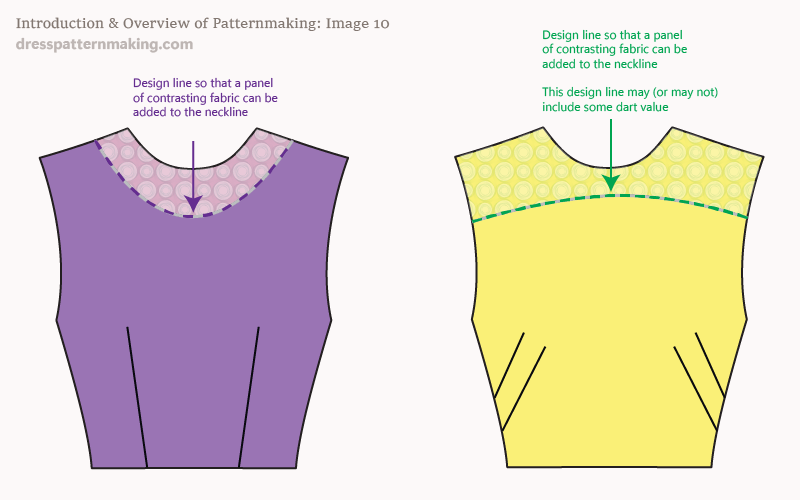
In Image 10, the design line (shown by a pink line) in the left (purple) flat does not have any dart involvement, while the yoke in the yellow flat may or may not incorporate an armhole gape dart.
Dart Equivalents
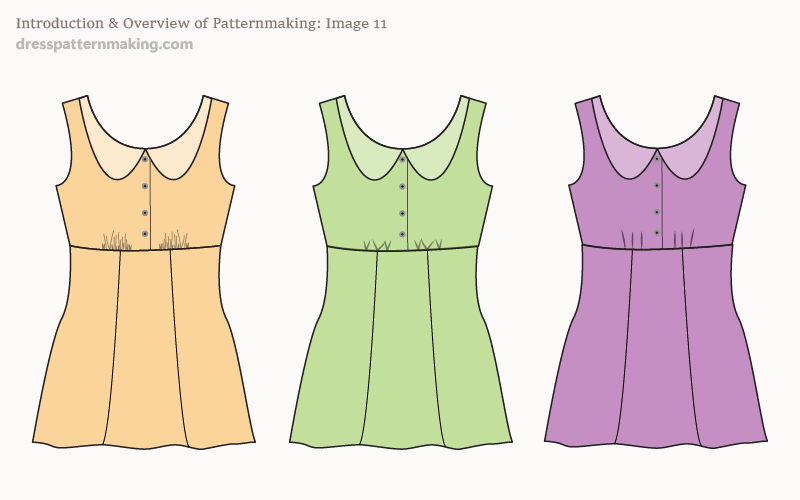
Dart equivalents include gathers, pleats and tucks, as in Image 11 below. (Style-lines are also Dart Equivalents).
Added Fullness
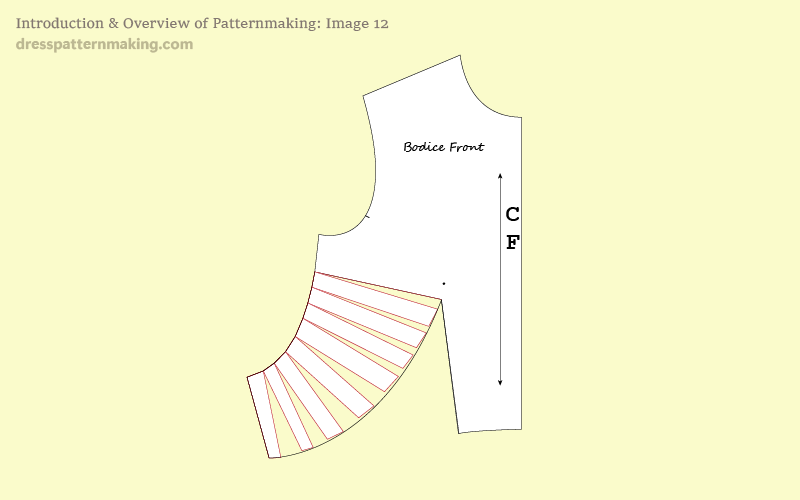
Generally Added Fullness with be indicated by gathers, flares, pleats and tucks. In the industry, while the Flat will to some extent give an indication of the amount of fullness that needs to be added, this will often be determined by the specification sheet. If making your own patterns, you might draw something with flares/gathers, but you will need to do some testing to see exactly how much fullness to add in order to get the look you want. Looking at shop purchased garments can be very useful for this; for example, measure the skirt hem width of different dresses/skirts that you like, and see what kind of fullness you need to achieve certain looks. Note the comparison in Image 11 where gathers, pleats and tucks indicate dart equivalents, and Figure 12 they indicate Added Fullness (as well as dart equivalents, as there are no darts).
Contouring
When armholes are cutaway and/or necklines are lowered, contouring will be required. The patternmaker will know what changes to make to the block to make the garment fit better in the armhole and neckline.
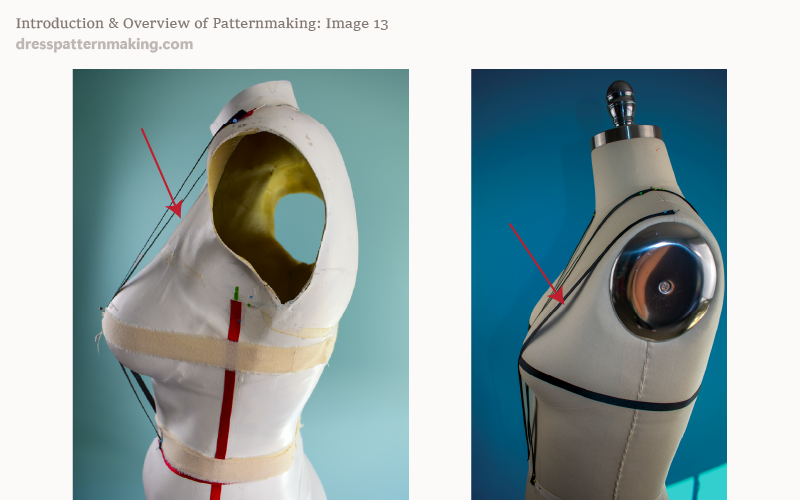
The line of the basic pattern goes from the neckline over the bust and down to the waist. As you can see in Image 13, there can be a lot of space in between the fabric and the chest and the fabric under the bust and the torso. (Image the white tape is the fabric line). This means when creating garments with low necklines (for example), adjustments need to be made so that the garment doesn't gape in the neck. Patternmakers know when contouring is required and how to made the necessary adjustments. You will need to read and understand the section on Contouring to know when contouring applies and how to make the changes to create the pattern.
There are Standard Contouring amounts that are used in the fashion industry but if you are making your own patterns you would be better off working out your own custom contouring. Image 13 shows the larrge differences that may be found between a Standard Figure (the dressmaker's dummy) and Non-Standard Figures (my body cast).
Parts of Garments
Parts of garments include collars, sleeves, pockets, plackets, etc. These are fairly easy to recognize on the flat, and all the detail for them will be noted in the Specification Sheet. A professional patternmaker would have learned over time how to to make these garment parts; e.g. how much to overlap the blocks at the shoulder when making collars, etc. This would be a case of learning on the job and referring to textbooks. In some cases, for example creating a puffed sleeve, it is just a case of applying a principle (Added Fullness), but in other cases it is not so obvious. Again, a patternmaker learns this over time. For the home-sewer-patternmaker, creating the garment parts are not so obvious the first time around. Armed with the knowledge of manipulating darts, adding fullness and contouring doesn't necessarily give you all the knowledge you need to create things like shawl collars, etc. That means while you are learning to make patterns and you want to make a design with a different collar or sleeve (etc), you will need to look up how to best make those garment parts. While you could in some cases work this out by yourself, the problem is that you don't know what you don't know... and you may not end up with an ideal sleeve/pocket/collar. There are some things that you learn over time, doing it again and again. The same applies for anything that you learn.
Stitching & Notions
Fashion flats will contain detail such as stitches, ruffles, lace, buttons, rivets, sequins, fur trim, zippers, belt loops etc. They can include intricate detail, for example for a zipper they will show the zipper stop, slide, pull tape and teeth. If you are a home sewer and can't draw at all, this level of detail isn't needed for your technical drawing. However, you should note these items down on the flat in writing if nothing else. Never assume that you will remember in a week what you were thinking of today; write everything down.
Dart Equivalents
In the previous page we mentioned Dart Equivalents, and showed that gathers, pleats and tucks fell into this category. What does "Dart Equivalent" mean? Darts are used to create shaping over the contours of the body. The nature of a dart means that it finishes somewhere within the inside of the garment piece in a point. Dart Equivalents use the value of the dart in other ways to create shaping without ending up with a dart point. Dart equivalents are:
- gathers
- pleats
- tucks
- design lines
In Image 14 below, the dress to the left uses darts to do the shaping, the dress to the right has a princess styleline which is a dart equivalent - this means that the dart has been incorporate into the princess styleline. The shaping is the same on both of these garments, but the dart has been substituted by the design line. (In this case the design has changed a little as the dress to the left has a waist seam while the princess line dress does not).
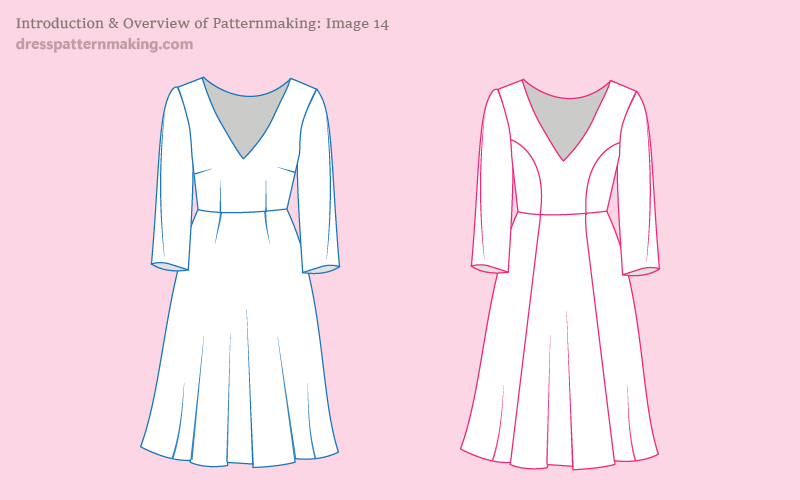
Any dart can be substituted with gathers, tucks or pleats, but substituting a dart with a design line is a little more complex; the design line must go from one edge of the pattern piece to the other and go near or through the Bust Point. Professional patternmakers need to know read dart equivalences from a flat (though they will also have a specification sheet that will specify those dart equivalences), know how to create that dart equivalent on the pattern from the working block, and how to correctly mark dart equivalents on the pattern pieces (e.g. what a pleat looks like on a pattern as opposed to a dart). Professional patternmakers need to create patterns that other people will use, and as those other people need to be able to read the pattern in order to create the garment correctly, they need to be very precise with how the patterns are marked. Of course as a home-sewer-patternmaker, you don't have other people to worry about, but it still helps to do things in a logical and consistent manner so that when you come back months later you can read your own pattern.
Creating the Pattern
So the patternmaker knows how to read a flat and refers to the Flat AND the Specification sheet for all the details of the garment. How does she then go about creating, or using patternmaking terminology, drafting the pattern?
The patternmaker starts with a basic pattern, a Block, to draft other patterns. Fashion houses would have a library of blocks, and the patternmaker would use the one that makes the most sense, and would save the most work for the particular style in question. The general workflow would be something like:
- Determine which block is the most suitable for creating the pattern
- Determine how many pattern pieces the design requires
- Draw the design on the working block
- Create the pattern pieces one at a time by applying the principles and other knowledge
Example
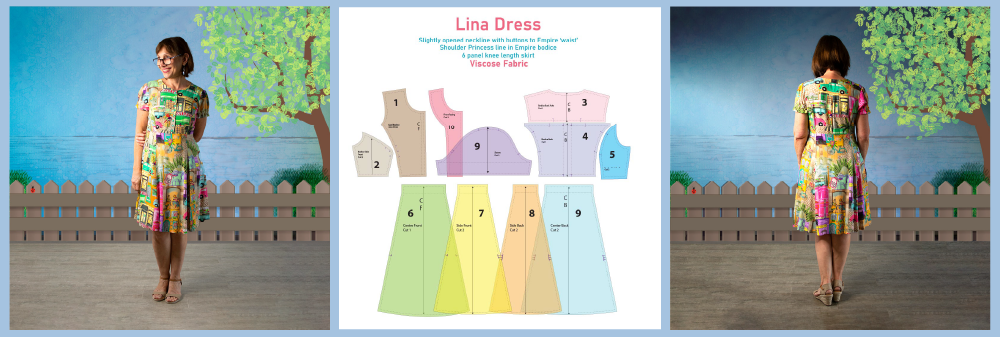
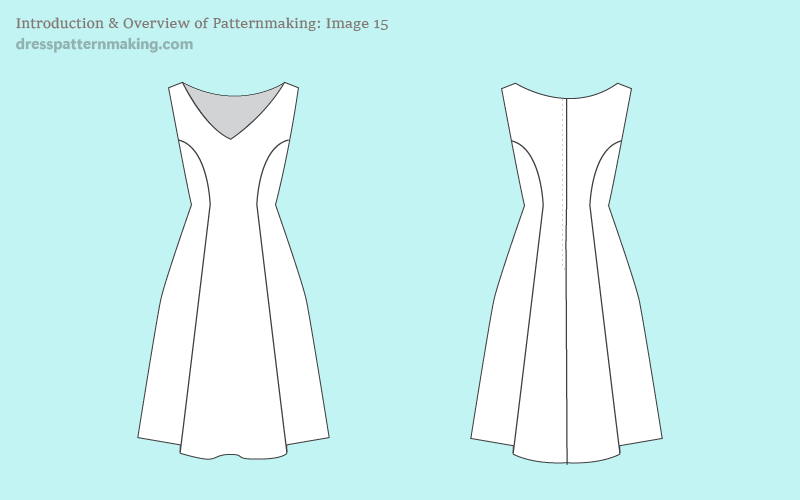
In the example in Image 15, I am showing the pattern that needs to be created, the block that is being used, and the thought process that goes into creating the pattern - in particular what theory the patternmaker has to know and apply. This is a fairly simple design with only 6 pattern pieces.
Which Block is the most suitable?
In this case, the Extended Line Dress block is probably the one used in the fashion industry. (As at 2024 I never use a Dress Block or a Skirt Block, I always use my Bodice Block and draft the skirt from scratch. This is just to point out that as a home patternmaker you do what works best for you!).
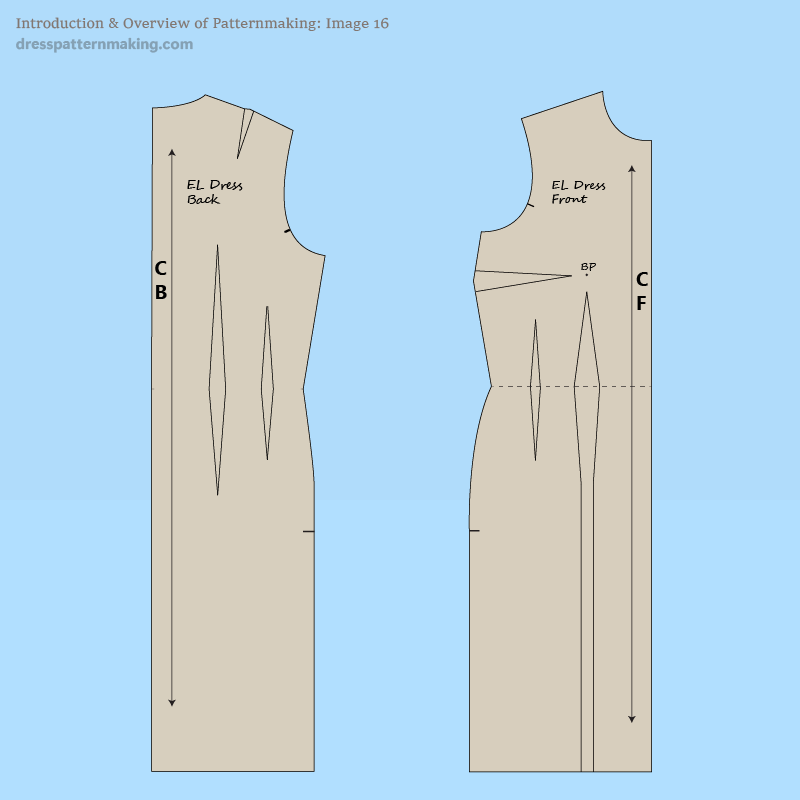
How Many Pattern Pieces?
- The front has two pattern pieces: Center Front and Side Front.
- The back has two pattern pieces: Center Back and Side Back.
- The specification sheet says there is all-in-one facing, so there are two internal pattern pieces: Facing Front and Facing Back.
- There is interfacing on the facing, but they are the same pattern pieces.
- There are a total of 6 pattern pieces.
Thought Process to Create the Pattern Pieces.
- The neckline looks a little low; this will require some contouring. This means there will be a gape dart needs to be pivoted into the design line.
- The block being used is a Sleeve Block (made to be used with sleeves), therefore (since this is a sleeveless dress), I will need to take some width off the side seams, and raise them up a bit - front and back.
- The front block has a side seam dart which will need to be pivoted into the Princess design line. The side pattern piece will need a little extra ease added at the curve point.
- The front block has two waist darts; the larger one will be incorporated into the Princess design line. The smaller one will be left out; that dart value will be used for extra ease in the waist.
- The back block has two waist darts: the larger one will be incorporated into the Princess design line. The smaller one will be left out; the dart value will be used for extra ease in the waist. (Calculations may be done to check the amount of ease in the waist, and if it is sufficient for the look of the design. Maybe some of the larger waist dart can also be used for extra ease?)
- The block has a straight skirt, this skirt is A-line and quite wide at the hem. Need to do some calculations to work out how much flare is added to each pattern piece to achieve this look.
- The Center Back piece has shoulder darts, so those do not need to be moved.
- The Center Back pattern piece needs to be marked for zip.
- The facing is just standard, all facing pieces to have interfacing.
Finalizing
Once all the pattern pieces are made, it is essential to check the pattern pieces against each other, and then mark all pattern pieces with the relevant information.
Instructions and Markings
Once all the pattern pieces have been made, they first need to be checked against each other before they are finalized. Then they need to be marked.
Pattern Pieces checked against each other
These should be done before adding seam allowance. The following needs to be checked:
- adjoining pattern pieces match in length
- flow through of adjoining pattern pieces
- that the relevant notches have been put on the pattern pieces to assist in telling pieces apart and where to match seams up
- markings have been made for things such as zip and button placement
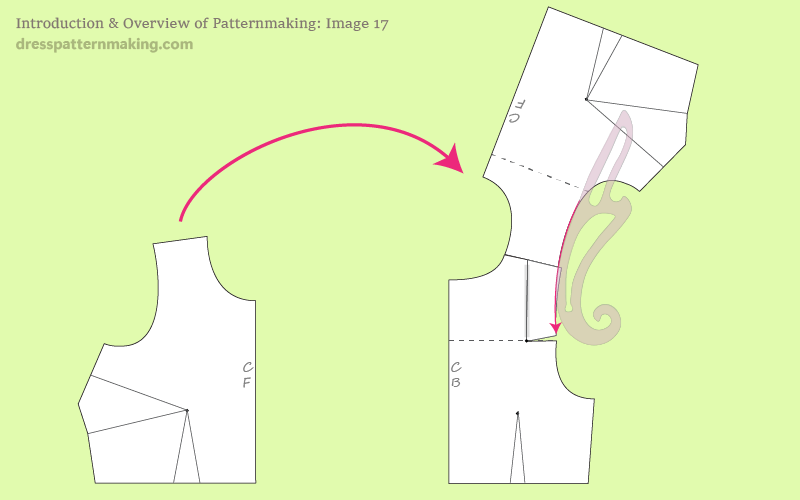
Below (Image 17) is an example of how pattern pieces need to be checked at seam lines for seam length (in this case the shoulder seam) and flow through. (This graphic shows a different pattern; this is just being used to show you to concept of checking the flow through).
Pattern Pieces labelled
The pattern pieces need to be labelled as follows:
- name of pattern piece
- cutting instructions
- direction of grainline
- CB and CF need to be marked
The pattern piece used in Image 18 is from a different pattern, but the concept of labelling is the same for all pattern pieces:
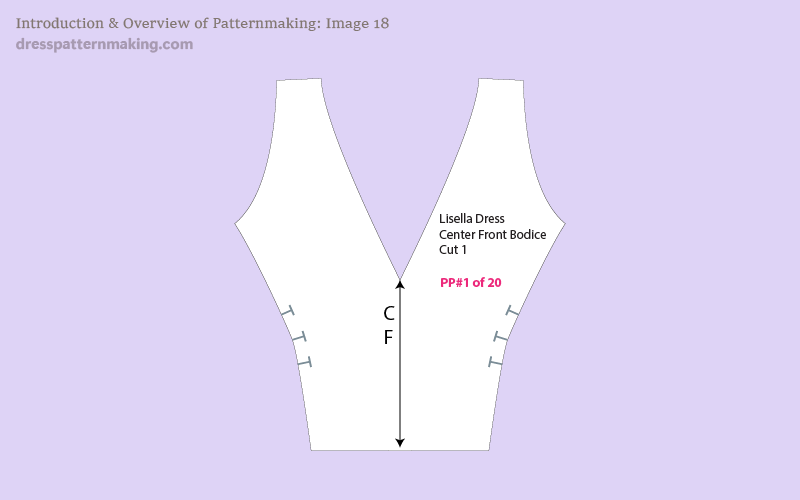
I have numbered my (Pattern Piece #1) pattern piece and included the total number of pattern pieces (so I would write on the other pattern pieces PP#2 of 6, PP#3 of 6, and so on), as that is what I learned to do in my patternmaking studies and I find useful. Having said that, I haven't seen this mentioned in any of my patternmaking books or seen it on commerical patterns, but you might find this useful.
The final thing is to add seam allowance. The amount of seam allowance added differs from place to place, but there are general guidelines. There is also the question of how to finish off the corners of the pattern piece seam allowance. We'll look at that next....
Seam Allowance
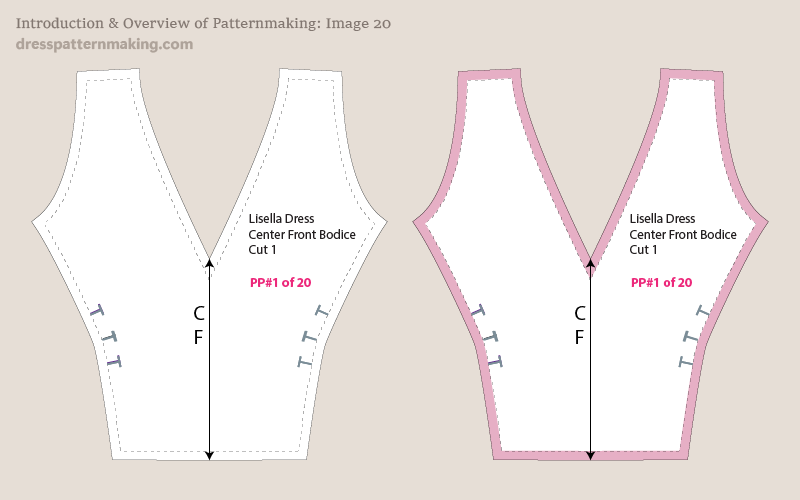
When adding seam allowance to pattern pieces there are two issues to consider:
- How much seam allowance to add, and
- How to finish off the seam allowance corners; i.e. do you want the cut edges to line up?
You do not have to add the same amount of seam allowance on all seams; in the garment manufacturing industry is is common to add less seam allowance to necklines and armholes, whereas quite often commercial patterns have the same amount of seam allowance for all seams.
How much Seam Allowance?
Seam allowance added in fashion production is usually less than added to Commercial Sewing Patterns. It also varies from manufacturer to manufacturer, but a rough guide would be:
In Fashion Production:
- 1/2-inch or 1/4 inch on standard seams
- 1/4-inch on curved seams such as necklines and armholes
- 3/4-inch for zips
In Commercial Patterns
- 5/8-inch on all seams (not including hem)
Of course when making your own patterns, you can choose what you add. If you are new to patternmaking, it makes sense to make what you are used to; if you do a lot of sewing with commercial patterns, then it makes sense to stick with that. If you are learning patternmaking for fashion production, use industry standards. As per the information above, you do not have to add the same amount of seam allowance to each seam; e.g. you can add less to the neckline, as shown in Image 20.
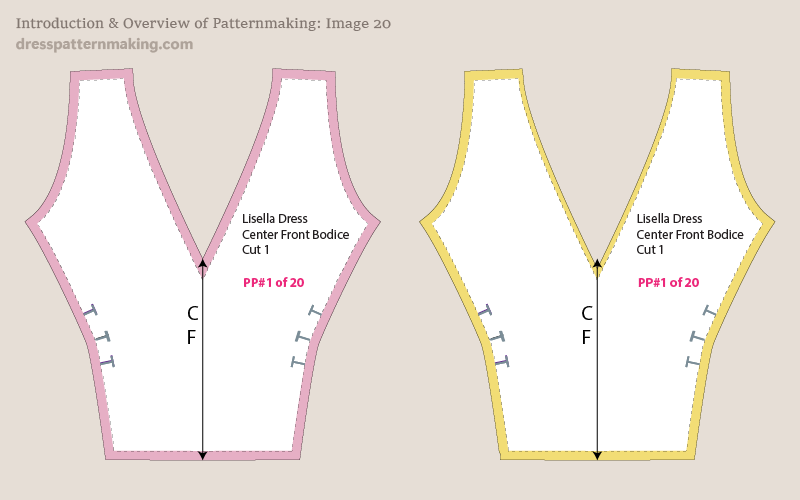
How to finish off Seam Allowance Edges?
When sewing two pattern pieces together, you sew on the seam line, not the cut edge. Depending on how you do your seam allowance, the cut edges may or may not line up. While it doesn't really matter whether or not the edges line up, it's a bit easier to sew if the seam allowance corners so DO line up. However, making the cut edges line up take a bit more work.
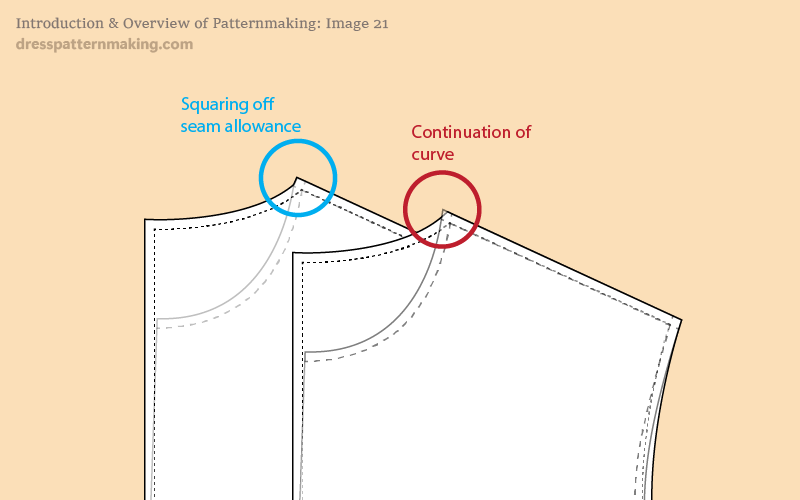
What you need to do is square the corners off rather than leave them at strange angles. If you do want your cut edges to match up, you need to keep in mind that one seam may be sewn onto two pattern pieces, and therefore it cannot be squared off to both; you would have to keep in mind the order of garment construction and square off the first seam to be sewn.
Image 21 shows you the different between squaring off seam allowance at a corner, versus continuing the curve.
Lastly, we'll talk about why you (as a home-patternmaker) may want to draw designs on the block.
Why draw designs on the block?
Why draw design lines on the Block? Why not keep the block nice and clean. Why not trace the block and draw the design lines on the paper pattern? Maybe experienced patternmakers work this way, and you can choose to as well, but there are a few reasons you may want to mark lines on the block, especially when you are new to patternmaking.
Saves Work (the next time around)
This is relevant in cases such as:
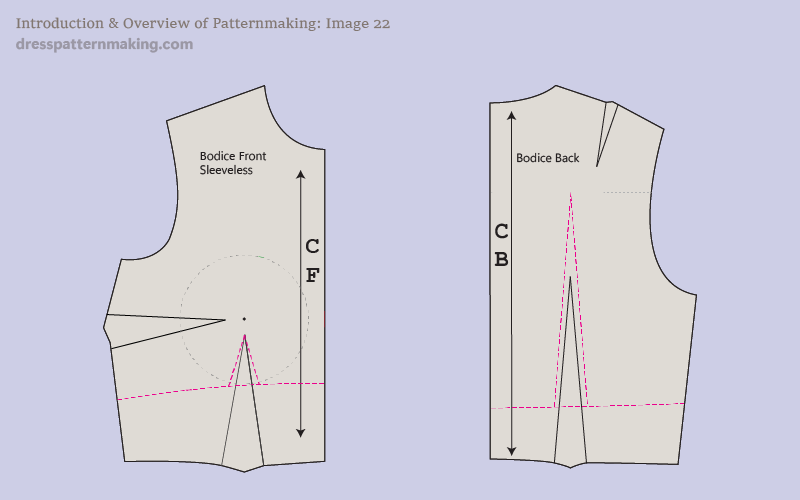
- Empire Line Markings (see Image 1 below)
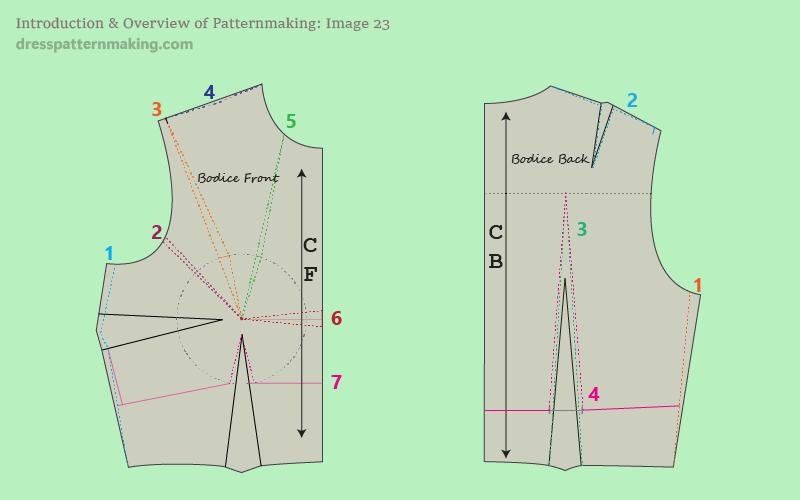
- Contour Markings (see Image 2 below)
You work it out once, the information is on the block, and you have that information to use again next time you make an style with an Empire Line, or next time your garment needs contouring (which will be often). If you did not put this information on the block, but just traced the block and put that information on the pattern you are making, next time you went to create an Empire Line garment (or do contouring), you'd have to do all the work again. Or you'd have to look it up on notes you have written down somewhere. (If you are a very experienced patternmaker after time you will probably just remember all that information without having to refer to notes).
Saves Work (this time around)
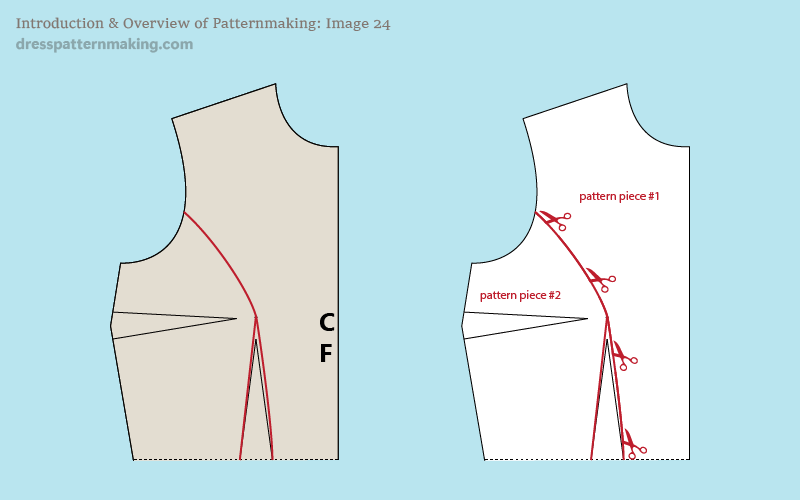
So you may understand why information that is used again and again is put on the block, but why general design lines? In the image below (Image 24), why not just trace the block and draw the Princess Line on the paper pattern? If you just copy the block onto paper (the pattern pieces on the right hand side of Image 24), you will then need to cut the paper through the design line. This means you have no paper for seam allowance at the cutting line... You will need to put paper underneath, stick the two pattern pieces onto that paper.... etc.etc. (It will also be necessary to cut up pattern piece #2 to close the side dart....).
Drawing the design line on the block and using that information as you draft the pattern means you can save cutting up the paper. What you do is trace off one pattern piece, move the block over to another portion of paper (to leave room for seam allowance in between) and trace off the second paper. (Note that you can pivot the side seam dart into the design line in the process, if you know how to manipuate darts with the pivoting method).
Summary of... Why?
The bottom line is; it can save work/time/paper. Either this time or next time. Drawing lines on your block doesn't mean that you will never have to cut up the resultant pattern, put paper underneath, stick the pieces together (and maybe do it all a second or a third time), but you won't have to do it as often. Note: Lines such as neckline depths or neckline shapes are really useful to have on a block, especially if it is a personalized block. You get to know the best neckline depths and shapes to suit your body, and it's very useful to have this information on your block.
Doesn't the Block get messy?
In Image 22, the only markings are the Empire Line markings, in Image 23, the Contour Markings and the Empire line information is noted. In reality a block may have a number of markings or a very limited number. Doesn't this get messy if you include too much? Maybe so, but it's useful to have that information on there; you can also have a few different blocks with different markings.

