Facing Explained: Types, Creation and when to use Separate vs. All-in-One Facings

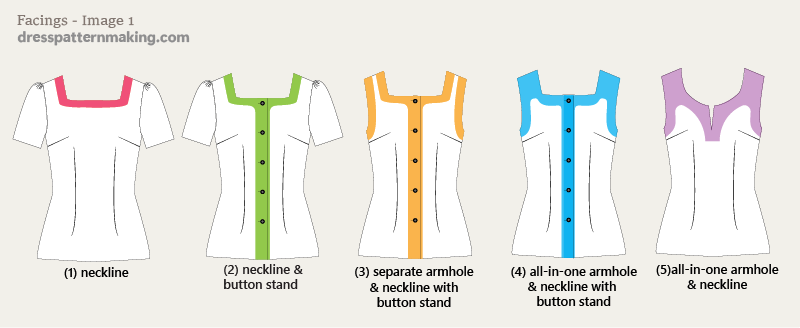
Facing is fabric that is placed on the inside of the garment to finish off seam edges and provide stability to the garment. Image A below shows some facing options on five garments:
- Facing on the neckline only
- Facing on the neckline/button stand
- Facing on the armholes and neckline with button stand (separate armhole & neckline)
- Facing on armholes and neckline with button stand (all-in-one facing)
- Facing on armhole and neckline (all-in-one-facing)
In the image the facings are shown overlaid in color on the garment for the purpose of demonstration. You would not see these facings on the outside of the garment. Note the following for Image A:
- For No.1. there is no facing at the armhole because the sleeves negates the need for facing. (Although you can actually have facing on sleeves - more common with cap sleeves).
- The neckline/button-stand facing on No.2., No.3 & No.4 could be either a separate pattern piece to the Bodice, or a grown-on facing which is one with the Bodice.
- Only the Bodice Front facings are shown here, the Bodice Back would also need facing that matches in width at the shoulders and armholes.
When should you use separate (armhole/neckline) facings, when should you use all-in-one facing?
If you're making your own patterns, it's up to you. In the garment manufacturing industry, where they try to keep costs to an absolute minimum, they might decide to go with Facing No.3. instead of Facing No.4, because the cutting layout means less fabric is needed. Less interfacing is also required. In my opinion the all-in-one is a bit sturdier, less likely to poke out and need to be poked back in, and it's easier to iron.
Creating Facings
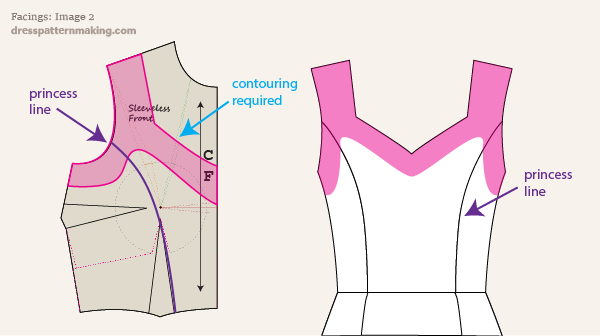
Although facings seem (and are generally) quite simple, some thought is sometimes required. For example, see an example in Image 2 below:

The things you need to consider when making this facing are:
- The contour markings mean that a gape dart needs to be taken out of the neckline. Therefore the facing around the neckline should be done after the Bodice Pattern piece is created (i.e. not straight from the block).
- There will be two final Bodice Pattern pieces: Center Front and Side Front; the shape of the armhole facing needs to be created before the pattern pieces (i.e. you do not want to have the facing in three pieces).
So... in this case some thinking is required to create this pattern piece. Not straight from the block, and not straight from the final pattern pieces.
Basic Examples of creating Facings
See the menu on this page for creating the basic facings for:
- separate armhole and neckline
- all-in-one armhole and neckline
- neckline with button stand - separate to main Bodice pattern piece
- neckline with button stand - together with (grown-on) to the main Bodice pattern piece
These pages contain basic information, showing what that type of facing looks like, when it is used, the width of the facing at the neckline, armhole and shoulders, etc. More complex examples (like in Image B above) will (eventually) be in the Patterns pages, which goes through the process of creating a particular pattern from A~Z.
Note: Workflow for creating Facings
As I have commented other places, the workflow that I use to make my patterns may be different to the fashion / garment production industry. This will always be to make things easier, and as I'm the only person involved it makes no difference to anyone. In my instructions I use and show my workflow, not necessarily the ideal workflow. For example: some textbooks suggest you trace the facing from the block, shave off a certain amount to make it slightly smaller than the main pattern piece, then add seam allowance. Then of course you need to create the main pattern piece... and add seam allowance. Adding seam allowance to both pattern pieces separately is tedious as far as I'm concerned. I create the main pattern piece and add seam allowance, draw the facing on the pattern piece then either (a) trace off the facing, or (b) draft it on a folded piece of paper so that when it is cut there are two of the main pattern piece and cut down one for the facing. If I want the facing slightly smaller, I do the trimming at the end. There may be people who think my way is more work; feel free to use your own method.

