Contouring
This page consolidates information that was previously spread across multiple pages. You can navigate directly to the relevant sections using the links below:
- Part 1: The Need for Contouring
- Part 2: Contour Markings
- Part 3: Sleeveless Block
- Part 4: Standard Contouring Amounts
- Part 5: Individual Contouring Amounts
- Part 6: Strapless
- Part 7: Contouring in Action
Part 1: The Need for Contouring
The standard bodice block is designed for garments with sleeves and a relatively high neckline. When used for designs with lower necklines or cutaway armholes, the fit can be compromised—sometimes to the point of being unwearable. Those with a smaller bust may experience minor issues, but for individuals with a larger bust, the lack of contouring often results in noticeable gaping and poor shaping.
This occurs because the bodice block does not fully follow the body's natural contours. It extends straight from the neckline over the bust and down to the waist, often leaving excess fabric under the bust and across the chest. Additionally, because it is designed for sleeves, it includes extra armhole ease, which, if not adjusted, results in a looser fit. To achieve a closer fit in sleeveless designs, some of this ease needs to be removed.
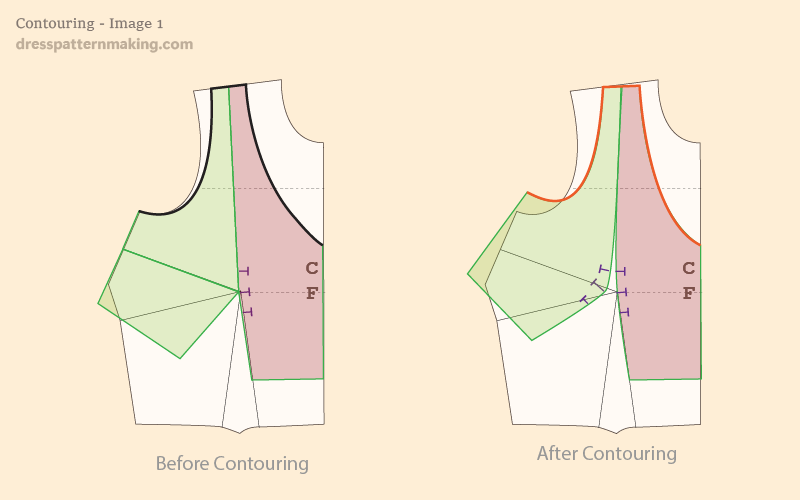
When using the standard bodice block for garments with low necklines or cutaway armholes, gaping is likely to occur. The contouring process involves four key steps:
- Recognizing the need for contouring and understanding that gaping will occur.
- Identifying where gaping will occur to address the issue during pattern development.
- Marking these areas on the block (using gape darts).
- Eliminating gaping by adjusting the pattern or closing the gape darts.
Contouring adjustments are not limited to necklines and armholes. For example, an Empire Line dress typically requires fabric reduction under the bust. This contouring information can be marked directly on the bodice block, or you may choose to create a separate Sleeveless Block. In a Sleeveless Block, contouring for block ease and armhole ease is incorporated, reducing the need to adjust these elements for each pattern.
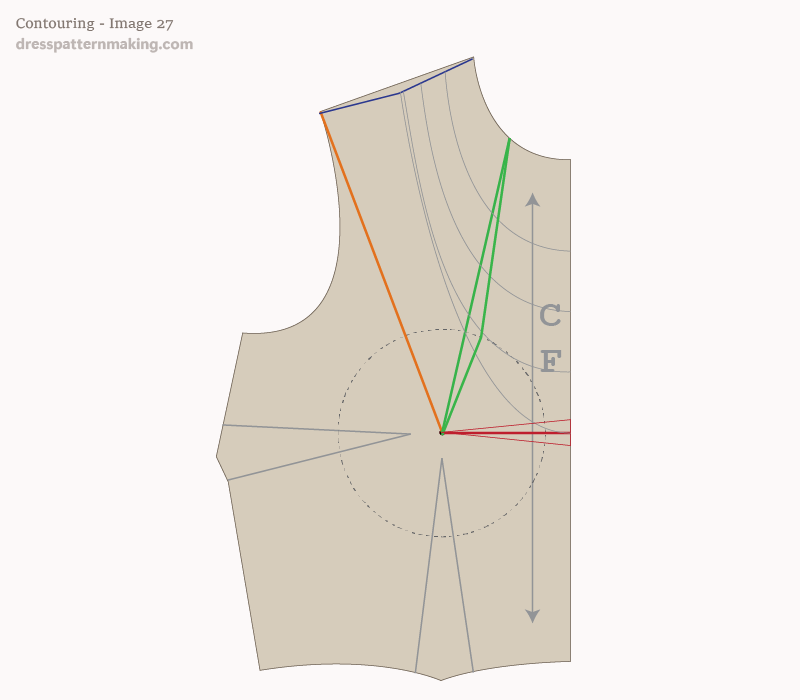
Bust Mound Radius
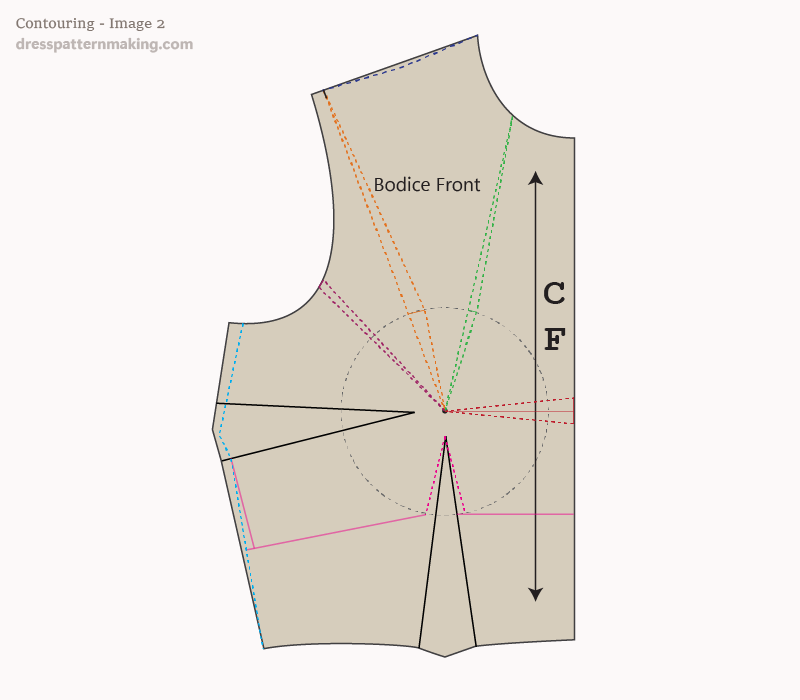
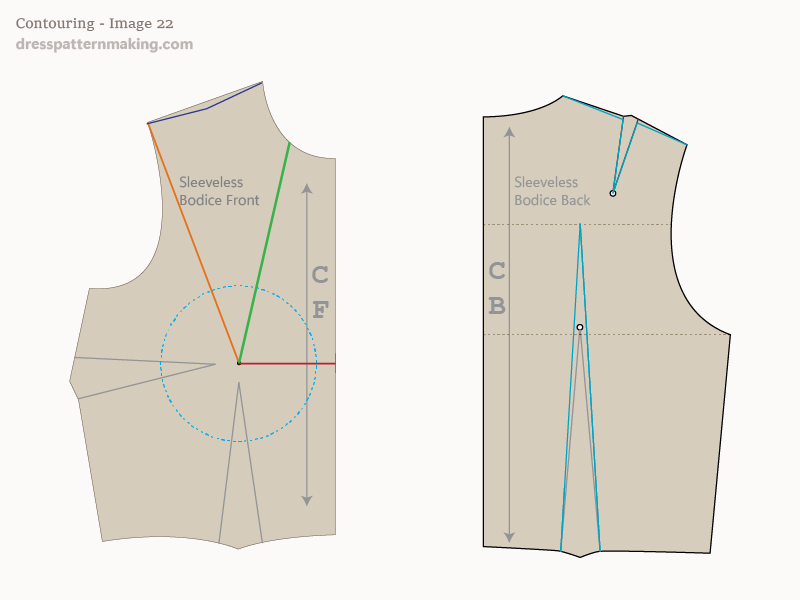
To accurately place contouring marks on the bodice front, you must first draw the Bust Circle. This requires a compass to ensure precision. The Bust Circle's radius represents the Bust Mound—the distance from the Bust Apex (nipple) to the underbust, where the breast tissue meets the ribs.
See Image 2 for a visual representation of the Bust Mound Radius on both the body and the bodice block. This circle is drawn directly on the Bodice Front, with the center point positioned at the Bust Point.
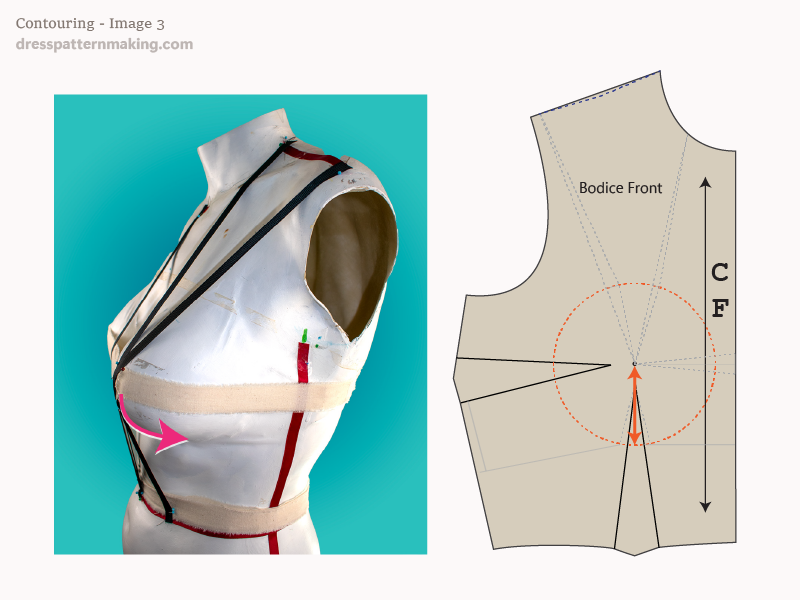
For standard blocks used in the fashion industry, the Bust Mound Radius varies by size, but contour markings remain consistent. Later sections cover these contouring details in depth. Note that Image 3 shows the standard bodice block with standard contouring markings, not my custom block.
Part 2: Contour Markings (Gape Darts)
Both the bodice front and back require contour markings to indicate where gape darts may be necessary and the size of each adjustment. The images below show contour markings on a standard Bodice (Sleeves) Block. The circle represents the Bust Mound, drawn using the Bust Radius measurement.
This section focuses on visualizing contour markings on the bodice block. Specific contouring adjustments are covered in later sections.
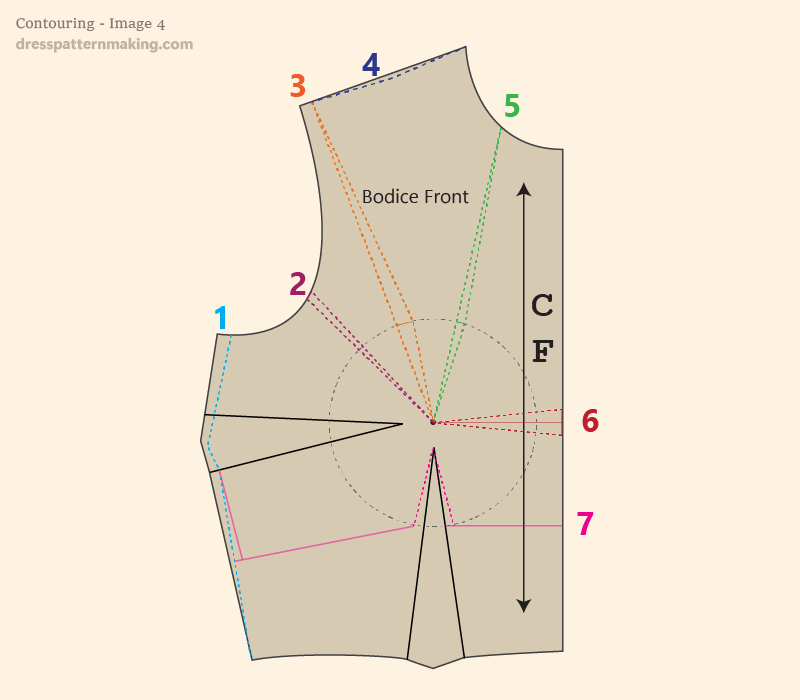
Bodice Front: Seven Contour Markings
Image 4 illustrates the standard bodice block (Sleeves) with seven key contour markings:
- Reduction of block ease
- Reduction of armhole ease
- Cutaway armhole gape dart
- Mid-shoulder dip adjustment
- Low neckline gape dart
- Between-bust gape dart
- Empire line gape dart for waist dart (including additional Empire Line contouring
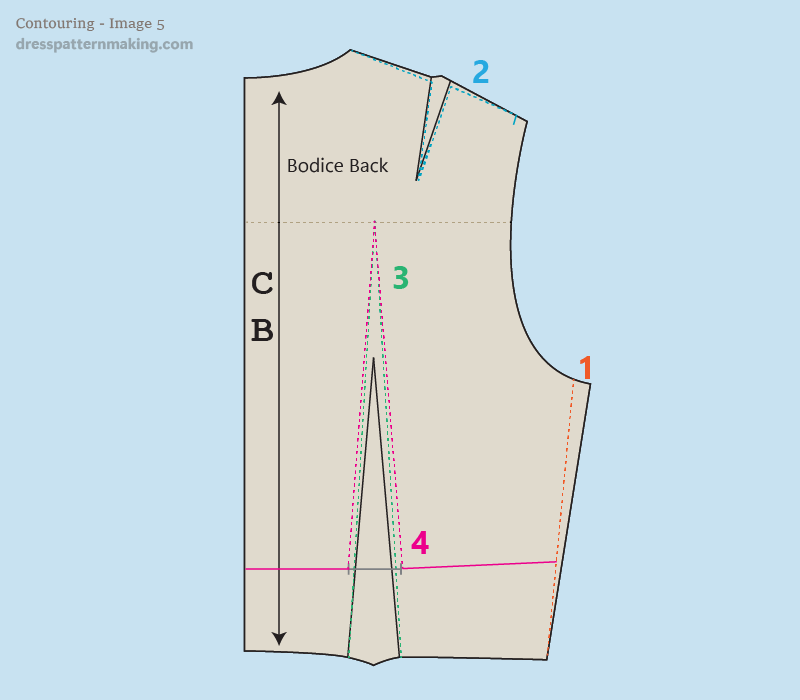
Bodice Back: Four Contour Markings
Image 5 illustrates the Bodice Block (Sleeves) with four contour markings:
- Reduction in block ease.
- Adjustment to shoulder shaping (mid-shoulder dip).
- Extension of the waist dart length.
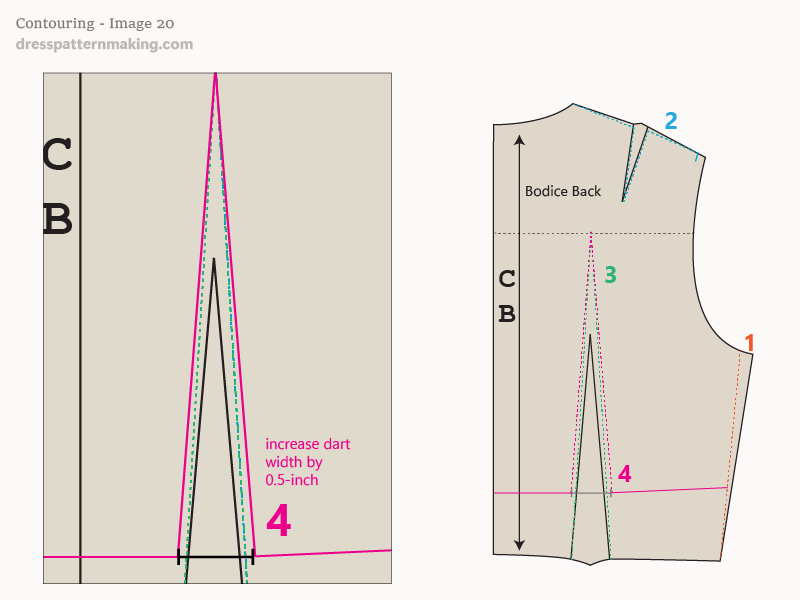
- Increase in waist dart width for the Empire Line (including other Empire Line contouring adjustments).
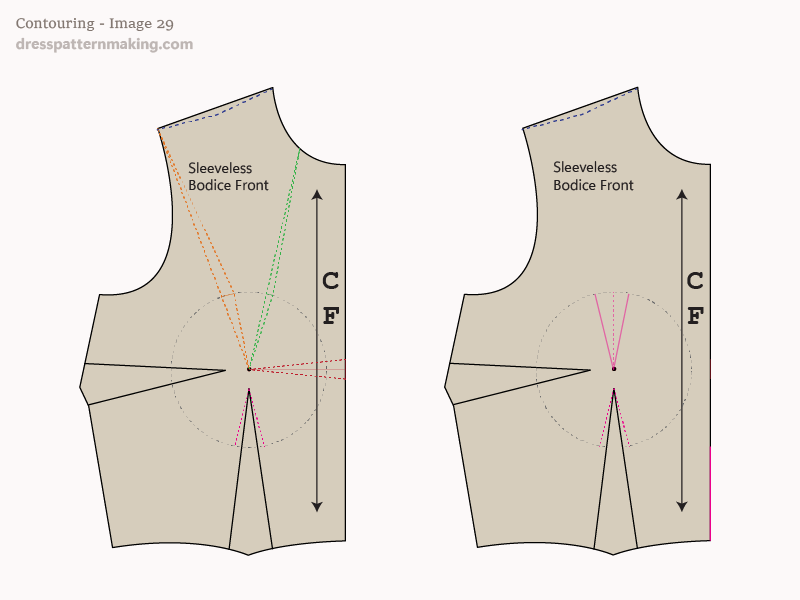
Part 3: Sleeveless Block
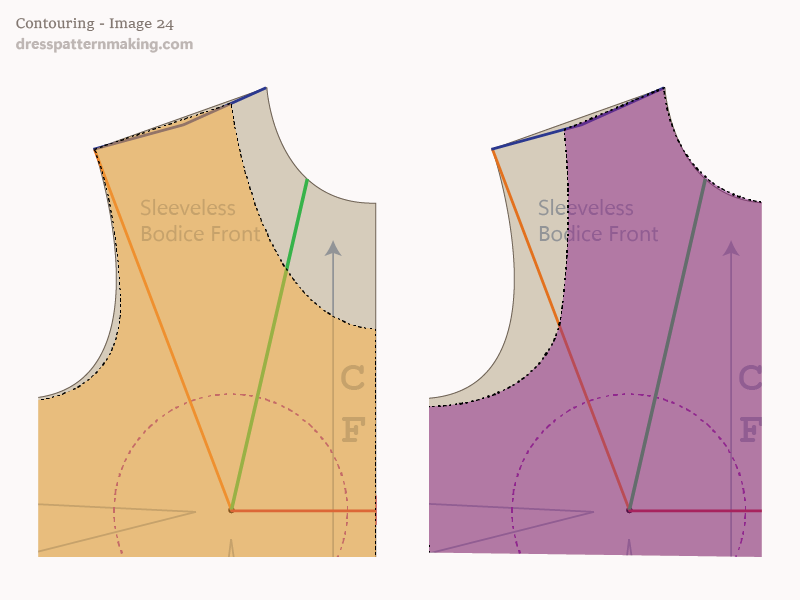
The Sleeveless Bodice Block is a derivative of the standard Bodice (Sleeves) Block, with a few essential modifications. While it is possible to adjust the standard block each time you make a sleeveless garment, creating a dedicated Sleeveless Block saves time by incorporating the necessary reductions in block and armhole ease from the start. If you frequently sew sleeveless garments, this adaptation is worth the effort.
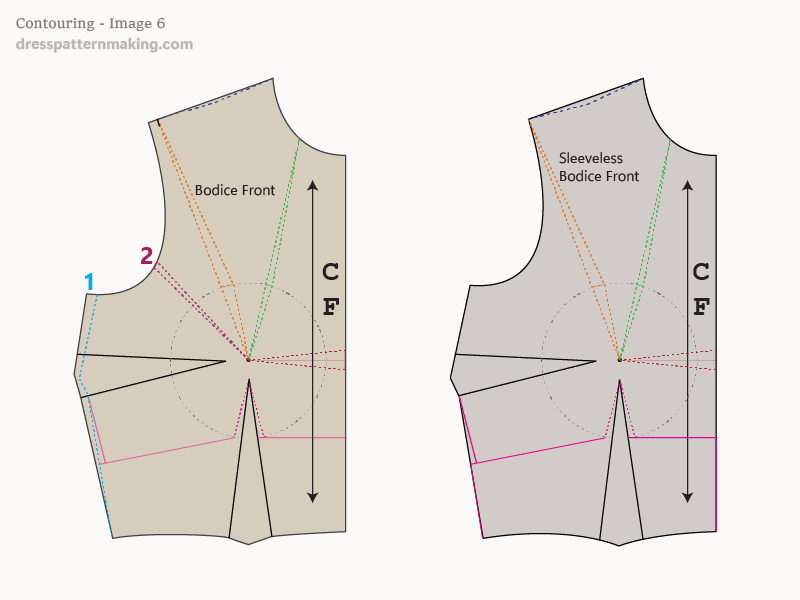
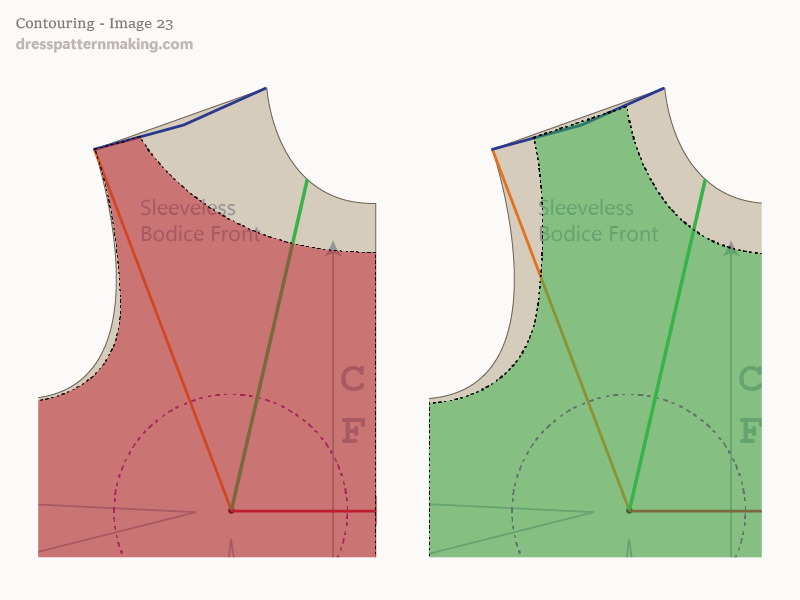
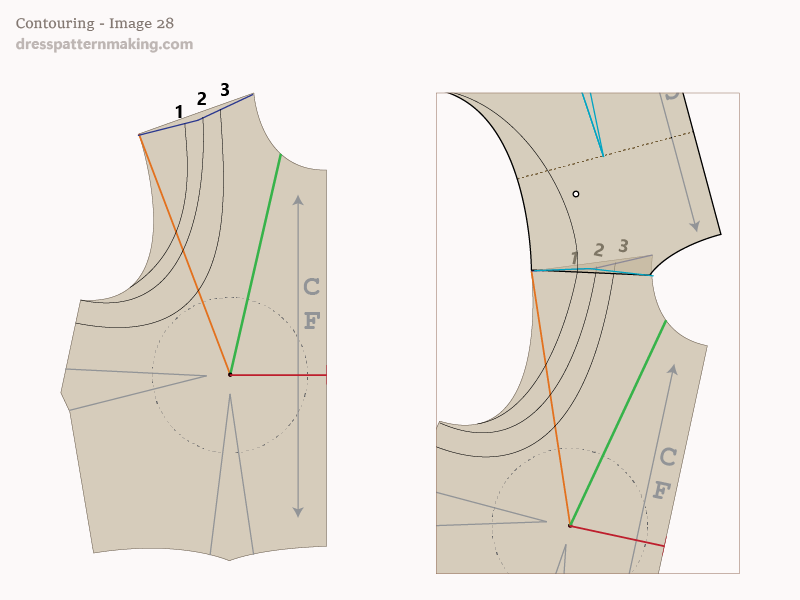
Bodice Front with Contour Markings: Sleeved vs. Sleeveless
Image 6 compares the contour markings on the Bodice Front for the standard and sleeveless blocks. Contouring adjustments No.1 and No.2 (reducing underarm and armhole ease) are omitted in the Sleeveless Block since these modifications are already built in. These two changes are essential for all sleeveless garments, while other contour adjustments depend on the specific design.
Bodice Back with Contour Markings: Sleeved vs. Sleeveless
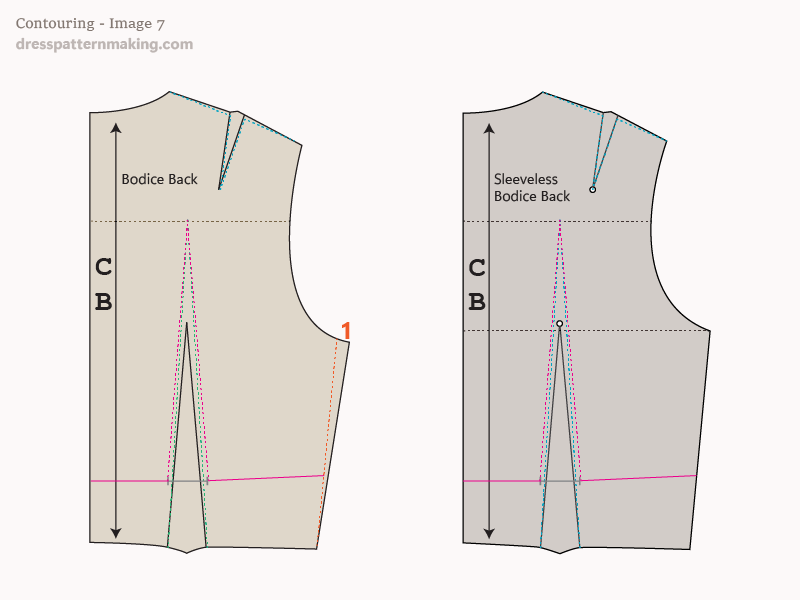
Image 7 compares the Bodice Back (Sleeves) to the Sleeveless Bodice Back. The underarm ease reduction (marked as No.1) is included in the Sleeveless Block.
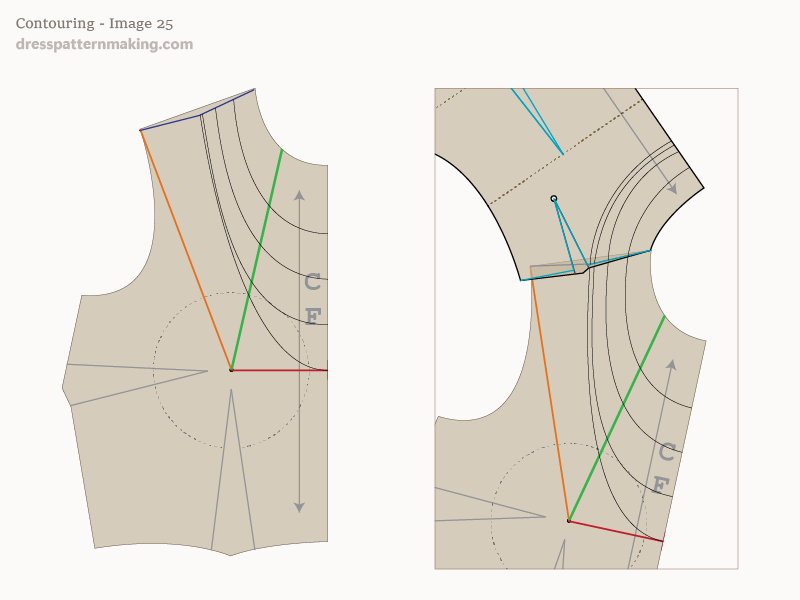
Superimposed Comparison: Standard vs. Sleeveless Block
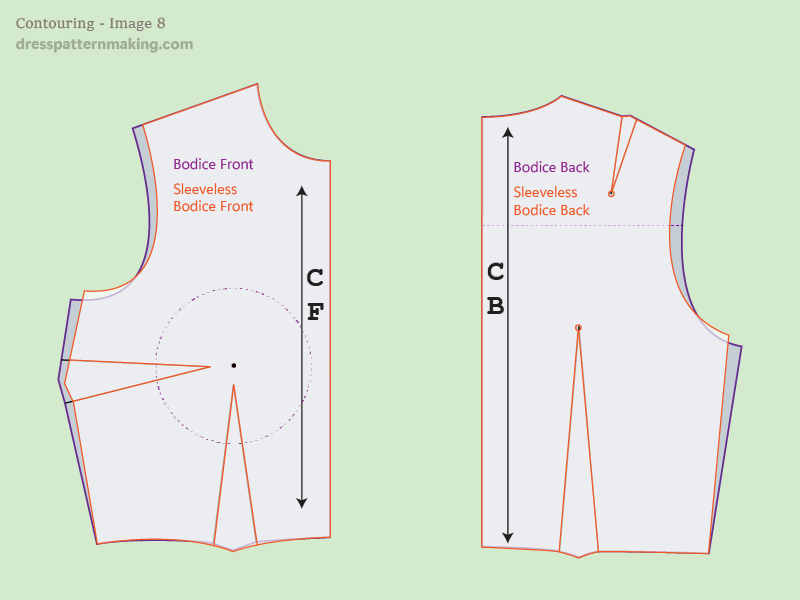
Image 8 overlays the standard Bodice (Sleeves) and the Sleeveless Bodice to highlight differences in shaping.
Part 4: Standard Contouring Amounts
The following diagrams illustrate the standard contouring adjustments for a typical figure. (The amounts given may or may not work for you; see the next section - Individual Contouring).
Bodice Front
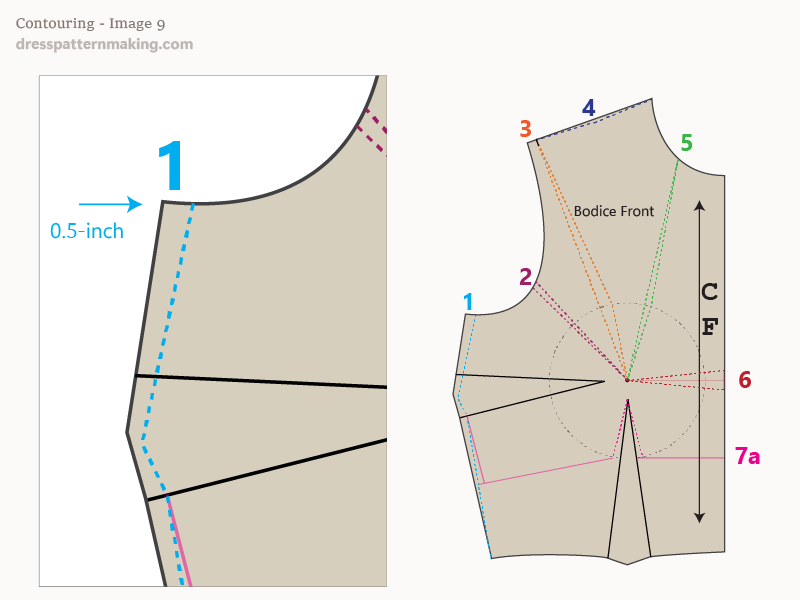
Bodice Front Contouring #1: Reduction in Block Width
Image 9 shows a 0.5-inch reduction in block-width. The original bodice block includes 5 inches of ease at the underarm level, ideal for sleeved garments. This reduction (0.5 inches on both front and back halves) lowers the total ease to 3 inches, making the block more fitted for sleeveless designs.
Bodice Front Contouring #2: Armhole Ease Reduction
Image 10 illustrates a 0.25-inch reduction. Without sleeves, the armhole should sit closer to the body in a Close Fitting block. This adjustment reduces the overall armhole measurement and raises its position slightly.

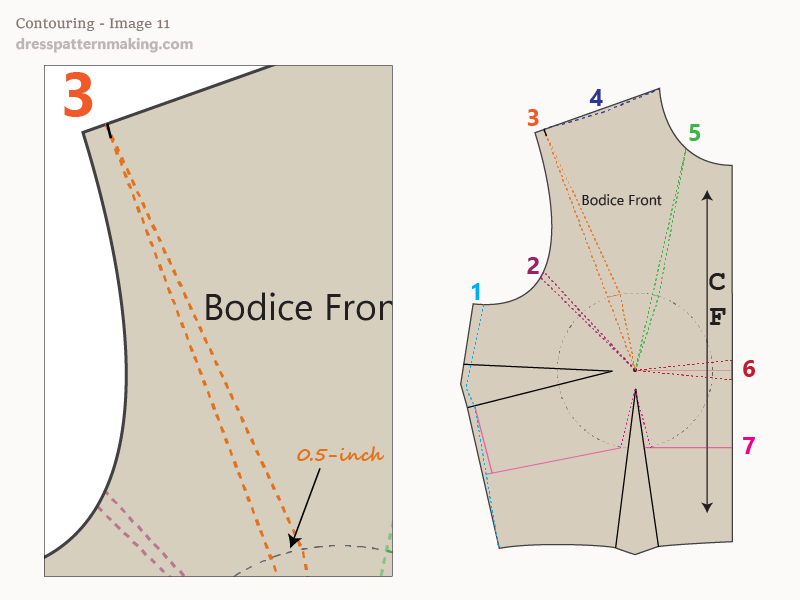
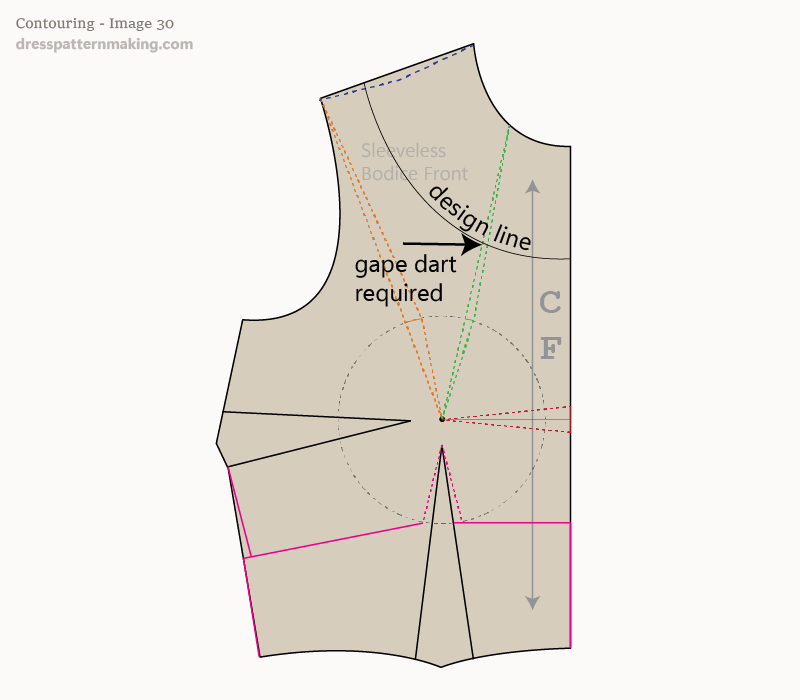
Bodice Front Contouring #3: Cutaway Armhole
Image 11 shows a 0.5-inch reduction at the Bust Circle, tapering to zero at the shoulder and Bust Point. A cutaway armhole can cause gaping, especially along bias-cut sections. The amount removed accounts for this bias stretch.
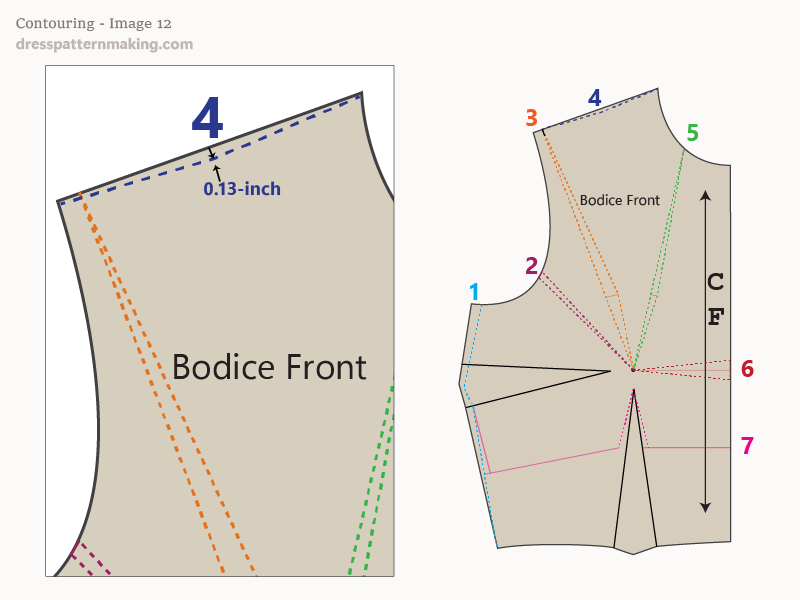
Bodice Front Contouring #4: Shoulder Line Shaping
Image 12 depicts a 0.13-inch reduction at mid-shoulder. The natural shoulder slope often causes a subtle dip in this area, requiring contouring for a better fit.
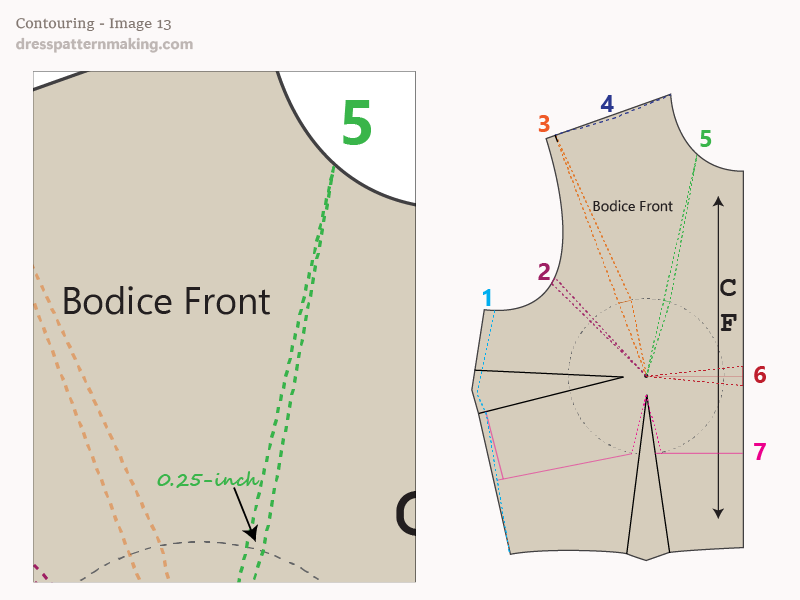
Bodice Front Contouring #5: Low Neckline Guide
A 0.25-inch reduction at the Bust Circle, tapering to zero at both the neckline and the Bust Point. The lower the neckline, the greater the tendency for gaping. If the neckline extends near or below the Bust Point, contouring adjustment No.6 should also be applied.
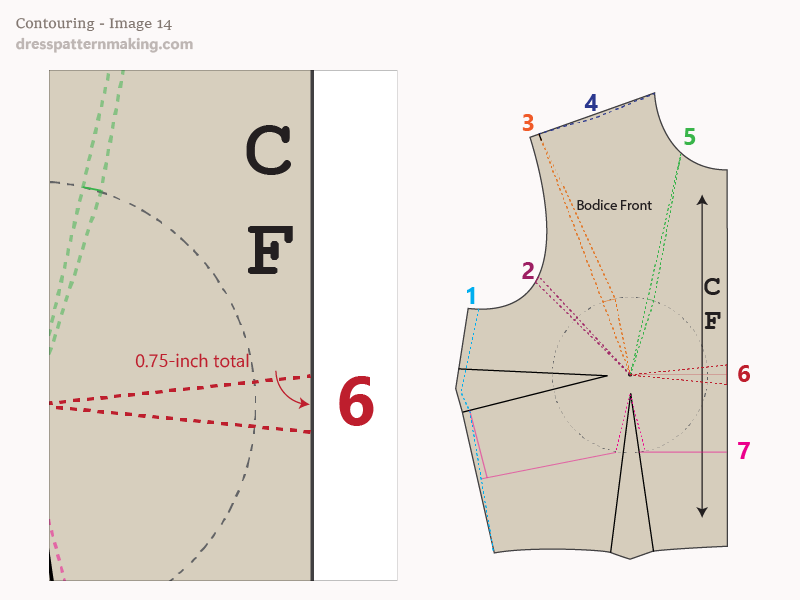
Bodice Front Contouring #6: Deep Low Neckline
For necklines extending near or below the Bust Point, a total contouring adjustment of 0.75 inches is required at the Centre Front to maintain a smooth fit.
Bodice Front Contouring #7: Empire Line Guides
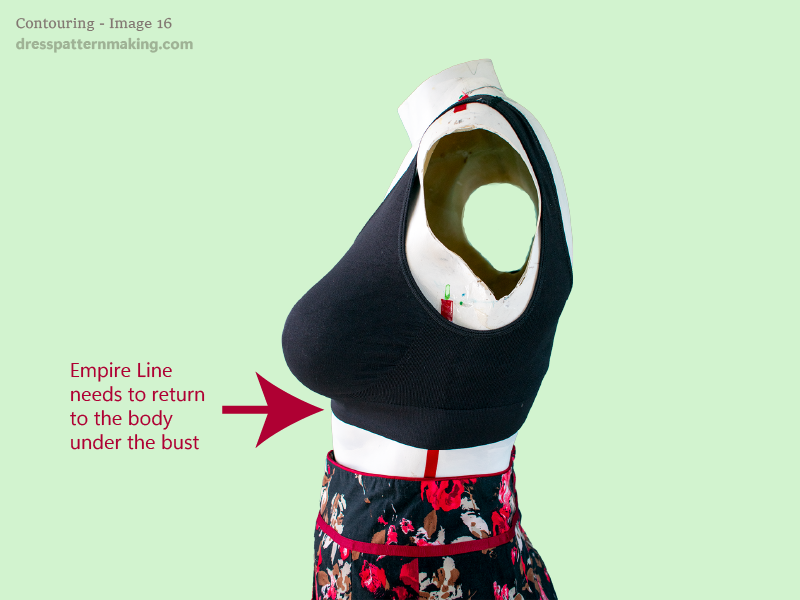
The dart width increases 0.75-inch at the bust circle. The Empire Line style ends beneath the bust, therefore the dart ends at the bust circle rather than extending to the waist. The dart needs to be wider for the garment to return to the body under the bust. See Figure 7b if you do not understand this.
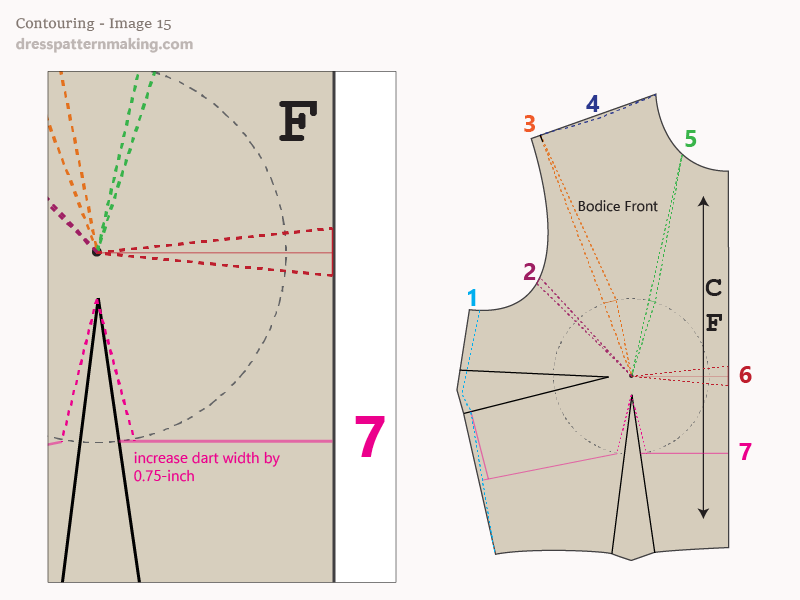
Bodice Front Contouring # 7b: The Empire Line return
The Empire Line returns to the body under the bust, rather than falling from the bust to the waist.
Bodice Back
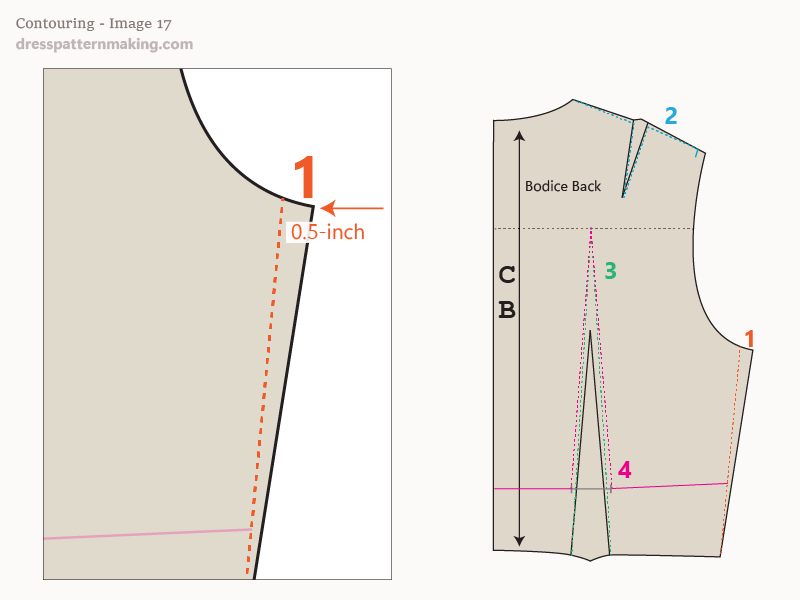
Bodice Back Contouring #1: Reduction in block width
The reduction is 0.5-inch. When creating the Bodice Block, the amount of ease added to the body measurement, at the underarm level, was 6 inches. This is ideal for garments with sleeves. This reduction of 0.5-inch on the half-blocks front and back will the total amount of ease to 4 inches for the fitted sleeveless garment.
Bodice Back Contouring #2: Shoulder line shaping
Reduction of 0.13-inch at mid-shoulder. The shoulder usually dips a little in the middle. (See the Examples for an application of using this guideline).
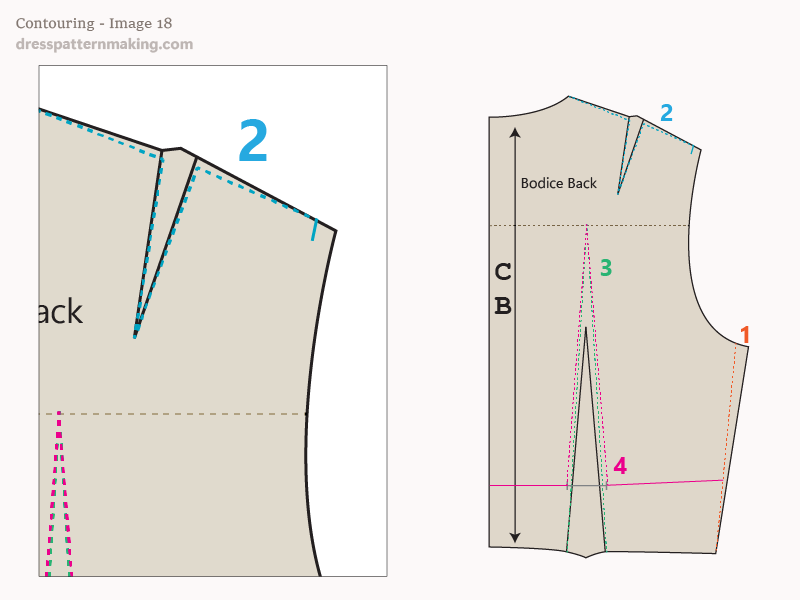
Bodice Back Contouring #3: Increase height of waist dart
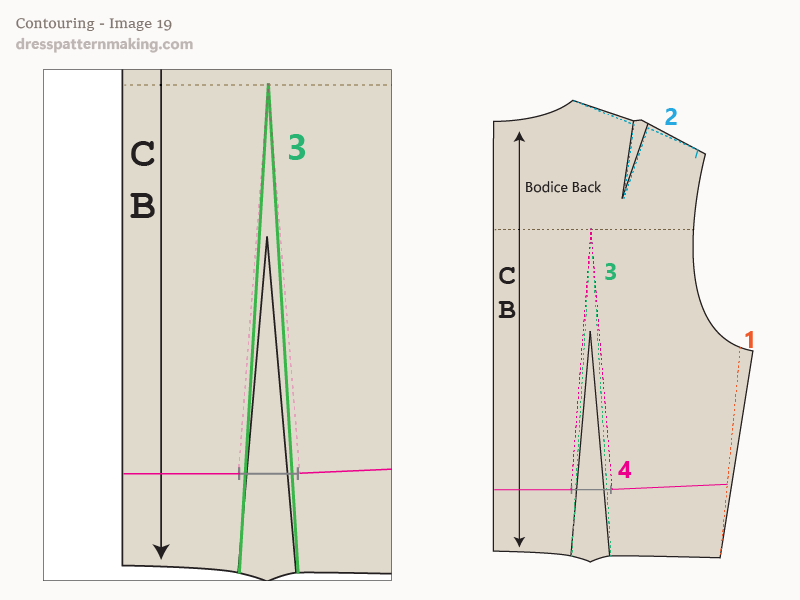
Increase the height of the waist dart by extending the dart point up to the Across Back line. The placement of the Across-Back line is 1/4 of the CB measurement - down from the CB neck point. This line is drawn at right angles to the CB line.
Bodice Back Contouring #4: Increase of dart
The dart, which was previously at the waist level, is now under the bust. The width increases 0.75-inch at Empire Line level. The placement of the Empire Line is another matter - it is based on the Bodice Front Empire Line. See the page Empire Line Styling in the Elements Menu.
Part 5: Individual Contouring Amounts
Working out your individual contouring amounts does take some time and effort, but it is worth spending the time up front to get it right.
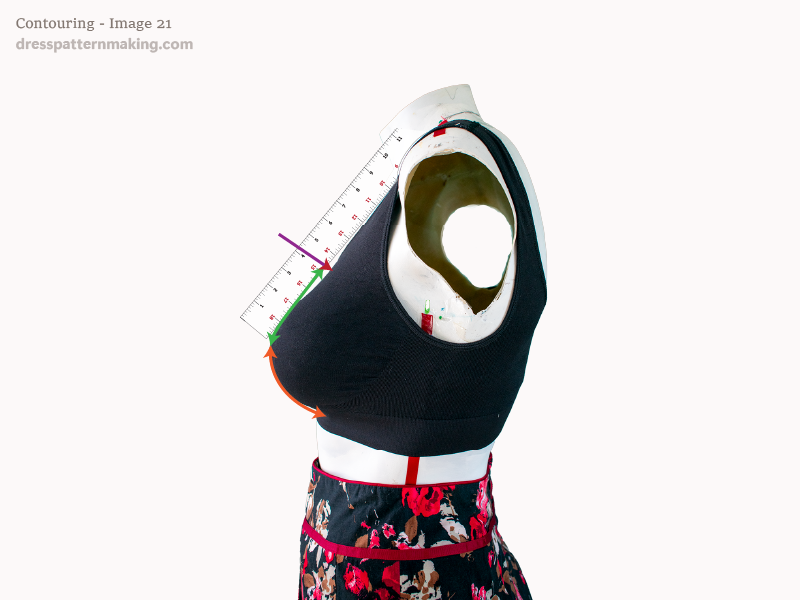
Some instructions suggest using a ruler against the body at the relevant points, as the example shown in Figure 1, and measuring the depth of the gaps, but I could not get accurate contouring with this method. As I had to make a toile to test and cut down the neckline and cut away the armholes, I think that one may as well go directly to the toile to work out the contouring.
In order to be accurate,I think it's necessary to make at least two toiles; one for the neckline and one for the armhole. Once you have determined those amounts, you can then use those same two toiles again to cut out the other (e.g. with the one you used for the neckline, you then also cut away the armholes and visa versa). If you want to make extremely low necklines or strapless garments, you will probably need to make further toiles.
I use the Sleeveless Block to make the toile to work out the contouring. The sleeveless block has some of the block ease removed, and the armhole it raised up. In the following example, a Sleeveless Block is used.
These examples give you an idea of what you need to do, you will need to apply these ideas to contouring for which I have not supplied examples. The information I am giving is a general guide, in some cases you will need to apply some logical thinking to solve some issues.
Note that the Empire Line contouring is not covered here; see the Empire Line page under the Elements Menu.
Preparation
On your Sleeveless blocks, draw the following guides:
Bodice Front:
- Your Bust Circle, shown by the purple dashed line. See the contouring page - Contouring Overview - if you are unsure of this measurement.
- A straight line from the Bust Point to the shoulder tip. This is the cutaway arm line, and is shown in orange.
- A straight line from the Bust Point to the mid-neck. This is the low neckline line, and is shown in green.
- A straight line from the Bust Point to the Center Front. This is for very low necklines that go below the Bust Point, and is shown in red.
- The contouring line for the shoulder. This is for the dip that is usual for the shoulder, and is shown in blue. Use the standard measurement to begin with - see the Standard Contouring page for details.
Bodice Back:
- Extend the height of the waist dart up to the Across Back line. This placement of this line is 1/4 of the CB measurement, measuring down from the CB neck point. The line is drawn at right angles to the CB line.
- The contouring line for the shoulder. This is the same measurement you used for the Bodice Front shoulder line.
Bodice Front Contouring #7: Empire Line Guides
The dart width increases by 0.75 inches at the Bust Circle. Since the Empire Line style ends beneath the bust, the dart terminates at the Bust Circle rather than extending to the waist. The dart must be wider to allow the garment to contour back to the body under the bust. See Image 7b for further clarification.
Bodice Front Contouring #7b: The Empire Line Return
The Empire Line contours back to the body beneath the bust rather than falling straight to the waist.
Bodice Back
Bodice Back Contouring #1: Reduction in Block Width
The reduction is 0.5 inches. When drafting the Bodice Block, 6 inches of ease were added to the body measurement at the underarm level, which is suitable for sleeved garments. Reducing the width by 0.5 inches on the front and back halves decreases the total ease to 4 inches for a fitted sleeveless garment.
Bodice Back Contouring #2: Shoulder Line Shaping
A 0.13-inch reduction at mid-shoulder accounts for the natural dip in the shoulder line. (See the Examples section for practical applications of this guideline.)
Bodice Back Contouring #3: Increasing Waist Dart Height
Extend the waist dart upward to the Across-Back line. The Across-Back line is positioned one-quarter of the CB measurement down from the CB neck point and is drawn perpendicular to the CB line.
Bodice Back Contouring #4: Increase in Dart Width
The dart, previously positioned at the waist, is now under the bust. The dart width increases by 0.75 inches at the Empire Line level. The placement of the Empire Line corresponds to that of the Bodice Front Empire Line. See the Empire Line Styling page in the Elements Menu for more details.
Part 5: Individual Contouring Amounts
Determining your individual contouring amounts requires time and effort, but it is worthwhile for achieving the best fit.
Some methods suggest using a ruler against the body to measure gaps, as shown in Figure 21. However, I found this method inaccurate for precise contouring. Since I had to create a toile to test the fit by lowering necklines and cutting away armholes, I found it more effective to determine contouring directly from the toile.
For accuracy, I recommend making at least two toiles—one for neckline contouring and another for armhole contouring. Once you determine these amounts, you can reuse the same toiles for additional adjustments (e.g., using the neckline toile to also refine armhole shaping, and vice versa). For extremely low necklines or strapless designs, additional toiles may be necessary.
I use the Sleeveless Block to create the toile for contouring adjustments. Since the Sleeveless Block already has block ease removed and the armhole raised, it provides a better foundation for determining contouring needs.
These examples illustrate the process, but you may need to apply the principles to other contouring scenarios not covered here. The information provided is a general guideline—some logical problem-solving may be required in unique cases.
Note that Empire Line contouring is not covered in this section. See the Empire Line Styling page in the Elements Menu for details.
Preparation
On your Sleeveless Block, draw the following guides:
Bodice Front:
- Your Bust Circle (purple dashed line). See the Contouring Overview page if you are unsure of this measurement.
- A straight line from the Bust Point to the shoulder tip (cutaway arm line, shown in orange).
- A straight line from the Bust Point to the mid-neck (low neckline guide, shown in green).
- A straight line from the Bust Point to the Center Front (for very low necklines, shown in red).
- The contouring line for the shoulder dip (standard measurement, shown in blue).
Bodice Back:
- Extend the waist dart to the Across-Back line (one-quarter of the CB measurement down from the CB neck point).
- Mark the shoulder contouring line (same measurement as used on the Bodice Front).
Important Note: Shoulder Line
The shoulder line might be misleading, making it seem like a curved line is required. However, that is not the case. (While using a curve is not incorrect, this guideline is not referring to that approach.)
Below are four examples illustrating how the shoulder line is used. The examples show the Bodice Front, but the same principles apply to the Bodice Back. Observe the shoulder lines in each example—despite variations in contouring, the shoulder lines remain straight.
These shapes have not yet been adjusted for cutaway armholes or neckline contouring; their purpose is solely to demonstrate the correct application of the shoulder line guide.
Toile 1: Low Necklines
Mark the Neckline Design Lines
On your Bodice Front block, draw four neckline variations, progressively lowering the depth. Align your Bodice Back at the shoulder line and continue the curve to shape the back neckline. Keep the back neckline relatively high for now.
Note: Cutting both the front and back necklines too low can cause additional issues, such as the garment slipping off the shoulders. To start, focus on the front neckline. Once the front contouring is determined, you can experiment with how much you can lower the back neckline before stability is affected. Low back contouring is not covered here, but the same principles apply.
Transfer Markings to Your Toile, Construct, and Fit
- Mark the bust mound, three gape dart guides, and necklines onto your toile.
- Construct the toile using the first neckline variation (the Bodice Back should already have contouring adjustments).
- Try on the toile and use pins to shape the fit, creating a dart at the green line (centering the dart on the green line) on both sides of the body.
- Remove the toile and transfer the pinned adjustments to your block.
- Unpin the dart.
- Cut the neckline down to the second variation.
- Repeat the pinning and transferring process for each neckline variation.
- For neckline No.3, leave the dart pinned in place while fitting neckline No.4. (You may need to sew it in place for accuracy.)
- This is a good opportunity to mark your preferred neckline depths on the block.
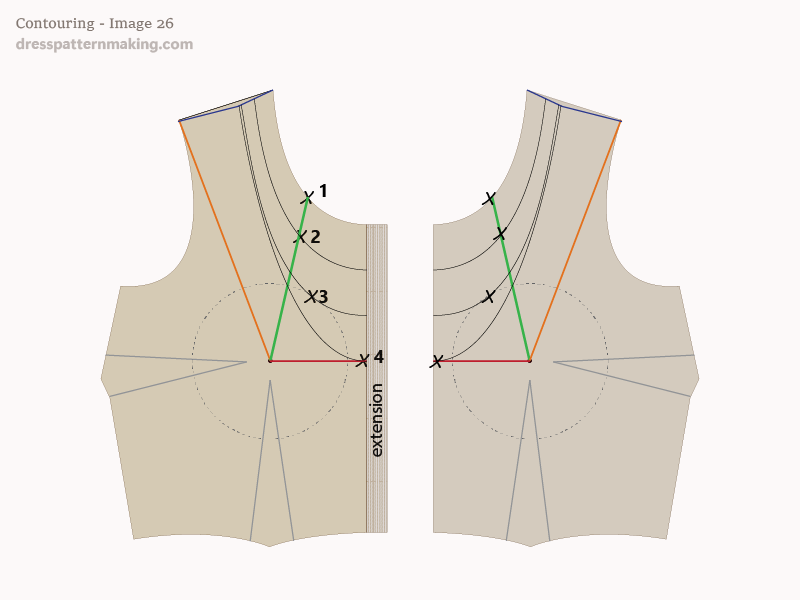
Markings on the Bodice Block
Among the first three necklines, neckline No.3 should have the largest gape dart. The dart can be recorded on the block as follows:
Toile 2: Cutaway Armholes
Repeat the process with a toile to determine the cutaway armhole gape darts. Note that the shoulder dart in the Bodice Back will need to be removed. However, the shoulder line should still have a slight dip in the middle.
Part 6: Strapless
For strapless garments, the armhole gape dart, neckline gape dart, and Center Front gape dart are combined into one larger dart. This example assumes you are using the Sleeveless Block. If using the Sleeve Block, the armhole gape dart must also be accounted for.
If you need guidance on merging multiple darts into one, refer to the Manipulating Darts section in the Principles Menu. The diagram below illustrates the merging of three gape darts into a single dart.
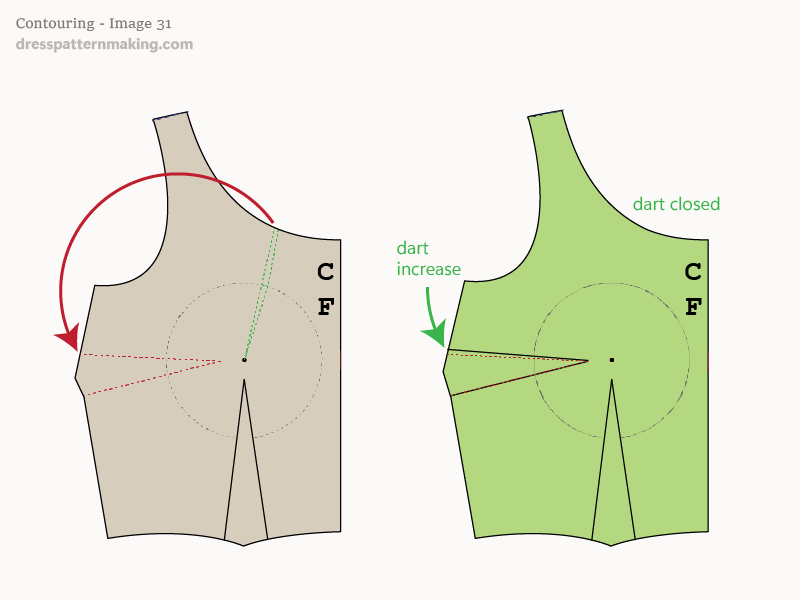
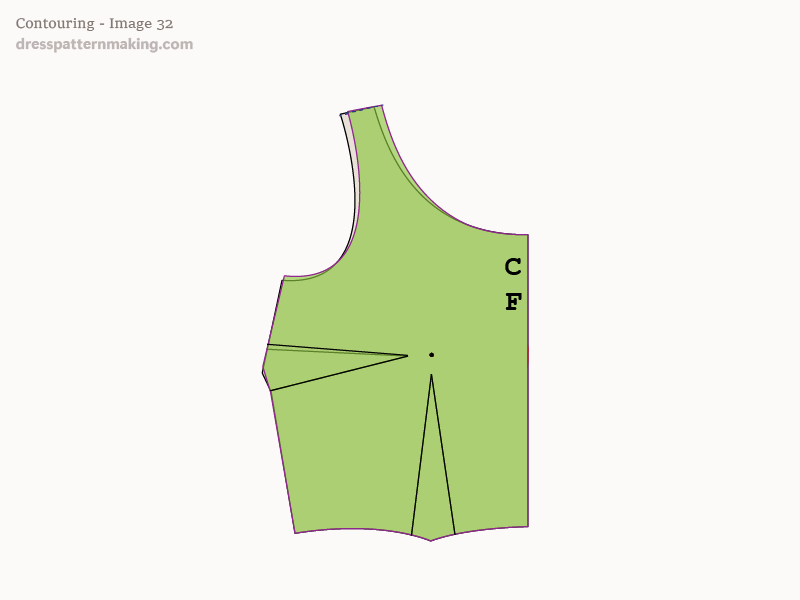
Part 7: Contouring in Action
The Gape Dart Moved
In Images 31 and 32, the gape dart has been transferred into the side seam dart.