Ease in Patterns and Blocks
This article will give you a guide to adding ease when you want to add ease to create jackets, coats, shirts, etc. Note that these are not step-by-step instructions for creating these garments; this article is only an overview on adding ease. The measurements given are standards, they are not set in concrete; onsider them a starting point. I am limiting this article to garments created with the Bodice Block, not Skirts or Pants. This article also refers to the standard block to use with woven fabrics, not with stretch blocks/garments. We will start with the basics and work through the following:
- What is Ease?
- How does ease differ from Added Fullness?
- How much ease is in the standard block, and why?
- What if you want more or less ease than is in the standard block?
- Where do you add the ease (i.e. down the length of the block, or only at certain points?
- How do you add ease when drafting patterns such as jackets, coats, etc.
- How do you reduce ease on the Bodice Block?
What is Ease and how does it differ from Added Fullness?
In real terms Ease and Added Fullness are really the same thing: they are the difference between the body measurements and the measurements of the garment. You generally use the term Easewhen you refer to adding enough to make the garment comfortable and wearable, you use the term Added Fullness when it the amount is above and beyond what is needed for comfort, and has been added for style.
Sometimes the two are hard to separate. For example, you could add 2-4 inches of ease for a jacket. You might need only 2 inches if you are only going to wear one layer underneath, you might need 4 inches if you want to wear many layers underneath. What if you add 4 inches but only plan on wearing one layer underneath; does that mean that 2 inches are wearing ease, and the other 2 inches are added fullness? My point is that it is a case of semantics and it doesn't really matter. What you need to understand is when and how to add ease for the purpose at hand, and it doesn't really matter what you call it.
Ease in the Standard Bodice Block
The standard Bodice Block usually has about 6 inches of ease around upper bust area (approx where the armhole is), and 4 inches ease in the bust. Remember that the standard Bodice Block is for garments with sleeves. If you make a sleeveless garment, you reduce that ease so that you have 3.5 or 4 inches ease in the upper bust, and 1.5 to 2 inches ease in the bust. How to make the adjustment to the standard Bodice Block for a sleeveless garment (or to make a Sleeveless Bodice Block for convenience' sake) is covered in the Blocks Drafting videos.
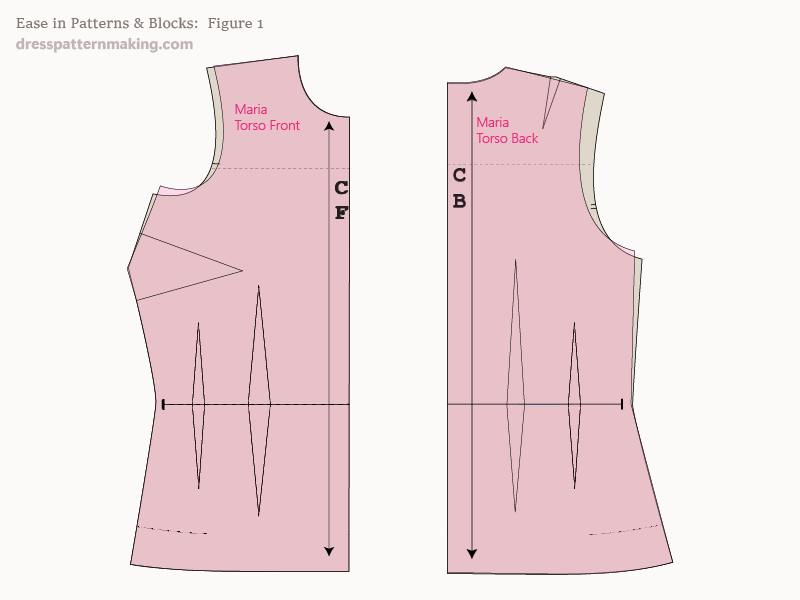
Figure 1
An example of my standard Bodice Block (in beige) and my Sleeveless Torso Block (in orange). You can see that the Sleeveless Block is narrower; i.e. it has less ease.
The sleeveless block is shaded pink:
You absolutely need some ease in your block to make garments that are wearable. If you make a garment to your exact body measurements, you will not be able to move and/or the garment will rip. Note that in some schools of patternmaking there is a practice of making a Moulage, which is a block without any ease. The purpose of creating a Moulage is to make certain of your measurements; before making any kind of garment, you add ease to the Moulage and create a working Block. Some people might like more of less ease that is contained in the block. In terms of reducing the ease, it is hard to reduce the upper bust ease too much or you won't be able to move your arms forward or up in a garment with sleeves. You could reduce the ease in the bust area to 1 inch with some types of garments depending on the closure; e.g. a dress that zips up the back could be tight in the bust, but if you put buttons down the front, you might get gaping.
Adding Ease: Jackets, Coats, Shirts & Oversize Garments
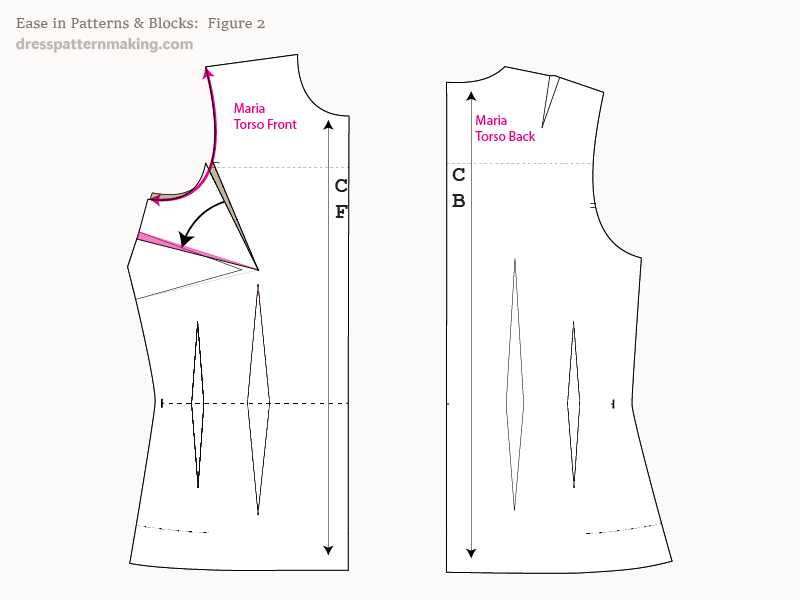
Adding ease means increasing the width of the block. When you add ease to a block to draft jackets, coats, shirts & oversize garments, you also lower the armhole. However, before you lower the armhole and widen the block, you first open up or relax the front armhole a little. This is done by dart manipulation; you move some of the side seam dart into the armhole. This means the side seam dart will end up a little smaller, the armhole gets a little bigger and the side seam stays the same length (no adjustment is necessary at this stage to the Back Block). The reason for relaxing the armhole for jackets and coats should be obvious; you need to be able to wear layers underneath. In the case of shirts and oversized garments; that is in the nature of the garment. (Blouses are well fitting, shirts are relaxed. Oversized garments are obviously oversized). So the first step you need to do when creating jackets, coats, shirts or oversized garments is to open up the armhole about 0.5 inches (1.25cm). For all the images that follow up to Figure 6, the following adjustment has been done and any further work is in addition to this. Note that this is the opposite of moving a gape dart from the armhole into the side seam dart (see Contouring).
Figure 2
0.5-inch (1.25cm0 is transferred from the side seam dart into the armhole. The brown block underneath is the original block, the pattern is in white showing the dart manipulation by the cut and spread method.
Fitted Jackets
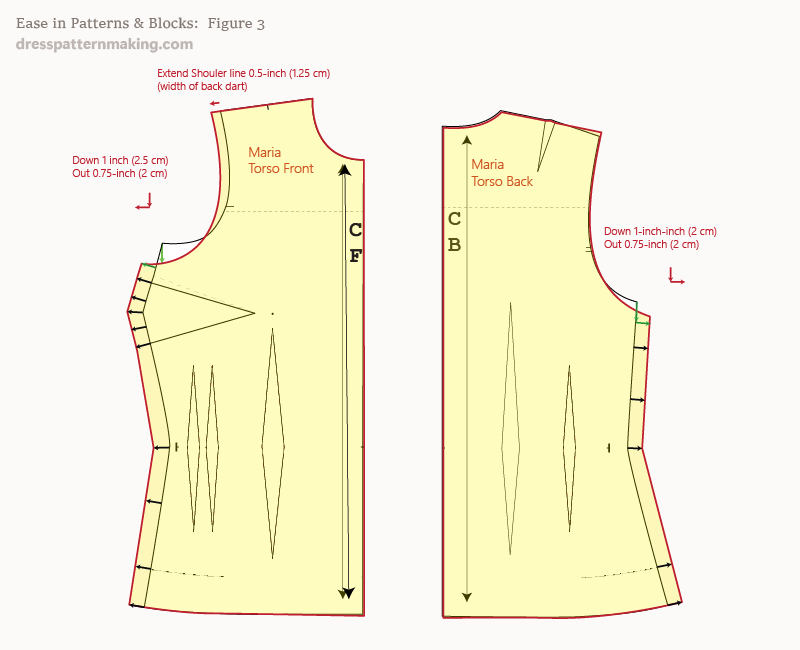
By the nature of the description of the garment, this jacket follows the contours of the body, so the ease is added evenly down both front and back. Making sure that you have opened up the armhole as per Figure 1, you need to further widen the block and lower the armhole. A standard amount would be:
- lower the armhole 1-inch (2.5cm) - Back & Front
- widen at the armhole level 0.75-inch (2 cm) - Back & Front (Meaning there will be a total of 3 inches additional ease on top of the ease already included in the block)
- continue the 2cm width increase all the way down the block, to the desired length of the jacket
- extend the Front shoulder line out 0.5-inch (1.25cm) before drawing in the new armhole (In this example the back dart is not being used/sewn, so the 1.25 increase to the front will make the shoulder lengths equal)
If you want a jacket that isn't fitted, you could add more ease at the waist so it has more of a squarer or straight-up-and-down silhouette. If you want it to have the fitted silhouette but have more ease, you could increase the 0.75-inch to 1-inch (4 inches additional ease for the whole garment). If you want more than 4 inches ease for the garment, only add the 1-inch and see Figure 4 for how to increase that more.
Figure 3
Ease is added evenly to the front and back at the side seam, after lowering the armhole.
Coats & Oversize
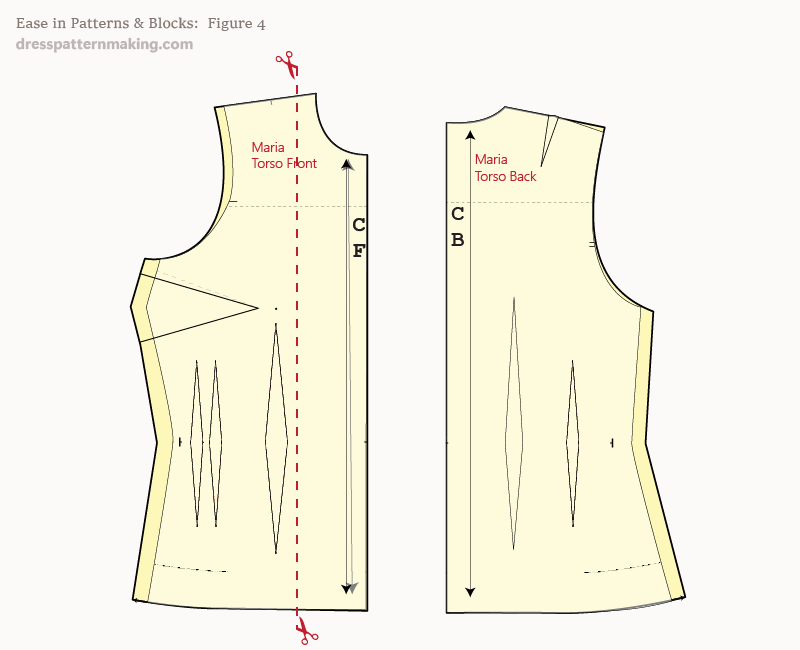
For coats and oversized garments where you want more than 4 inches additional ease, add 1 inch to the side seam as per Figure 3, then add more ease by cutting and spreading in the front. You could add anywhere from 0.25-inch to 1-inch into the front and back (i.e. 1 inch to 4 inches for the whole garment). Draw a vertical line down the block, in between the high neck point and the first dart. (Keep away from the neckline!). See Figure 4b if you need clarification.
Figure 4:
Adding ease extra ease by cutting and spreading in the front.
Coats & Oversized Continued...
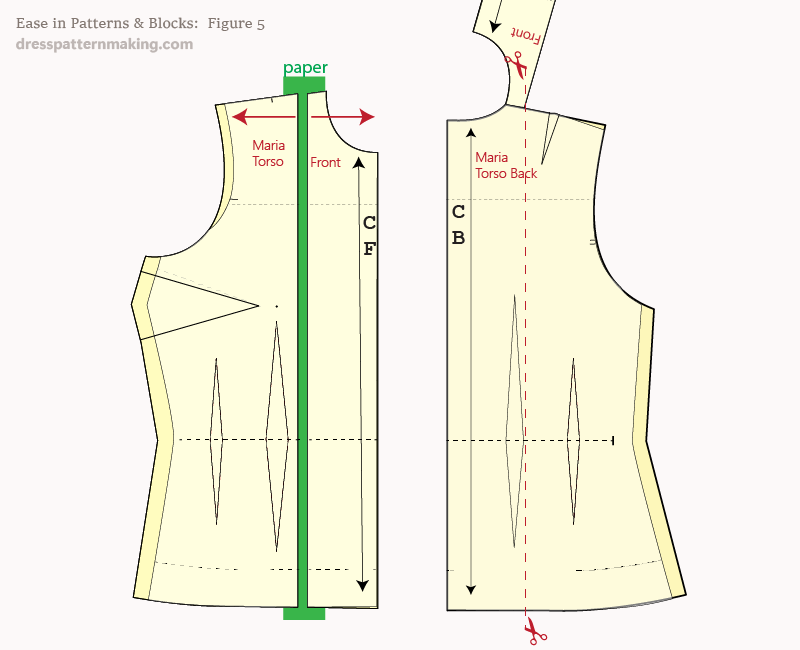
- Put paper underneath where you have cut and spread, and tape it down
- Cut and spread the back so that it matches at the shoulder line (cutting line shown, cut and spread not shown)
In this case, the garment still has a fitted look, but of course the coat could have a straight look and the ease reduced at the waist. It could also have an A-line silhouette and have more ease added at the hem.
Figure 5
Cutting & Spreading to add in additional ease in the center of the garment .
Shirts
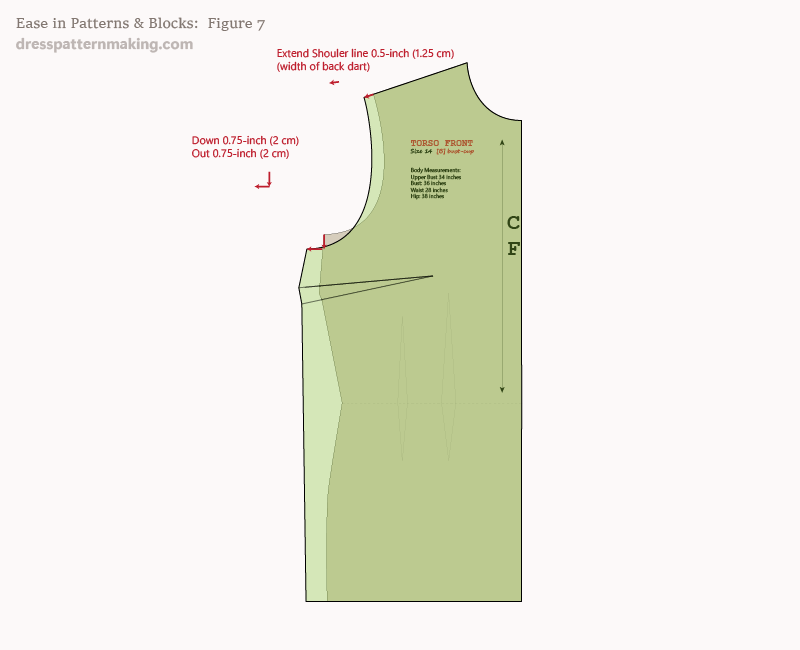
The steps to draft this shirt are similar to the ones above; the pattern in white shown underneath has already had the armhole adjustment done. This shirt has been lowered 0.75-inch and widened 0.75 inch. Like the jacket and coat shown above, the shoulder line has been extended. Where the shirt differs from the examples shown above is that a line a drawn straight down from the new underarm/width point (with the appropriate adjustment for the bust dart), down to the hip-line, or where the shirt ends. The ease is not added proportionally; there is a lot more ease in the waist. Traditional shirts are very boxy and square. (Which does not always work that well for non standard figures). This is just one example of a classic shirt silhouette, of course you could shape it a little more in the waist, shape the hemline, include or exclude the darts. Remember though that a shirt is supposed to be loose; if you want fitting, then you would more likely draft a blouse and not lower the armhole or add the width ease.
Figure 6:
This example of ease added to a shirt is using my personal block, which may look strange. Look at Figure 5b for the same Figure using a Standard Size 14 Block.
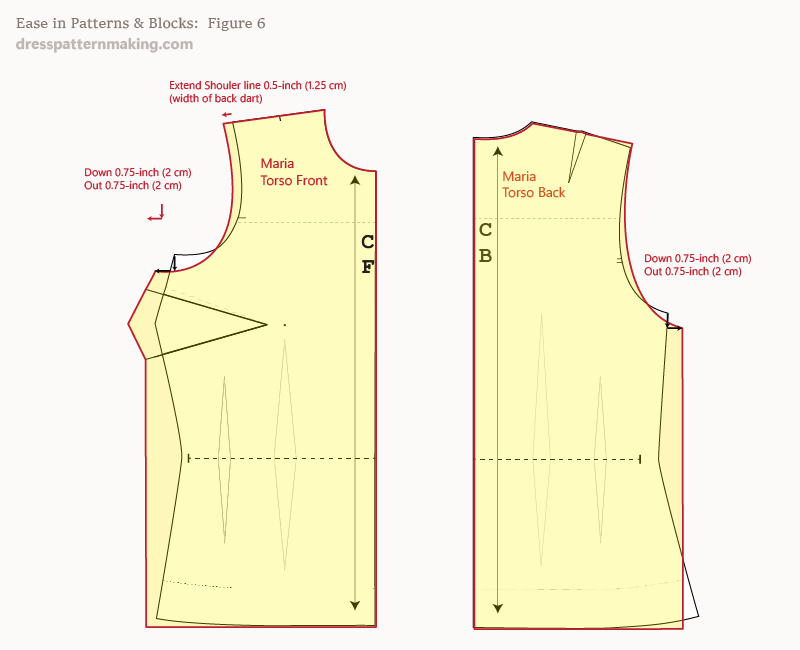
Figure 7
The shirt silhouette showing ease, drafted with a standard block (size 14).
Added Fullness
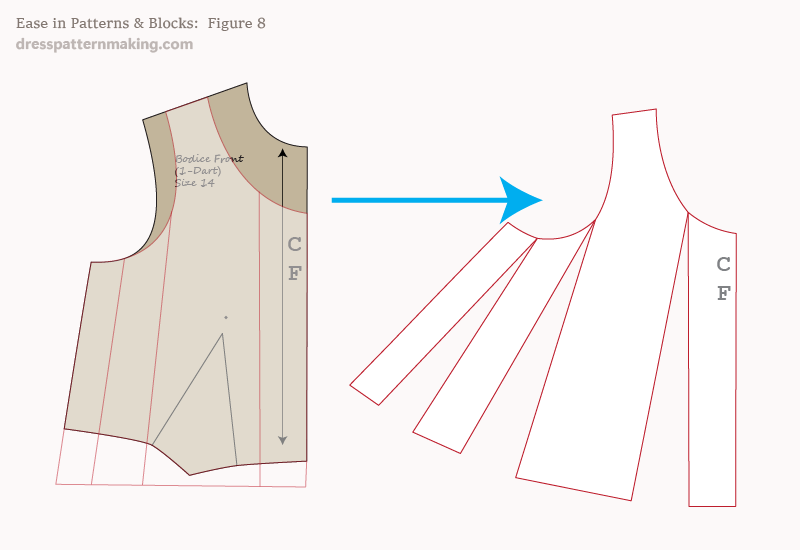
I just wanted to touch on the difference between ease and added fullness again. In reality the drafting of the shirt shown in Figure 5 can be classed as either ease or added fullness. In the case of the top in Figure 6 - this is obviously added fullness - it's ease added purely for the purpose of design and aesthetics. (Front only shown, the Back would have similar fullness added).
Figure 8: Added Fullness in a top.
Increasing or Reducing Ease in the Block
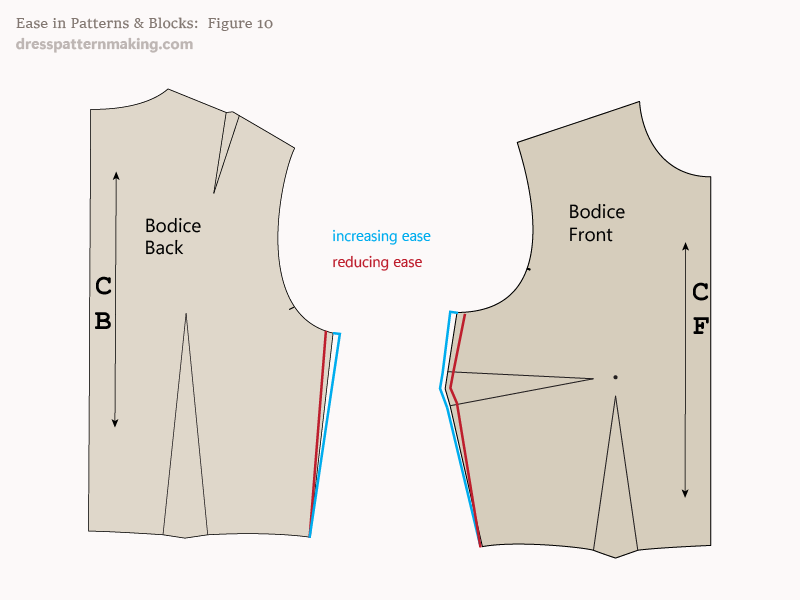
There is nothing to stop increasing or reducing the ease on your block.
- You can add it evenly as indicated on the right in Figure 7. (You would add same amount to the Front & Back, I am showing just the front).
- You can reduce your ease at your Upper Bust/Bust reducing down to nothing (no addition) at the waist.
Which one you will do will depend on what you are trying to achieve. If you just want the whole garment to be a bit looser (have a bit more ease), add it evenly. Remember that a little goes a long way; if you add 0.25 inch to both front and back blocks, that's 1 inch for the garment. If you feel it is too loose in the underarm but you want to keep the waist as is, make the adjustment as per the example on the left; you may need to close the dart to draw the side seam line successfully. If your block fits at the underarm and waist, but is tight in the bust, you need to do a large bust adjustment (which, if you have taken your measurements correctly and used my method to draft the block, you should not need to do!),
Figure 9:
Increasing or Decreasing Ease in your Block (Front only shown, most adjustments would be made to both F&B).
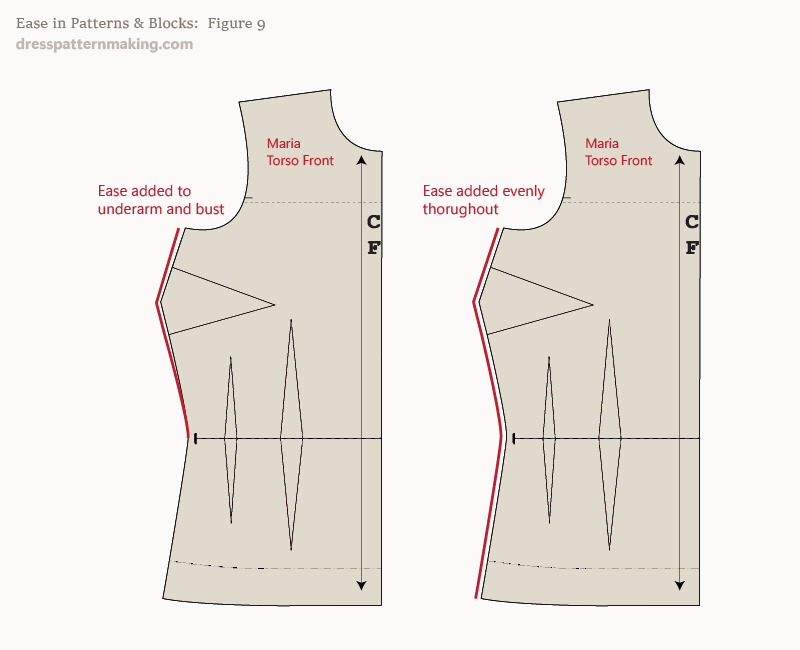
Figure 10:
Increasing or Decreasing Ease in your 1-Dart Bodice Block.
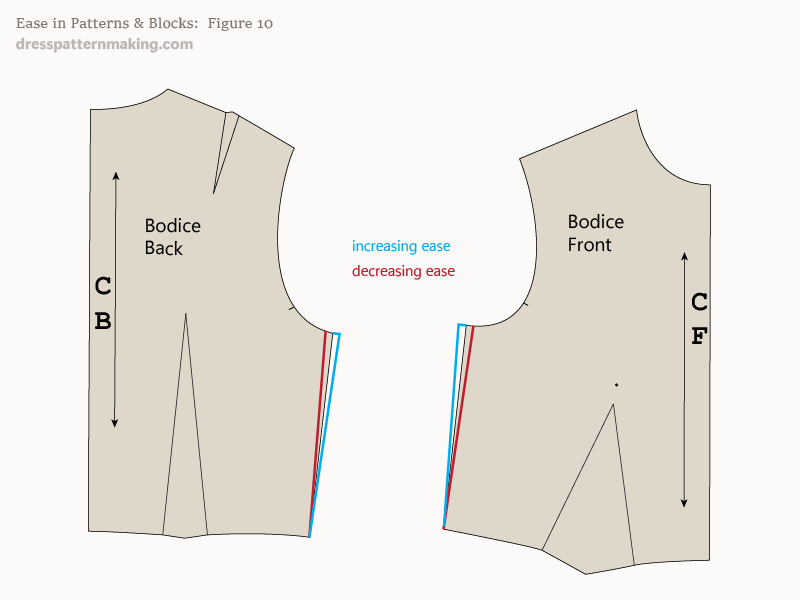
Figure 11:
Increasing or Decreasing Ease in your 2-Dart Bodice Block.
