Understanding the Sleeve Part 1: The (Minimal-Ease) Fitted Sleeve Block
There are four parts to this article on Understanding the Sleeve and they follow on from each other. On this website there are instructions to make a Fitted Sleeve Block. These articles explain the sleeve in this context; making a personalized Fitted Sleeve Block. This means a basic sleeve with minimal ease and no design lines. This block is then used to make patterns with stylelines and extra ease; e.g. puff, butterfly, dolman, kimono, petal, etc.
What makes a Fitted Sleeve?
The two aspects of the Fitted Sleeve are:
- The Look: It follows the contours of the arm; it doesn't flare out too much. This is achieved by adding minimal ease in the Bicep and ensuring the correct Cap Height.
- Smooth head of the sleeve: it has minimal ease in the sleeve cap; no tucks and gathers, just enough ease to sew the sleeve into the curve of the armhole.
Lets first look at what minimal ease looks like on the sleeve.
Minimal Ease
Looking at the image below, only A is a fitted sleeve - all the others have excess ease in either or both the sleeve cap curve and the bicep.
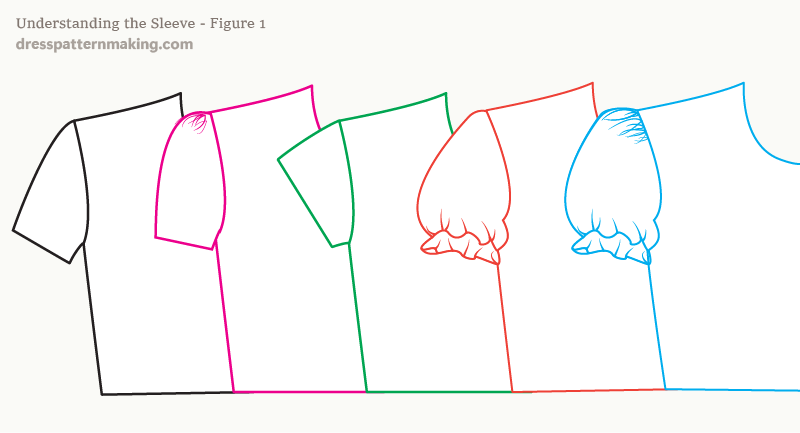
- In (A) there is minimal ease in both the sleeve cap (armhole), and in the bicep. This sleeve follows the curve of the arm.
- in(B) there is excess ease in the sleeve cap, shown by gathers at the top of the arm, but minimal ease in the bicep.
- In (C) there is minimal ease in the sleeve cap, but extra ease in the bicep
- In(D) there is minimal ease in the sleeve cap, but extra ease in the bicep (this time that ease is gathered)
- In(E) there is excess ease in both the sleeve cap and the bicep.
If there is Excess Ease...........
If there is excess ease, it will show as:
- gathers or tucks in the Sleeve Cap Curve,
- flare in the arm/bicep (the sleeve will swing away a bit from the arm rather than follow its contours)
The more excess ease there is in either the bicep or the sleeve cap, the less fitted it becomes in that area. (More ease in the bicep, less fitted down the arm. More ease in the sleeve cap, less fitted in the sleeve cap).
The Cap Height
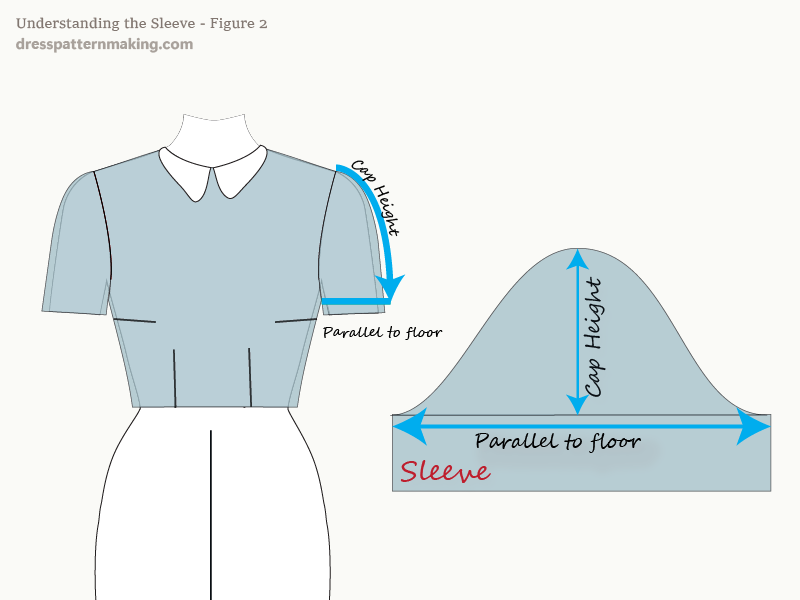
The Cap Height is the height, on the outside of the arm, FROM: the seam line of your bodice block at the Shoulder Tip Point, TO: the underarm seam point on your block. If you drew a line on your toile (which is what you could do) where the Bicep Line is or parallel to it a bit further down the sleeve, and you have made the sleeve with the correct Cap Height. that line would be horizontal to the floor. See the image to the left for an indication of what I mean. Having this line parallel to the floor gives you the Fitted Sleeve look. In the next image, let's look at the result of a Lower and Higher Cap Height - in the context of a Fitted Sleeve with minimal ease in the bicep.
Incorrect Cap Height
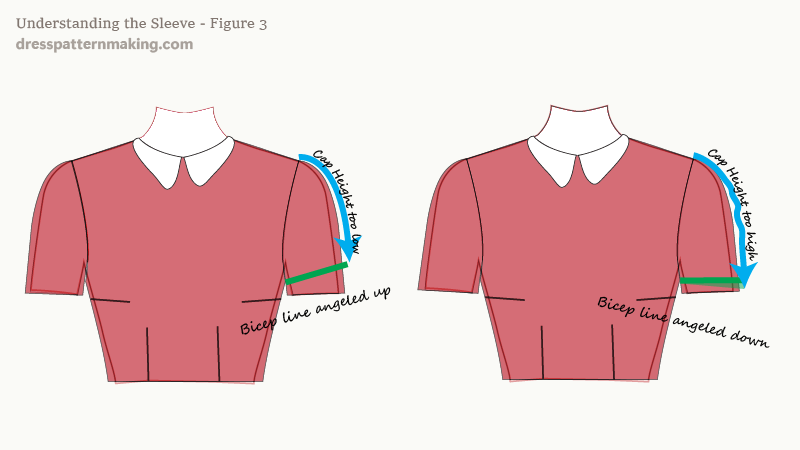
First note: you can have a low Cap Height without it being incorrect - many sleeve styles have a low cap height. In this section, I am talking about a low Cap Height in the context of a Fitted Sleeve. In the context of a fitted sleeve, which is supposed to follow the curve of the arm, with minimal ease (about 2 inches) in the bicep, if you make the Cap Height too low/short, then the line across the bicep which should be parallel to the floor will not parallel. In real terms what this means is that the sleeve will not fit properly.
If your Cap Height is Too Low
There will be some drag lines from the top of the sleeve cap down to the underarm. It should be obvious why this is so - The bicep measurement is of course taken from the bicep. The bicep line now doesn't really go around your bicep, it goes up at an angle. making that circle bigger than the bicep circle. This means there is insufficient ease where the bicep line is now sitting.
If your Cap Height is Too High
Then folds of fabric will form in the sleeve between the shoulder and the bicep. The bicep line may point down a bit, but the sleeve is more likely to take the path of least resistance, and just bunch up above the the bicep line. (i.e. The bicep line may still seem parallel to the floor, the indication of the incorrect cap height is the bunching up of the sleeve).
Lower and Higher Cap Height
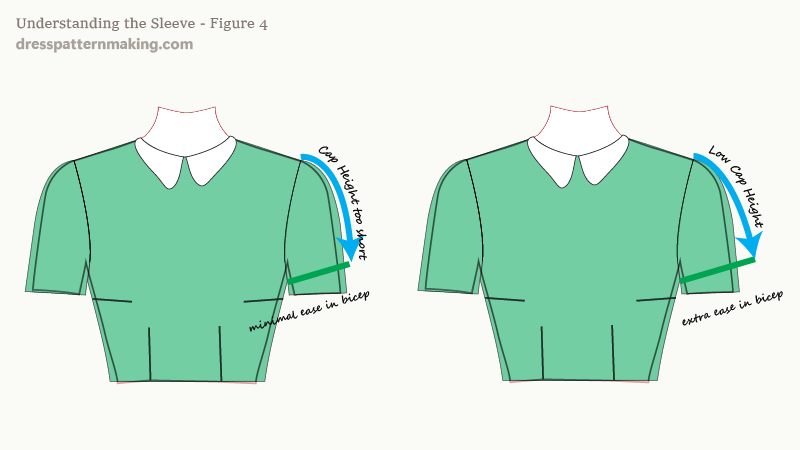
As mentioned above, a low Cap Height does not always mean in incorrect Cap Height. In the image to the left shows the incorrect Cap Height at the top; it is incorrect if you are trying to create a Fitted Sleeve. It will not fit properly, and therefore you wouldn't want to use this sleeve as your block to make other sleeves. In the image at the bottom, there is a lot more ease in the bicep. The sleeve doesn't follow the curve of the arm, it swings away from the arm. In this case it's not meant to be a Fitted Sleeve, it is just a type of sleeve. Given that there is excess ease in the bicep, it won't have the problem of the upper image, in that it won't pull and be tight, because the ease added to the bicep line is sufficient for the arm.
Flagging a Difficulty....
I am flagging something here which will be covered in detail in the upcoming sections of this article. This Fitted Sleeve that has minimal ease in both the bicep and the sleeve cap is hard to achieve for some people. The bottom line is: in order to have a sleeve that is comfortable, some people may not be able to achieve the minimal-ease in the sleeve cap. What this means in real terms is that you will either:
- end up with gathers or tucks in your sleeve cap, OR
- you'll need to either put in a dart or two, OR
- you'll need to put in a seam line and have a two-piece sleeve rather than a one-piece sleeve.
If you usually have trouble with sleeves in shop purchased clothing (not stretch clothing), this probably relates to you. If you find that sleeves seem to fit, but when you stretch your arms forward, the feel really constrictive and/or painful, this probably relates to you. The reason for it is this: The ease that you add at the Bicep level doesn't only provide ease for the bicep, it provides ease for the upper arm. This means some people need more than the minimal amount of ease THAN IS REQUIRED FOR THE ACTUAL BICEP, and therefore, to maintain the Cap Height for a sleeve that follows the contours of the arm, you end up with extra ease in the sleeve cap. If this seems confusing, just ignore it for the moment, we'll get to it. See the next part of the article: The Sleeve Cap Curve.

